
Our Christmas experience Ho-Ho Hunt actually started as a very different idea: a personal fitness app for the 24 days leading up to Christmas. The plan was that you would shovel small areas of snow at first and then tackle bigger spaces as the days went by. Fun concept – but not a great fit for one-off events and B2B campaigns.
So we pivoted, kept the satisfying movement, and moved it into a compact backyard scene where a single, clearable playfield works much better for short sessions - a perfect, compact VR snow-shoveling challenge for teams, events, and brand activations.
Ho-Ho Hunt in a nutshell
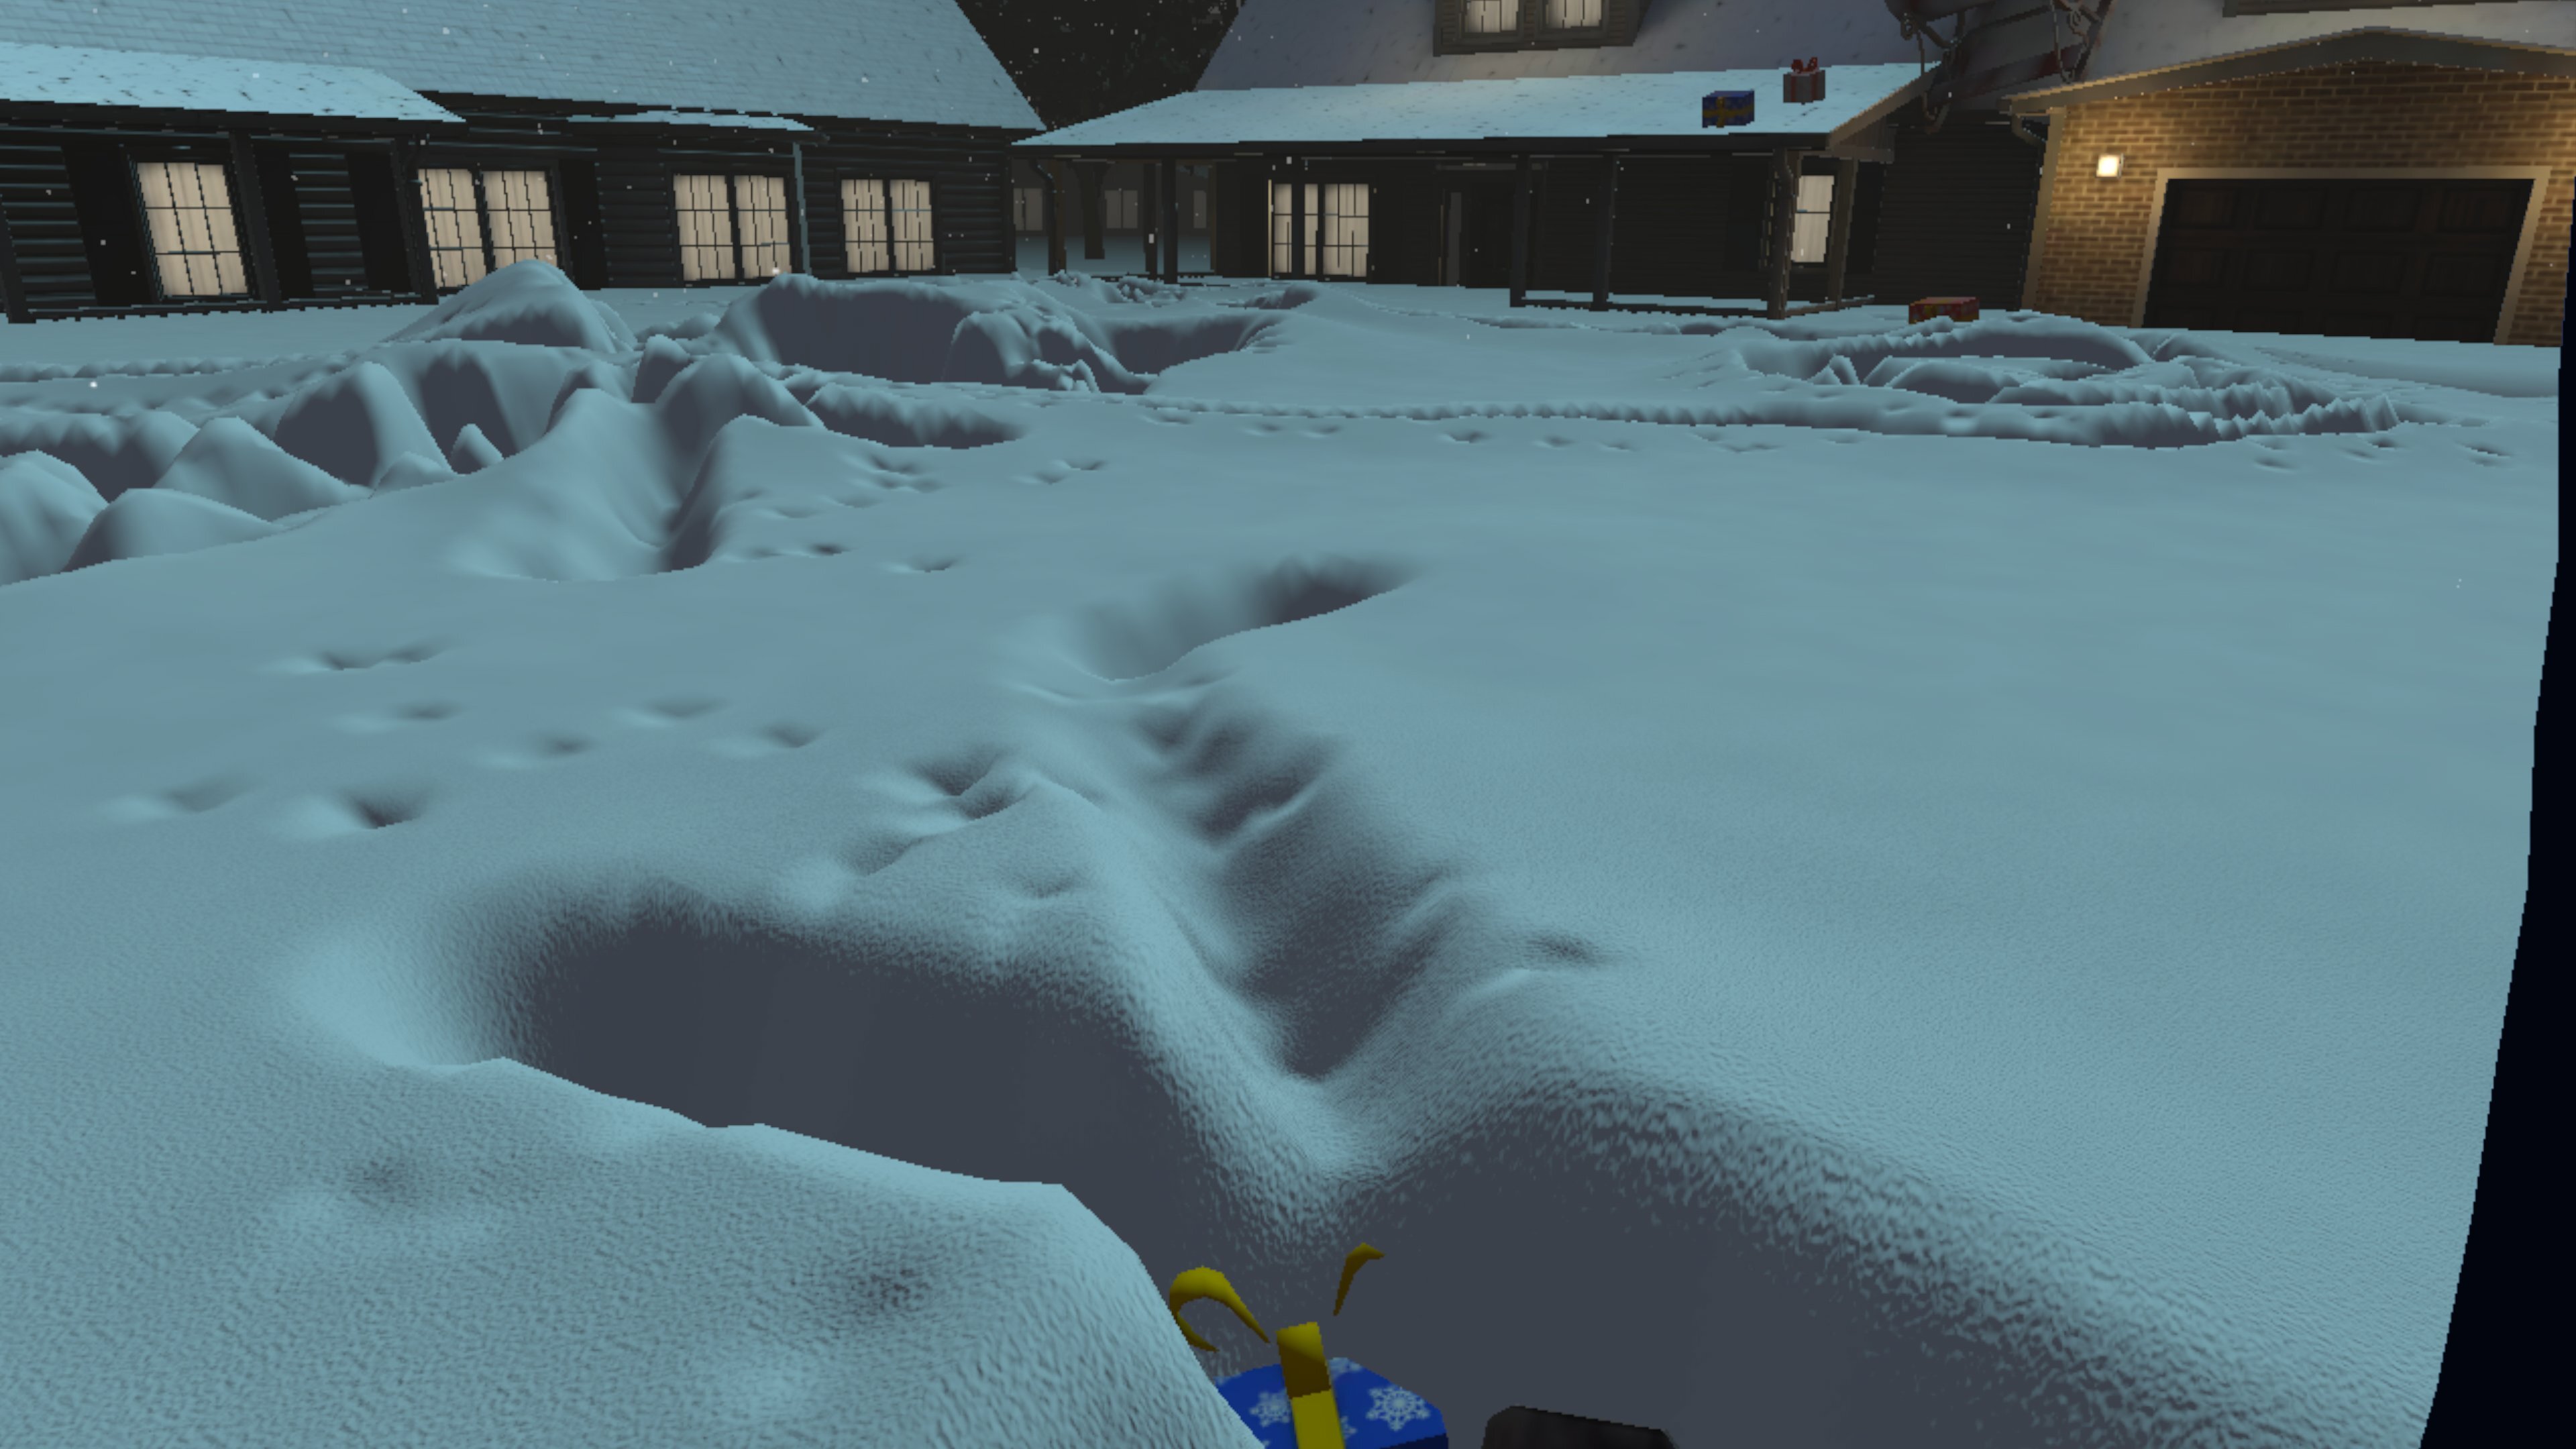
In Ho-Ho Hunt, you step into the boots of Santa Claus on a night where things go wrong: he crash-lands on a rooftop in a quiet neighborhood, loses control of the sleigh, and watches gifts tumble into the deep snow of a small backyard.
Armed with a shovel that luckily lies nearby, you have one mission: clear the backyard and dig every present back out before the timer hits zero.
Each stroke visibly carves away the snow and reveals more gifts; the tempo rises, you're racing the clock and the leaderboard, and colleagues or visitors around you cheer you on. Simple to understand, surprisingly intense, and very much a heart-rate-raiser.
Behind the scenes:
building a snow shoveling mechanic
The demo project for this article was created with Unity 6 (6000.0.62f1 specifically). We're not aware of significant changes in Shader Graph that might affect the functionality, though, so you should be good with an older or newer version, too.
The snow field mesh
To build a "shovelable" snow field, we need to compromise between complexity, performance, and gameplay. We don't want to build igloos or snowmen, but reveal what's covered under the snow. Therefore, we decided to go for a granular plane mesh with vertex disposition steered by a height map, all rendered by a dedicated snow shader. Whenever the height map changes from the dig of the shovel blade, we call a compute shader to modify the height map accordingly. This doesn't just allow us to remove snow where shoveled, it also allows depositing snow elsewhere or creating footsteps and other dents easily.
For our experience, we made use of Unity's runtime mesh generation capabilities to be more flexible and experiment with size and granularity. To follow along, you can use Blender to create the mesh. Add a plane object, switch to edit mode, right-click on the plane and select Subdivide. Then enter the number of desired subdivisions per edge into the bottom left panel. In this example we'll be using 63, giving us a plane subdivided into 64x64 smaller faces.
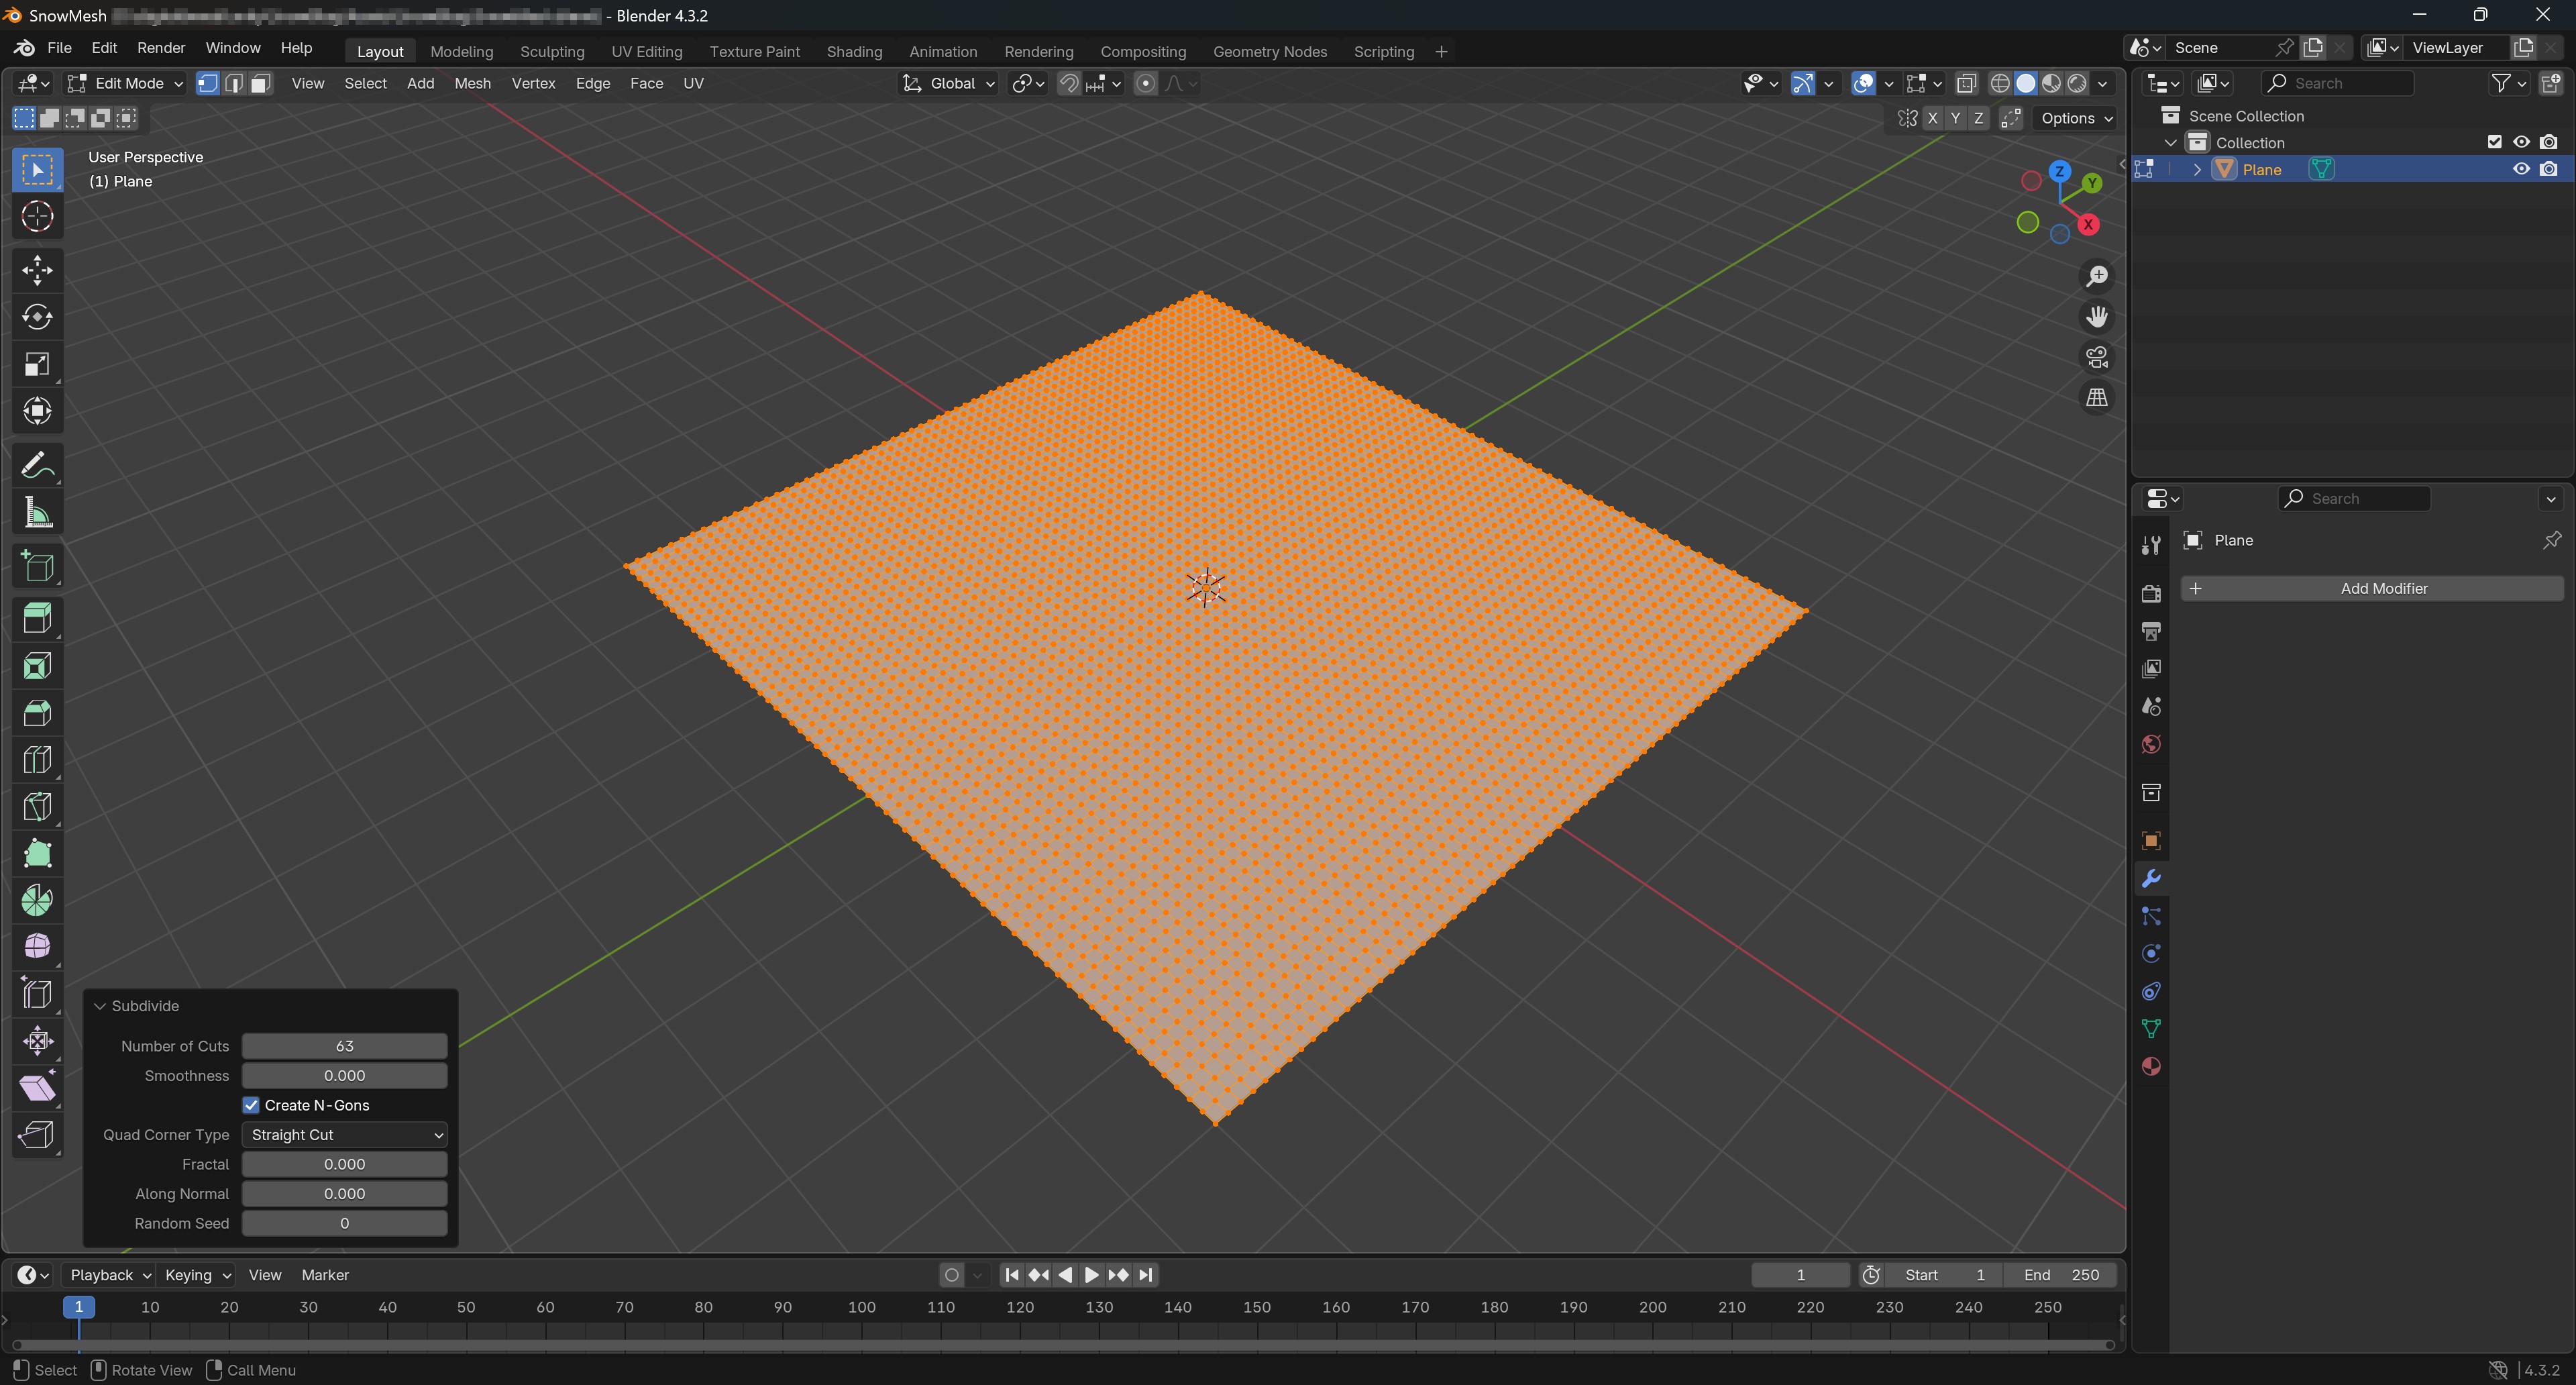
Then, export this mesh as an FBX file (File -> Export -> FBX), limit the export to the selected mesh only (we don't need the default camera and light), and tick the "Apply Transform" checkbox to normalize the scale. Unity does allow importing .blend files directly, but going through FBX makes things a little easier due to the different coordinate systems in Blender and Unity.
Simple snow color
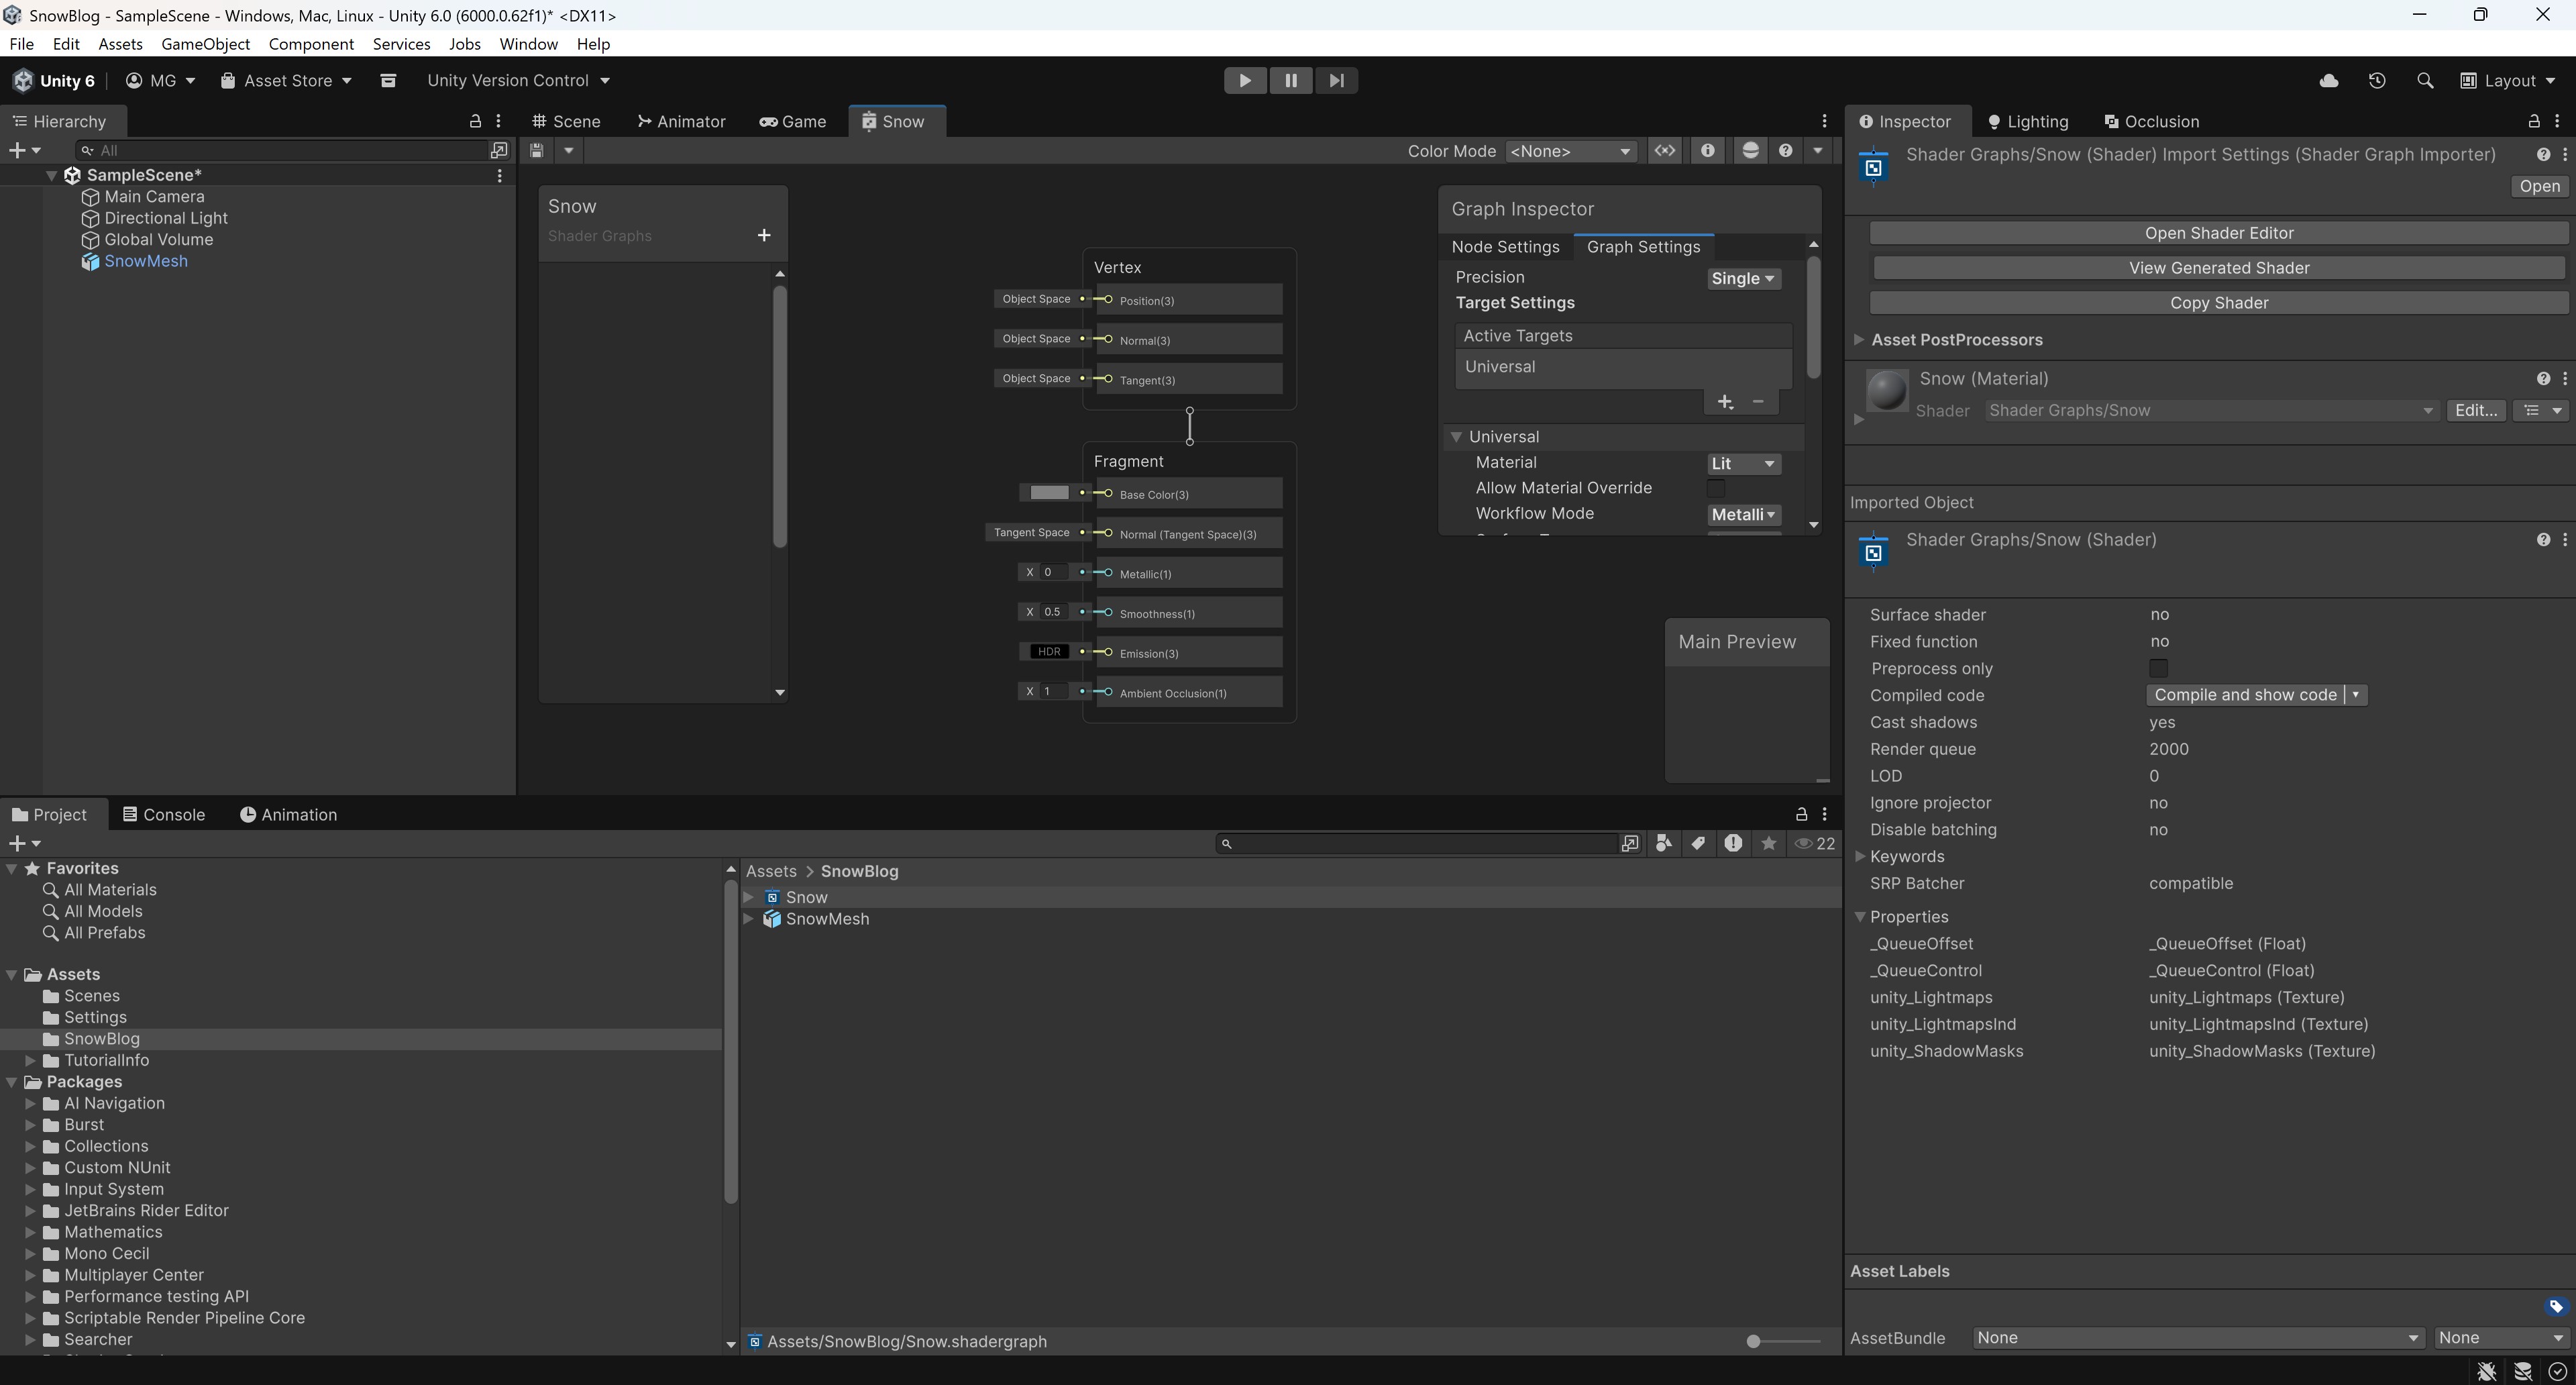
We used Shader Graph to build a shader for the snow. Right-click in your project, select Create -> Shader Graph -> URP -> Lit Shader Graph. This creates an empty shader with inputs for the vertex and fragment stage.
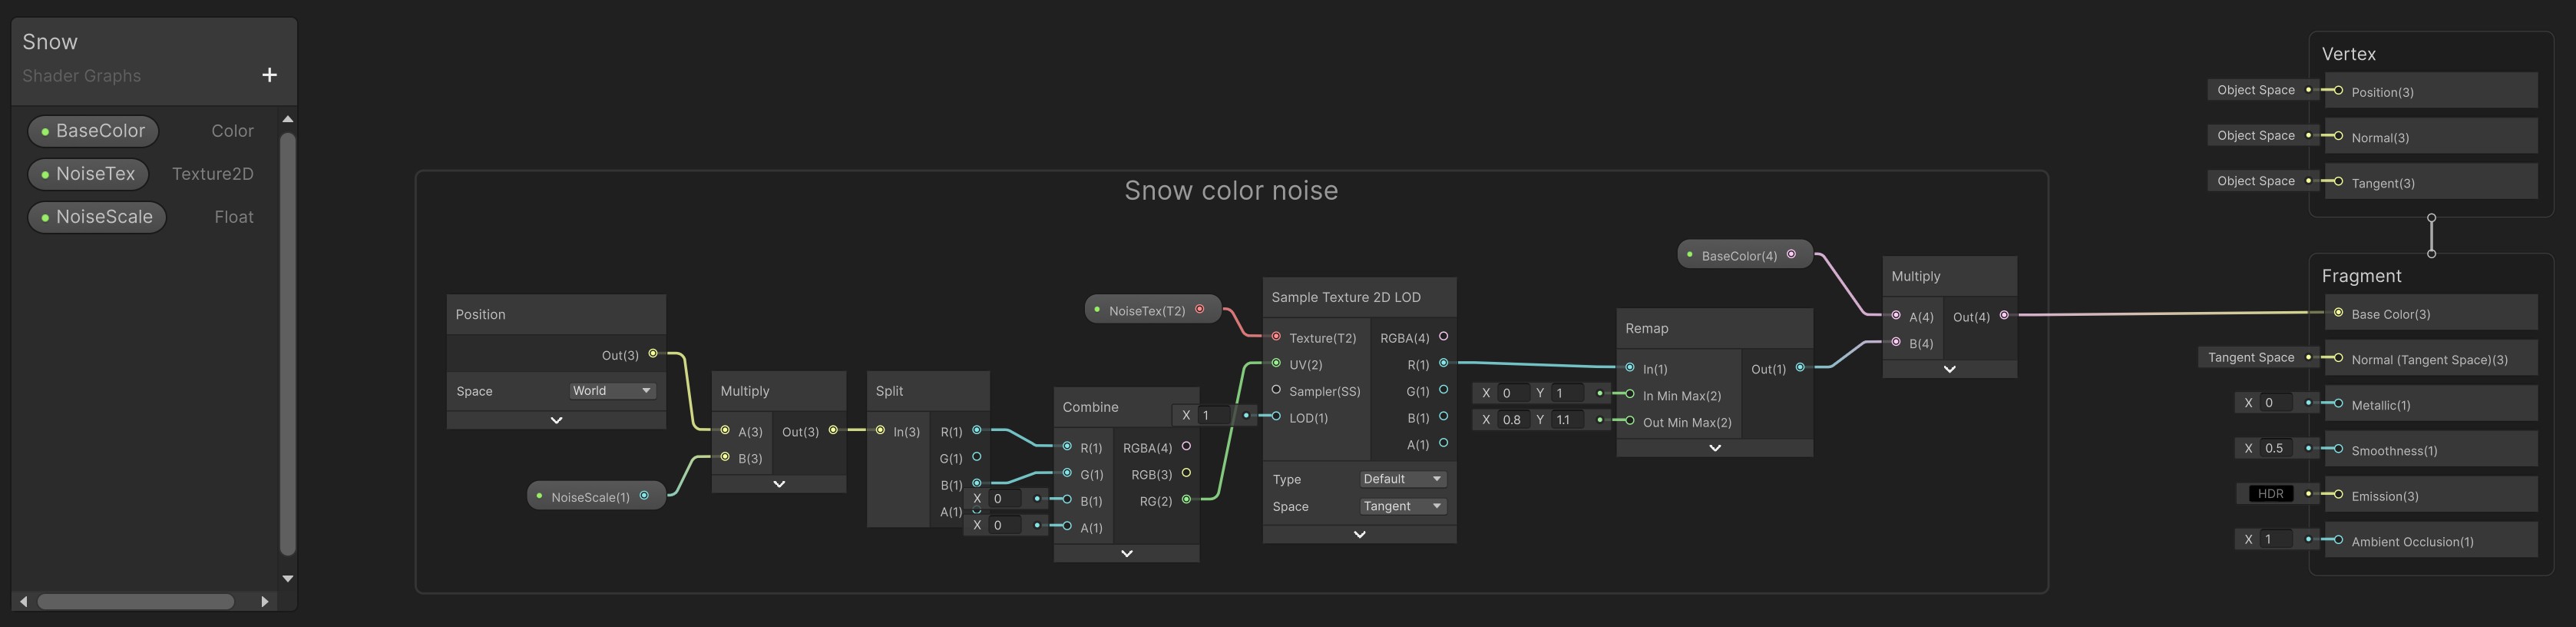
Before we start supporting changing heights, let's take care of the basic snow color first. A flat layer of fresh snow is usually white, with a bit of subtle noise. We'll add two parameters to the graph: a Color BaseColor (default white), a Texture2D NoiseTex for the noise, and a Float NoiseScale to scale the noise as needed (default value 1). Then, we'll take a fragment's world position, scale the x and z values according to the noise scale, sample our noise texture, remap the value, and then modify the base color using this value slightly. For the remapping, a range of 0.8 to 1.1 has proven to work well. We feed this output into the fragment's Base Color.
Now save this shader, right-click on it in the project view, and select Create -> Material. This will automatically create a material using this shader. Finally, drag the shader onto the snow mesh in the scene to assign the material.
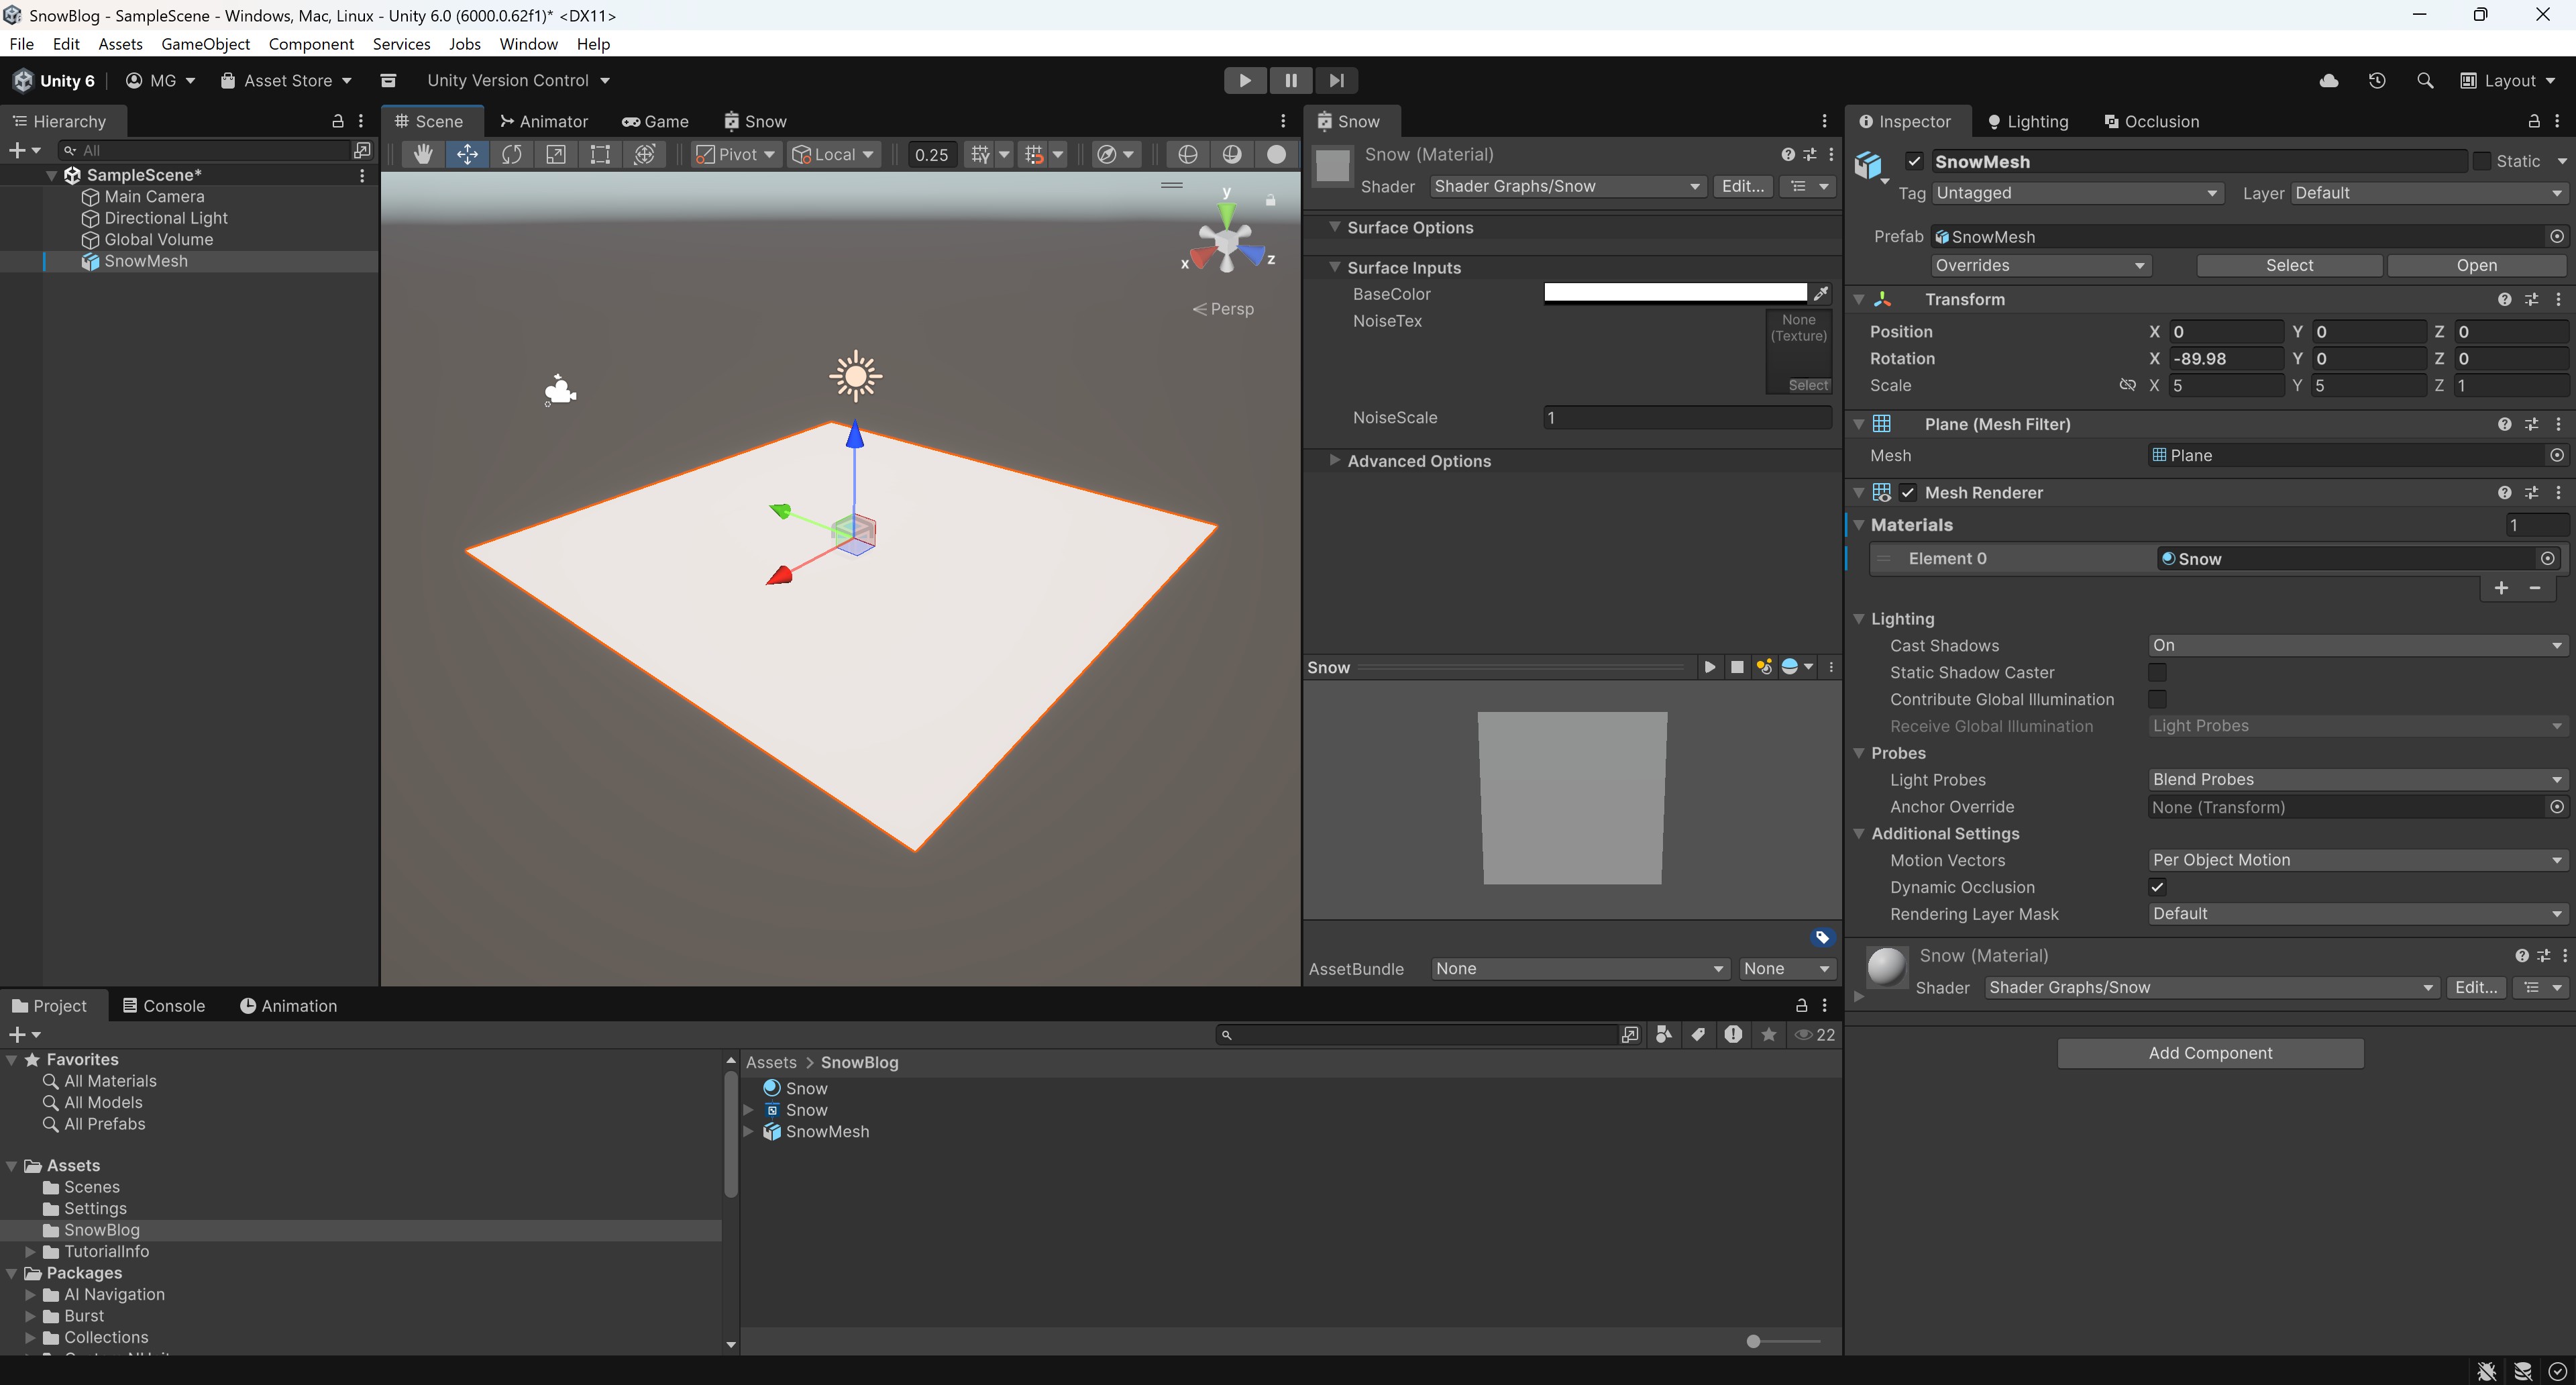
We haven't set a noise texture yet, so the sampling always yields 0 and the remapping leads to a constant (0.8, 0.8, 0.8) colored snow.
You can use an online generator which supports generating tiling perlin noise textures, store the resulting image in the project, and assign it to the material's NoiseTex parameter, which gives a result like the following:
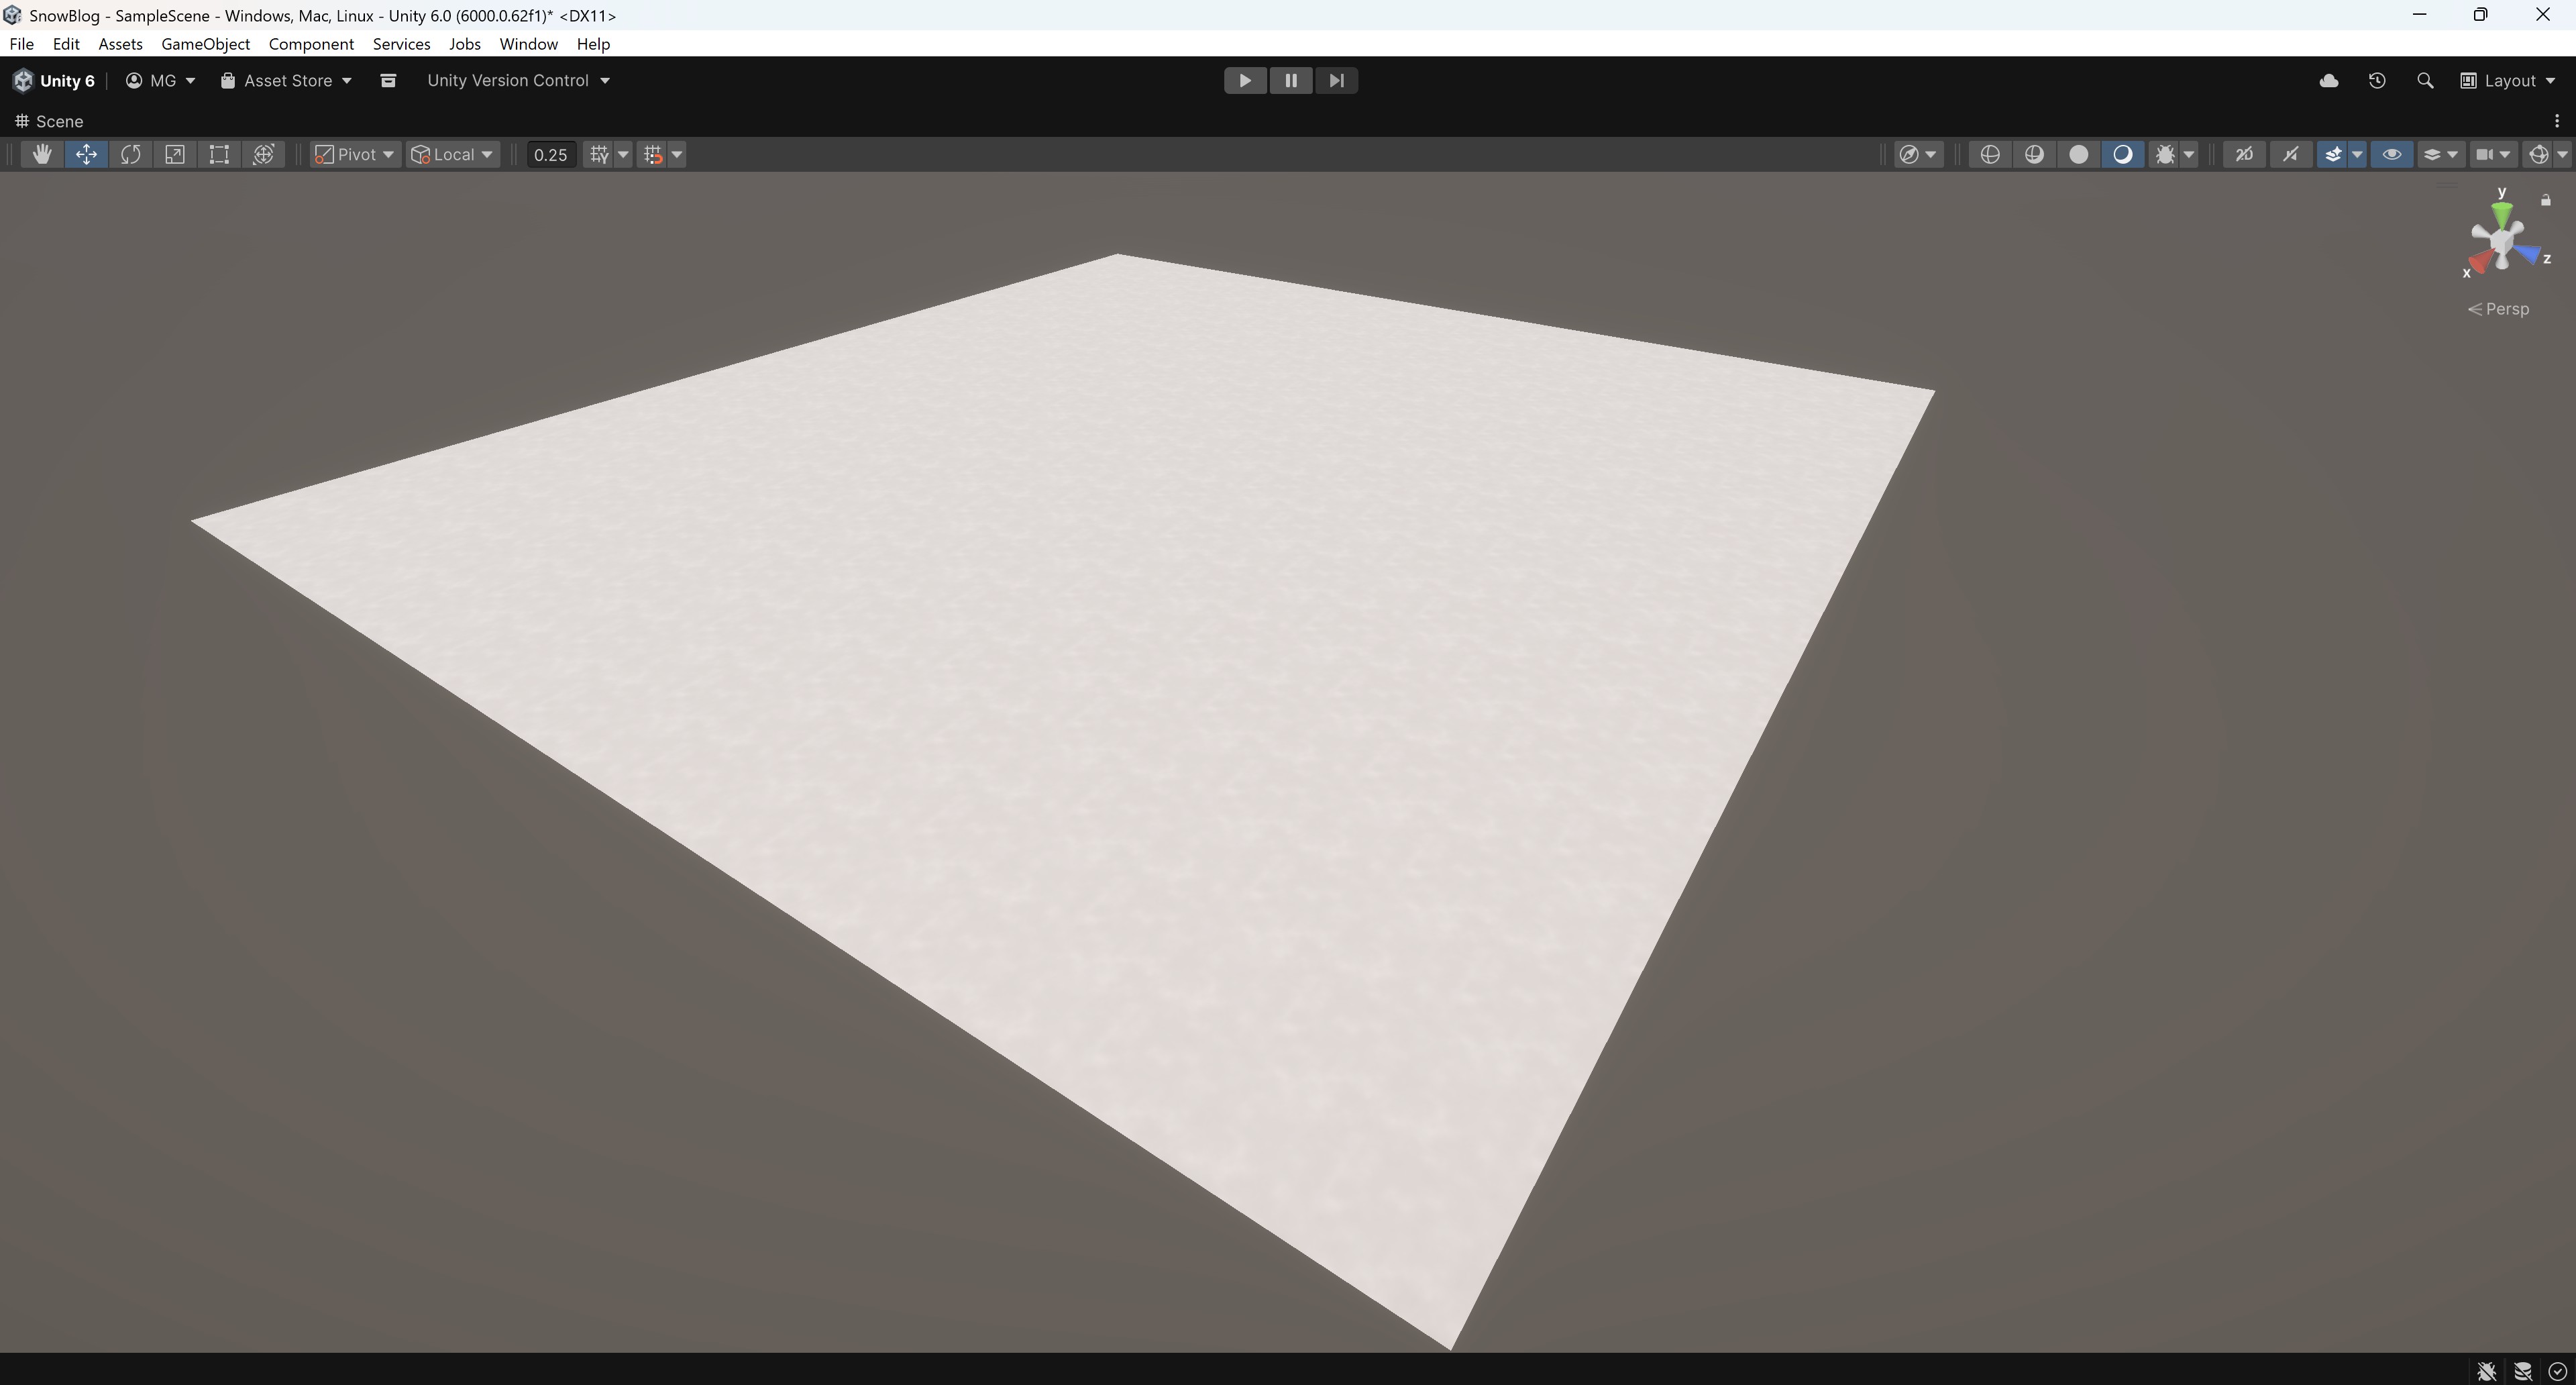
(The difference might be hard to see due to compression and monitor settings.)
Heightmap for vertex displacement
Now let's build the vertex displacement. To feed in the height values, we'll add another Texture2D parameter HeightTex to the shader. We could also introduce a scaling parameter to play with the effect, but in this case, we'll skip that to avoid confusion later on - it's easier to assume that the value coming from the height map is the actual rendered height difference.
To apply the height value, we'll sample the height map and add the value to the y value of the vertex position before we feed the result into the vertex position parameter.
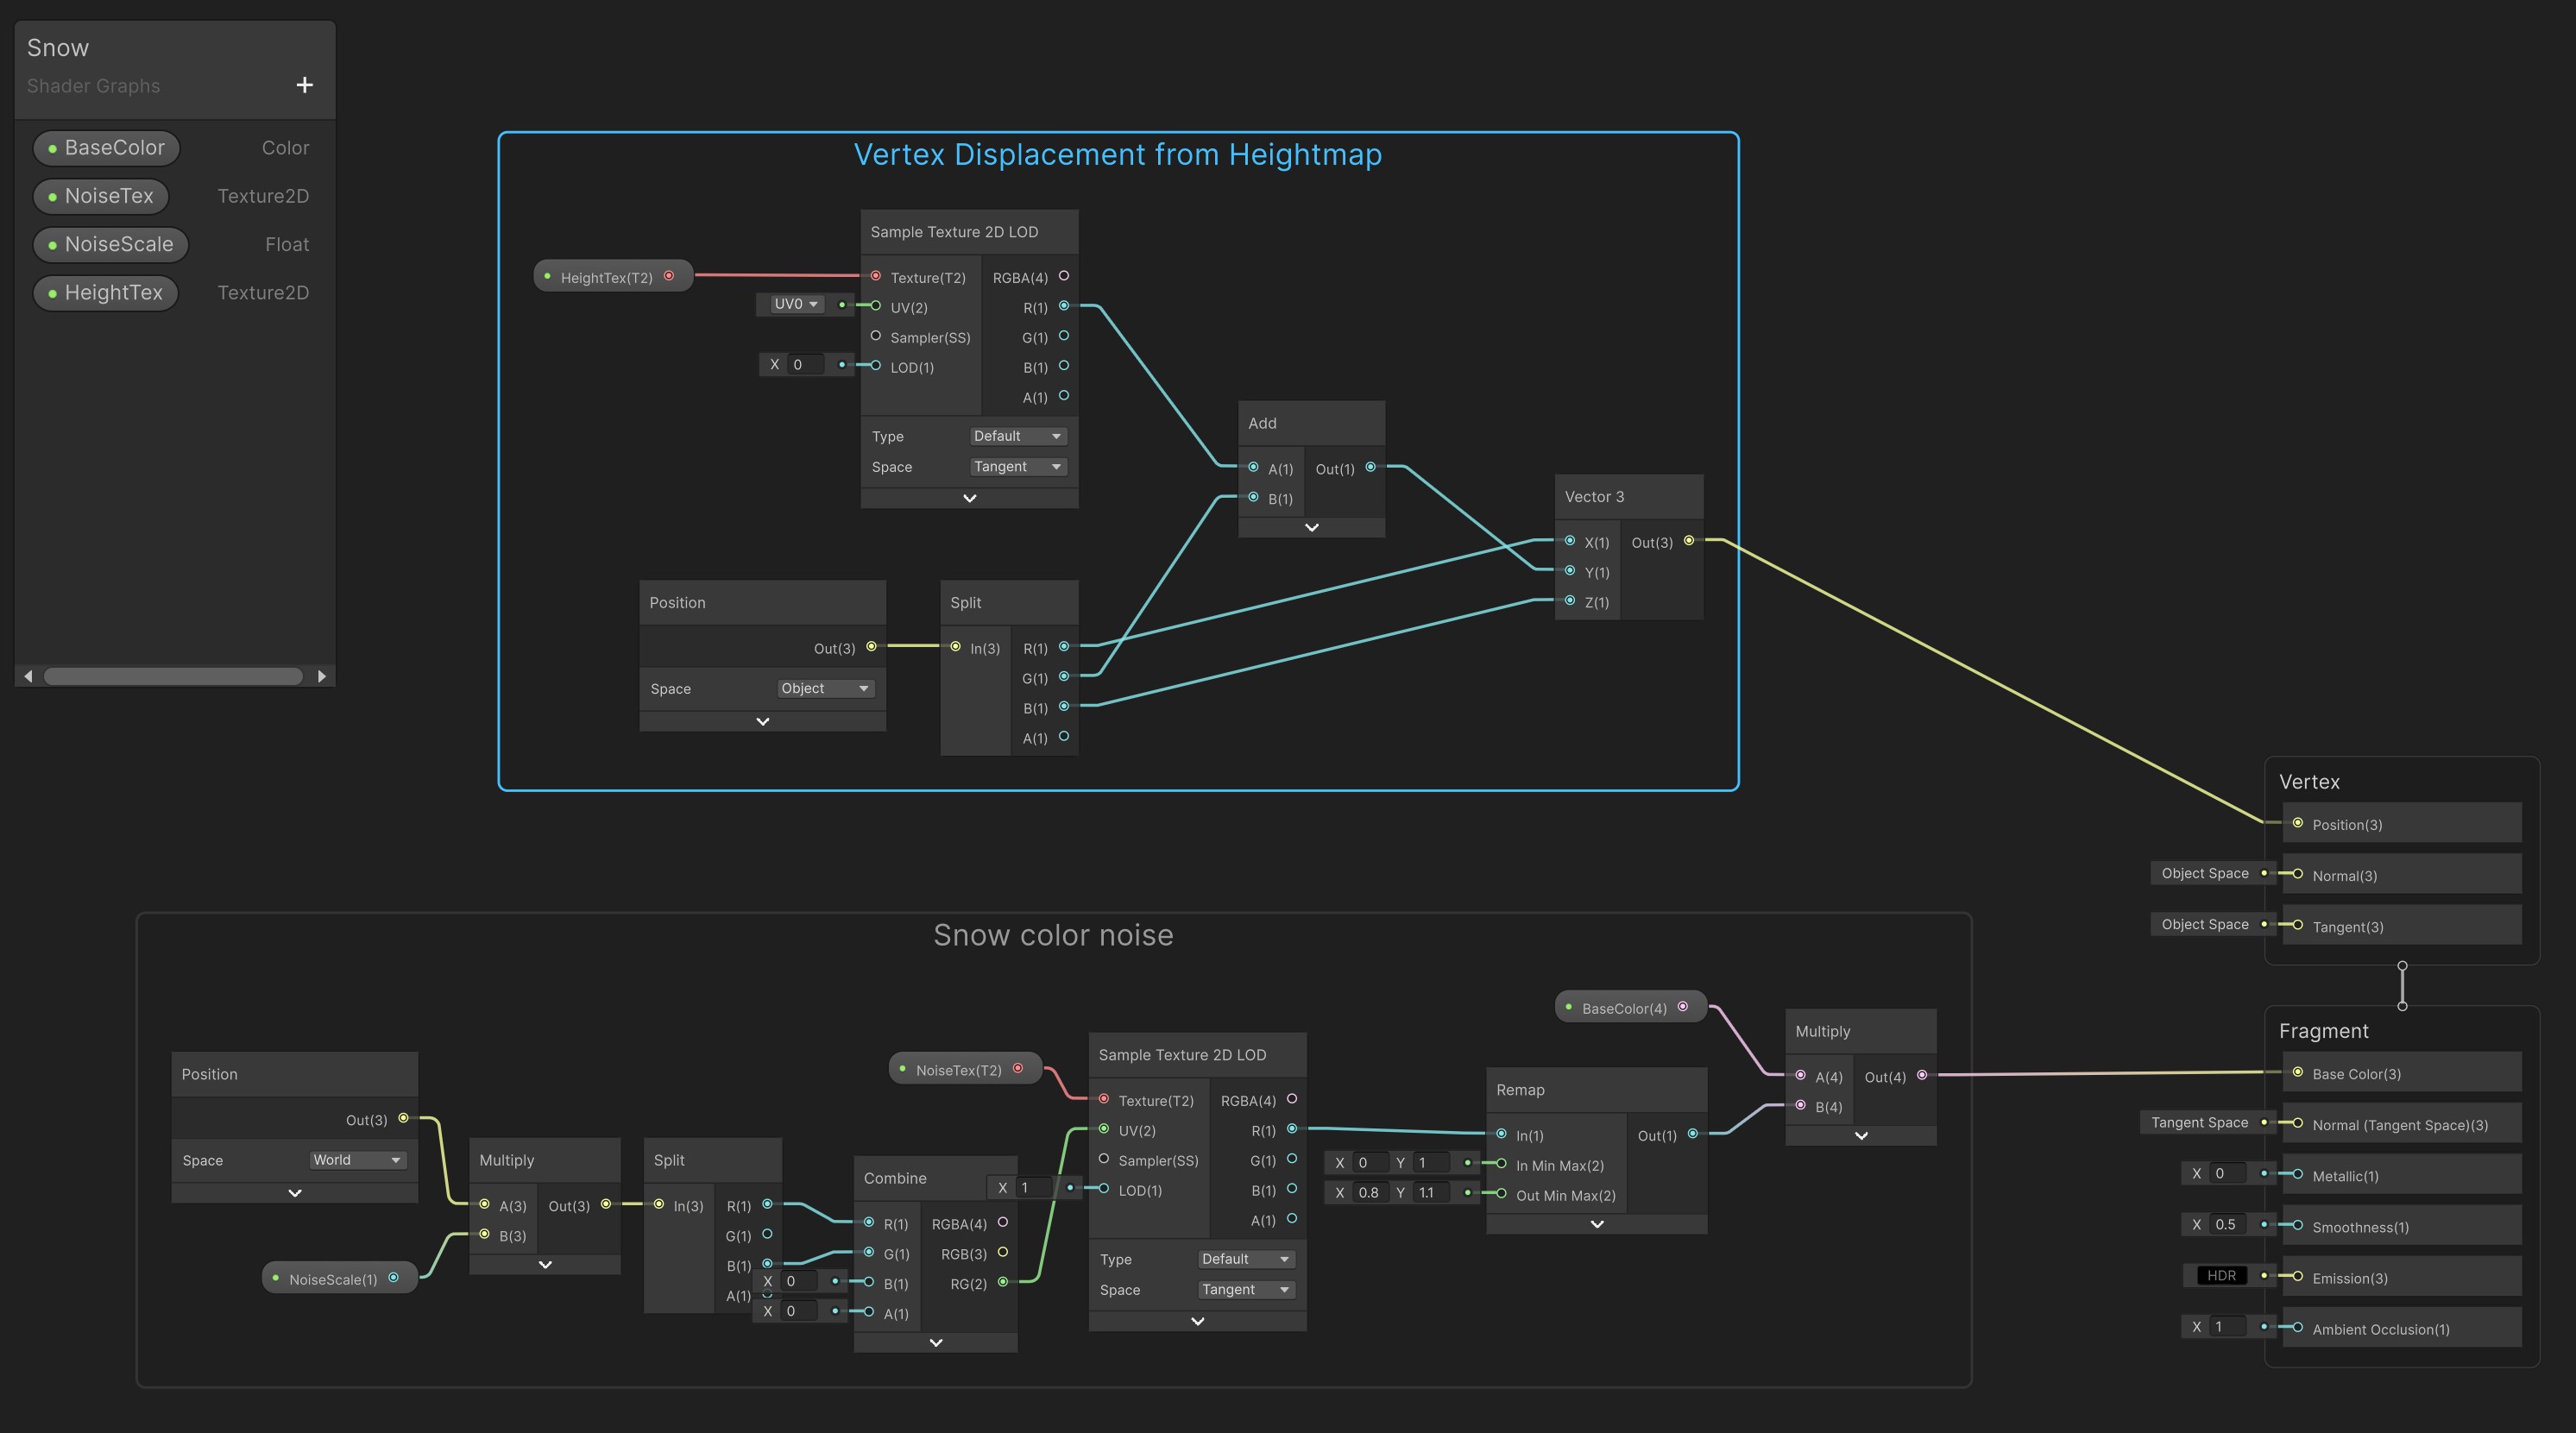
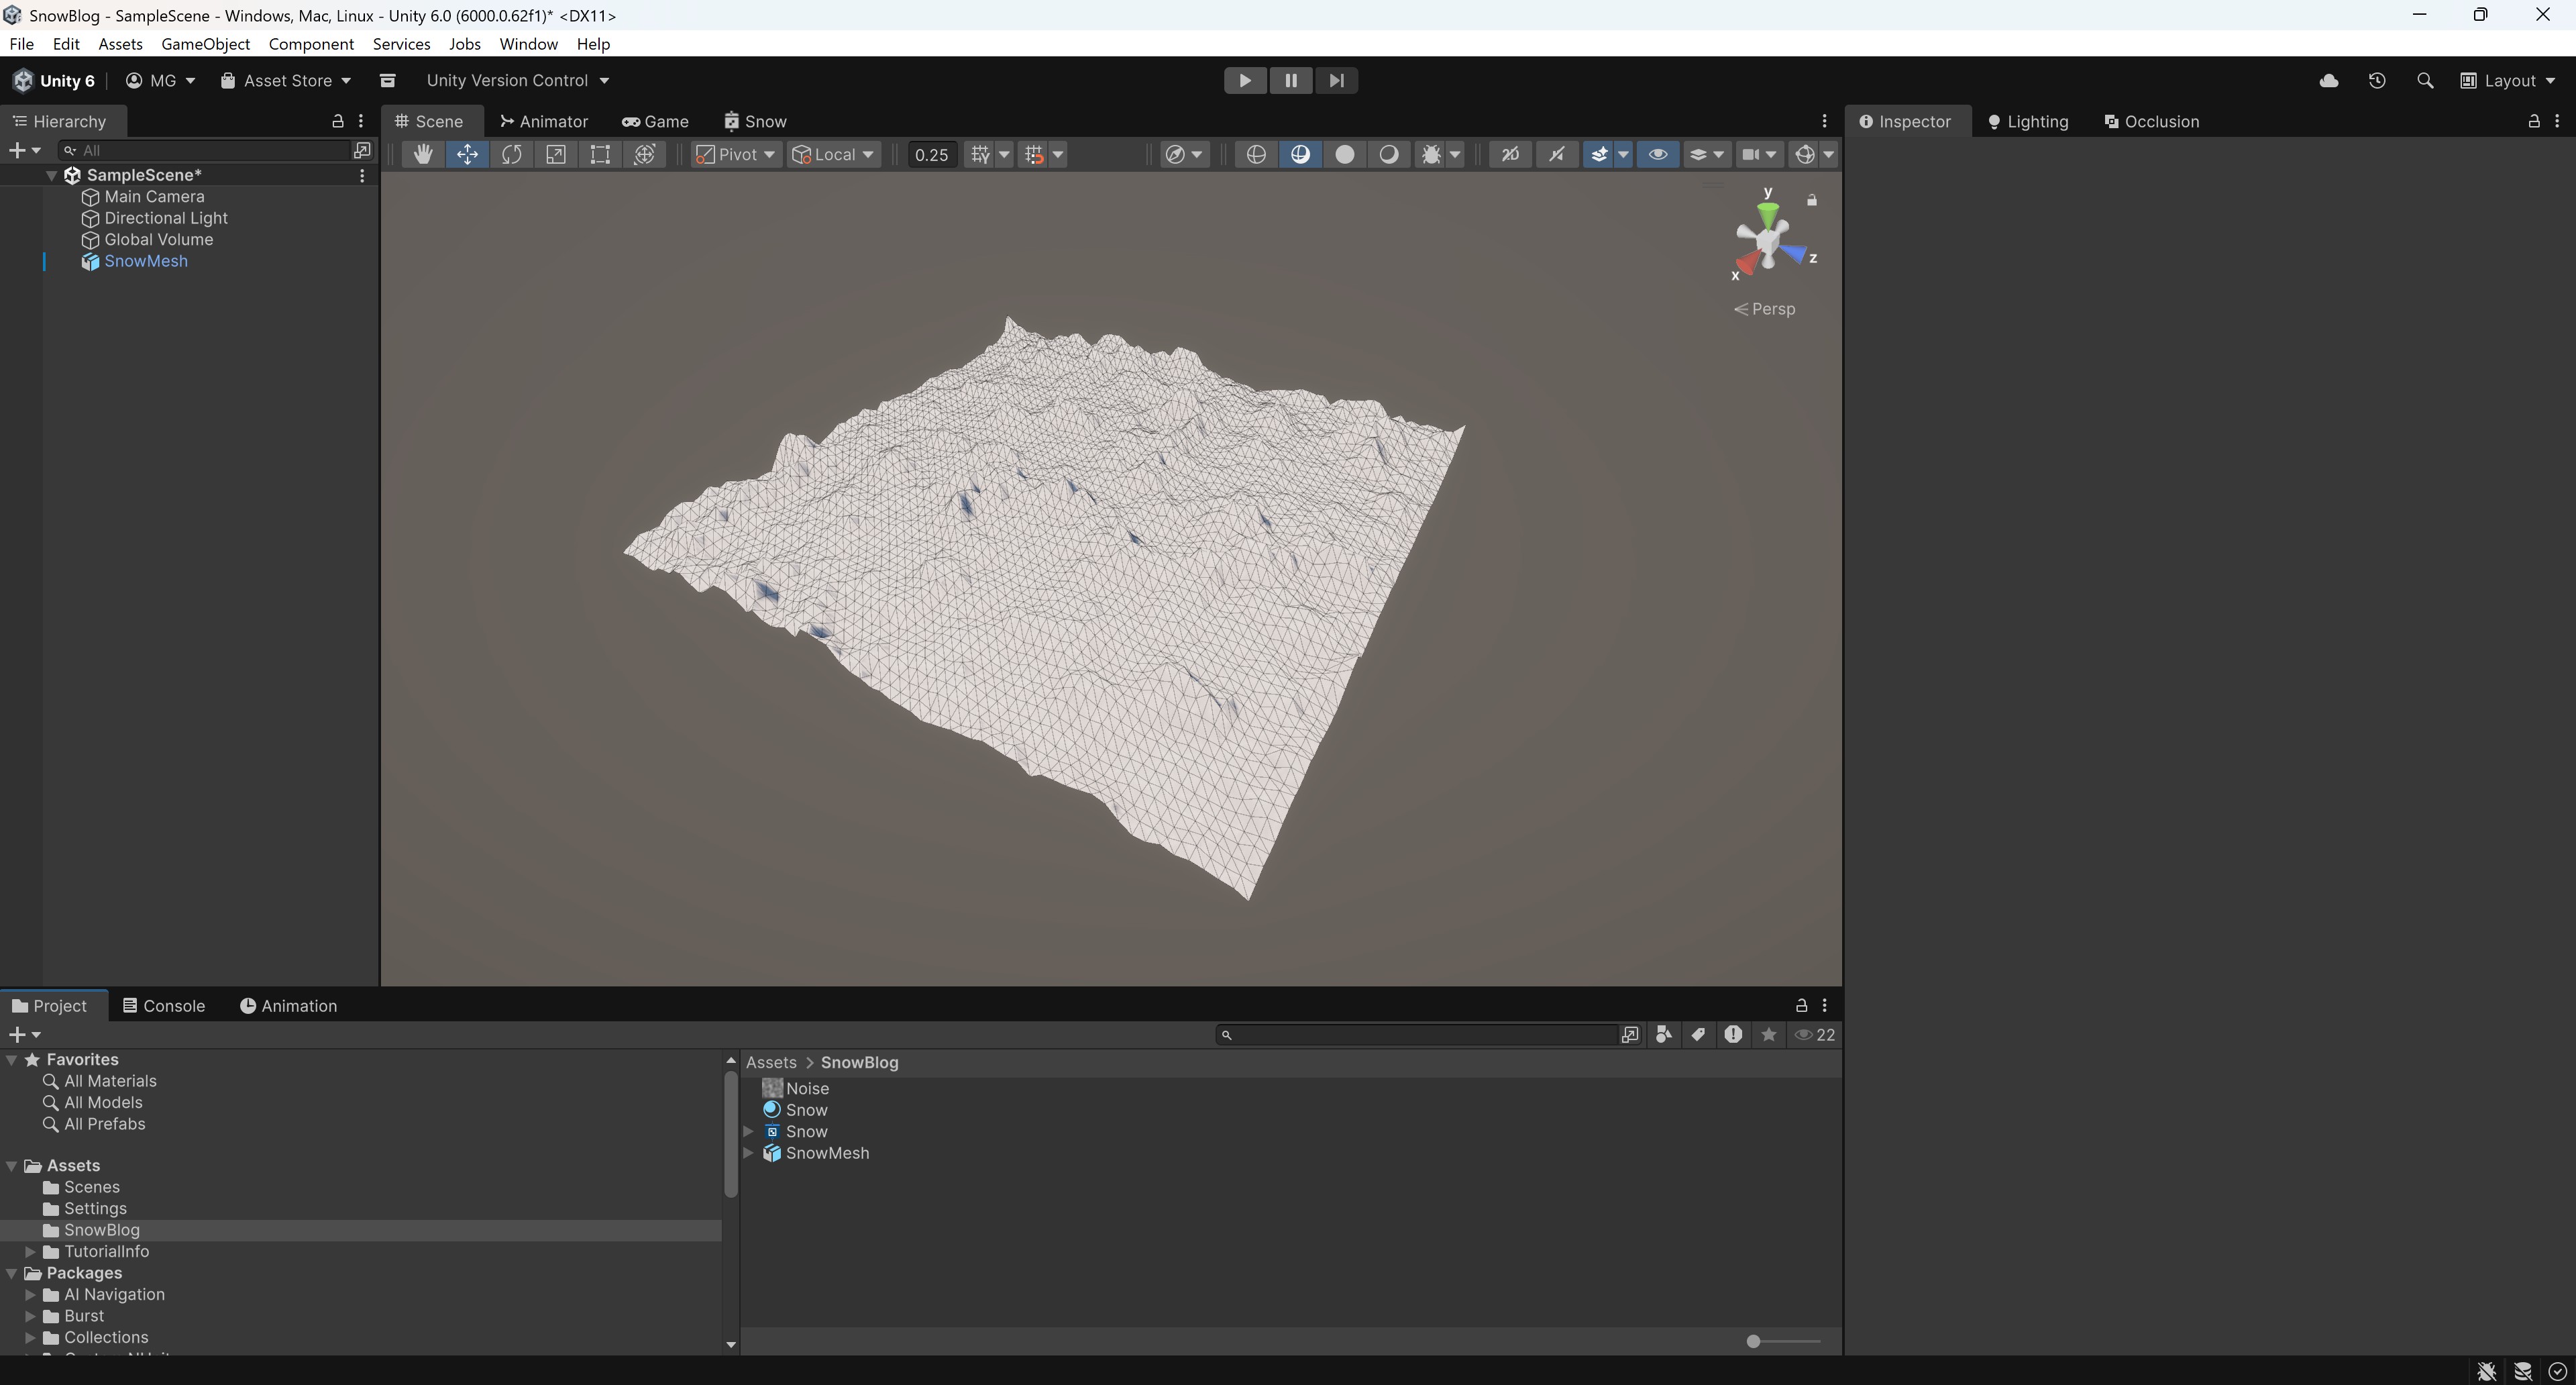
We don't have the actual heightmap yet - we're going to create this as a render texture to update it at runtime - but for testing purposes, we can temporarily feed the perlin noise texture in. Lighting isn't pretty since we're not calculating normals yet, but with wireframe enabled, the result looks as expected.
Generating dents at runtime
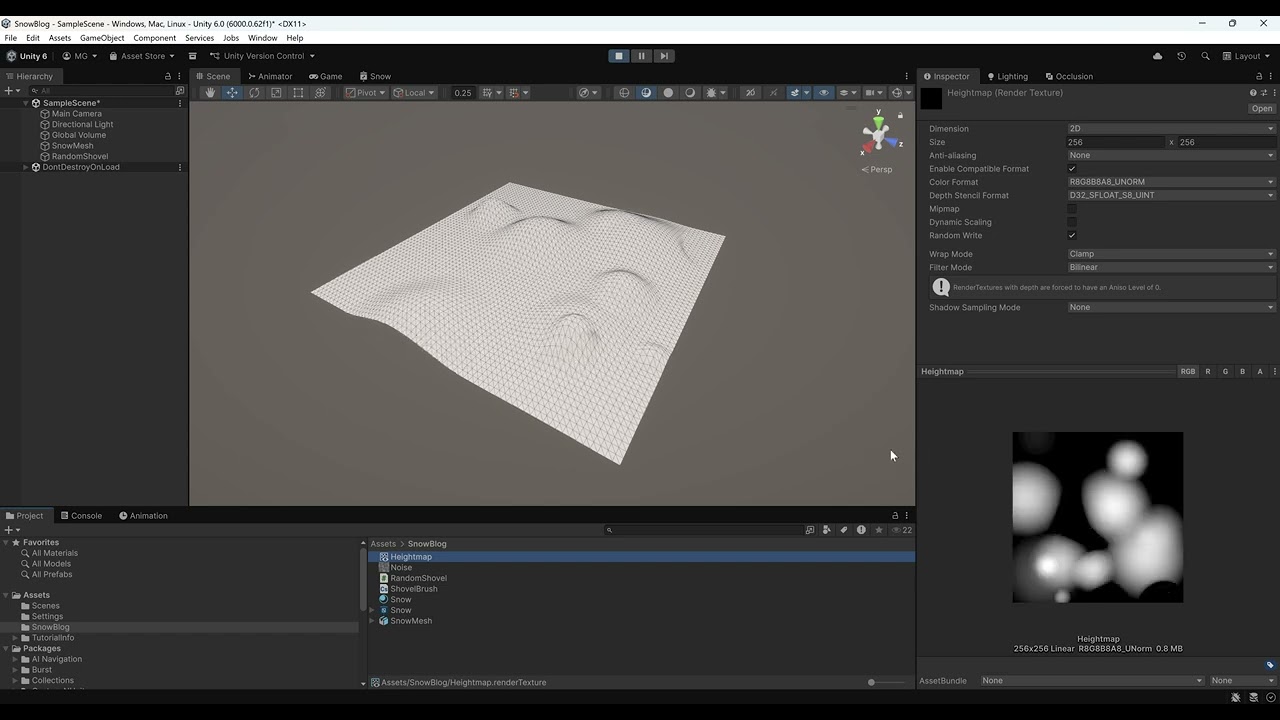
We'll create a render texture to store and change the heightmap at runtime. In your project view, click Create -> Rendering -> Render Texture, call it Heightmap and tick the "Random Write" checkbox. Then, drag this render texture into the HeightTex parameter of the snow material.
To modify the render texture, we'll create a compute shader with a kernel which performs the modification. In your project view, click Create -> Shader -> Compute Shader and call it ShovelBrush, then implement the kernel like this:
#pragma kernel Shovel

// The heightmap to modify
RWTexture2D<float> Heightmap;

// Shovel parameters, set before calling the kernel
uint Resolution;
float2 CenterUV;
float Radius;
float Strength;

[numthreads(8, 8, 1)]
void Shovel(uint3 id : SV_DispatchThreadID) {
    // Bail out for calls outside of the known resolution
    if (id.x >= Resolution || id.y >= Resolution) {
        return;
    }

    // Ignore texels outside of the shovel radius
    float2 uv = (float2(id.xy) + 0.5) / Resolution;
    float2 d = uv - CenterUV;
    float dist = length(d);
    if (dist > Radius) {
        return;
    }

    // Calculate falloff inside the radius
    float t = saturate(dist / Radius);
    float falloff = smoothstep(1.0, 0.0, t);

    // Update heightmap
    int2 coord = int2(id.xy);
    float h = Heightmap[coord];
    h += Strength * falloff;
    Heightmap[coord] = h;
}
Contrary to the graphics shader earlier, a compute shader is a GPU program you run on demand to do general-purpose work (physics, image processing, painting into textures, etc.). It doesn't draw anything by itself. The graphics shaders don't write into textures, so we need the compute shader to do that for us.
We're launching 8x8 = 64 threads in parallel on a texture, and each call needs to verify whether there's actually something to do for its specific parameters. The size maps nicely to 2D textures, plays well on mobile GPUs, and keeps register pressure modest. It has proven to be a safe default on our target device, Meta Quest.
What's missing now is a piece that ties all of this together. We'll build a simple script that randomly generates dents or piles on our mesh, just to show the effect. Create a new script in your project (project view: Create -> MonoBehaviour script), call it RandomShovel (for lack of a better name), and implement like this:
using System.Collections;
using UnityEngine;

public class RandomShovel : MonoBehaviour {

    [SerializeField] private ComputeShader shovelShader;
    [SerializeField] private RenderTexture heightmap;
    [SerializeField] private Material showMaterial;

    private int _shovelKernel;
    private Coroutine _shovelCoroutine;

    void Start() {
        _shovelKernel = shovelShader.FindKernel("Shovel");
        shovelShader.SetTexture(_shovelKernel, "Heightmap", heightmap);
        shovelShader.SetInt("Resolution", heightmap.width);

        // Clear heightmap with "medium height"
        var prev = RenderTexture.active;
        RenderTexture.active = heightmap;
        GL.Clear(false, true, new Color(0.5f, 0.5f, 0.5f, 1f));
        RenderTexture.active = prev;
    }

    void OnEnable() {
        _shovelCoroutine = StartCoroutine(RandomShovelCoroutine());
    }

    void OnDisable() {
        StopCoroutine(_shovelCoroutine);
    }

    private IEnumerator RandomShovelCoroutine() {
        while (true) {
            yield return new WaitForSeconds(0.2f);

            // Prepare parameters for this run
            Vector4 center = new Vector4(Random.Range(0f, 1f), Random.Range(0f, 1f), 0, 0);
            float radius = Random.Range(0.05f, 0.3f);
            float strength = Random.Range(-0.5f, 0.5f);
            shovelShader.SetVector("CenterUV", center);
            shovelShader.SetFloat("Radius", radius);
            shovelShader.SetFloat("Strength", strength);

            // Execute kernel
            shovelShader.Dispatch(_shovelKernel, heightmap.width / 8, heightmap.height / 8, 1);
        }
    }

}
Then, create an empty game object in the scene with the same name and drag the script onto it. Then drag compute shader, heightmap render texture, and snow material from your project view into the corresponding properties to tie it all together.
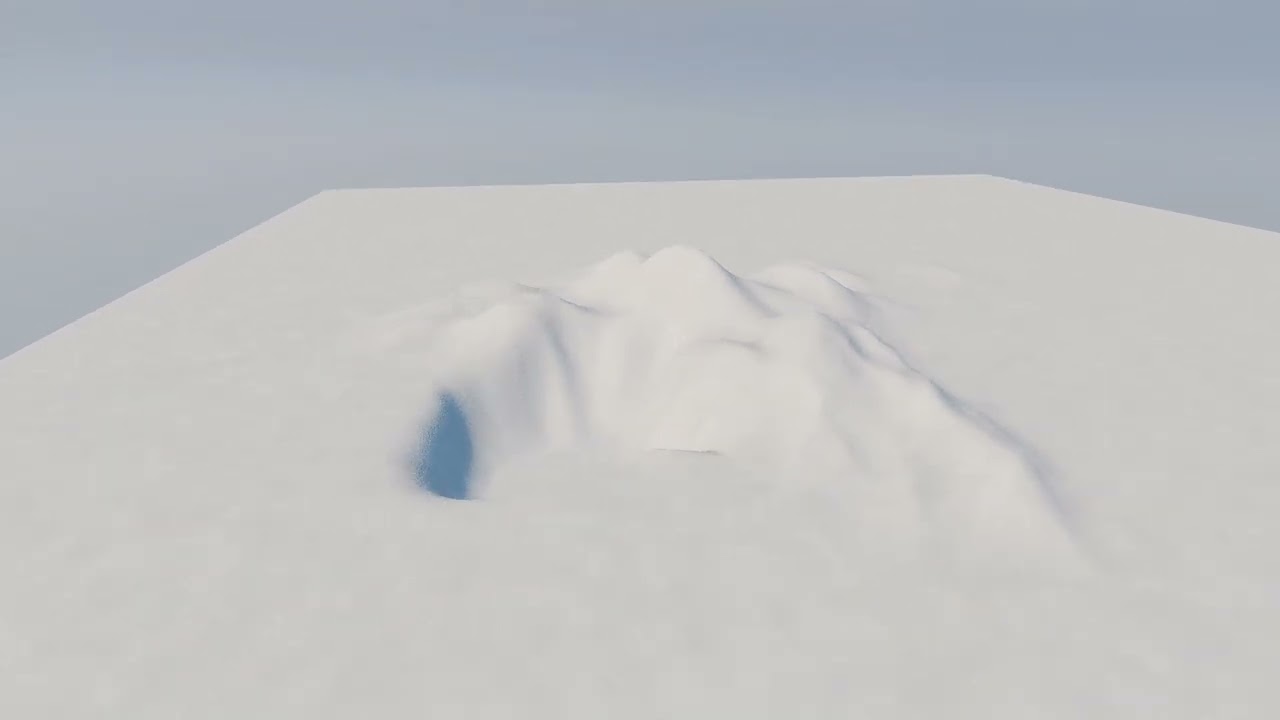
The script clears the heightmap using a medium color value, so that we immediately can see the effect of dents and piles. It also pushes the necessary parameters into the compute shader, triggers the kernel every 200ms, and randomly creates dents or piles on the heightmap. When you start the project now, you can see the heightmap render texture changing, too.
Clicking play will embed the YouTube player and may set third-party cookies and collect data from YouTube.
Proper lighting
You'll notice that the snow still seems quite flat and unaccentuated even when heights change. This is because we're not yet feeding any information about normals into the shader.
Our first approach was to use the "Normal from Height" node and feed the heightmap in:
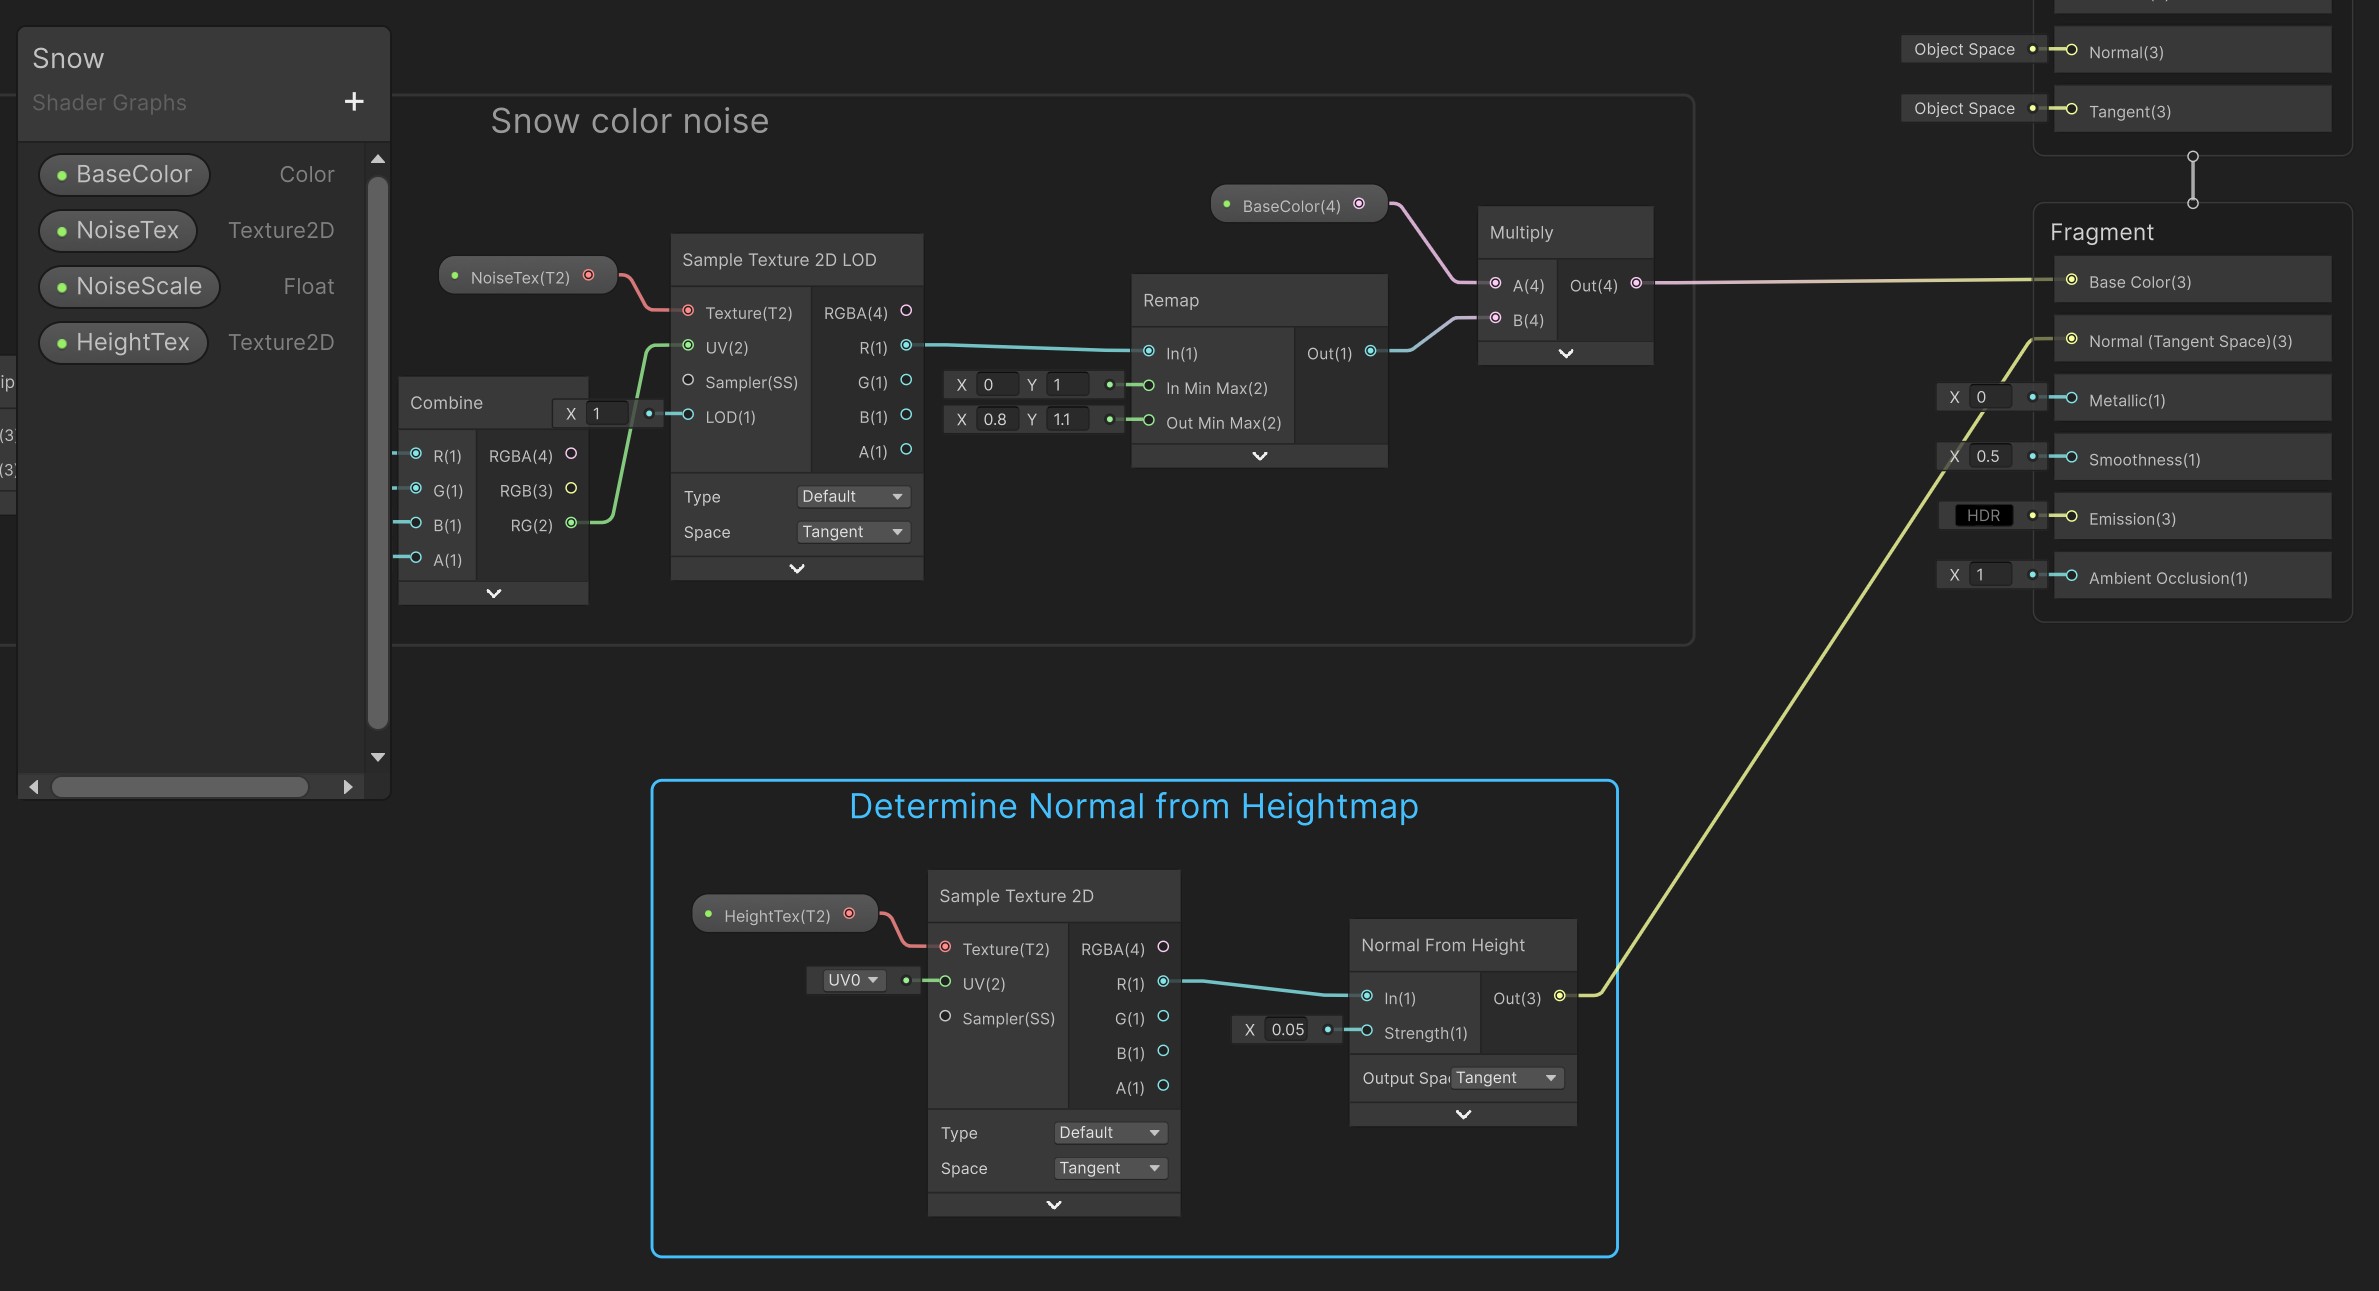
The result wasn't very satisfying, though! Even with an additional "Normal Strength" node with a strength of e.g. 2, the snow appeared quite flat.
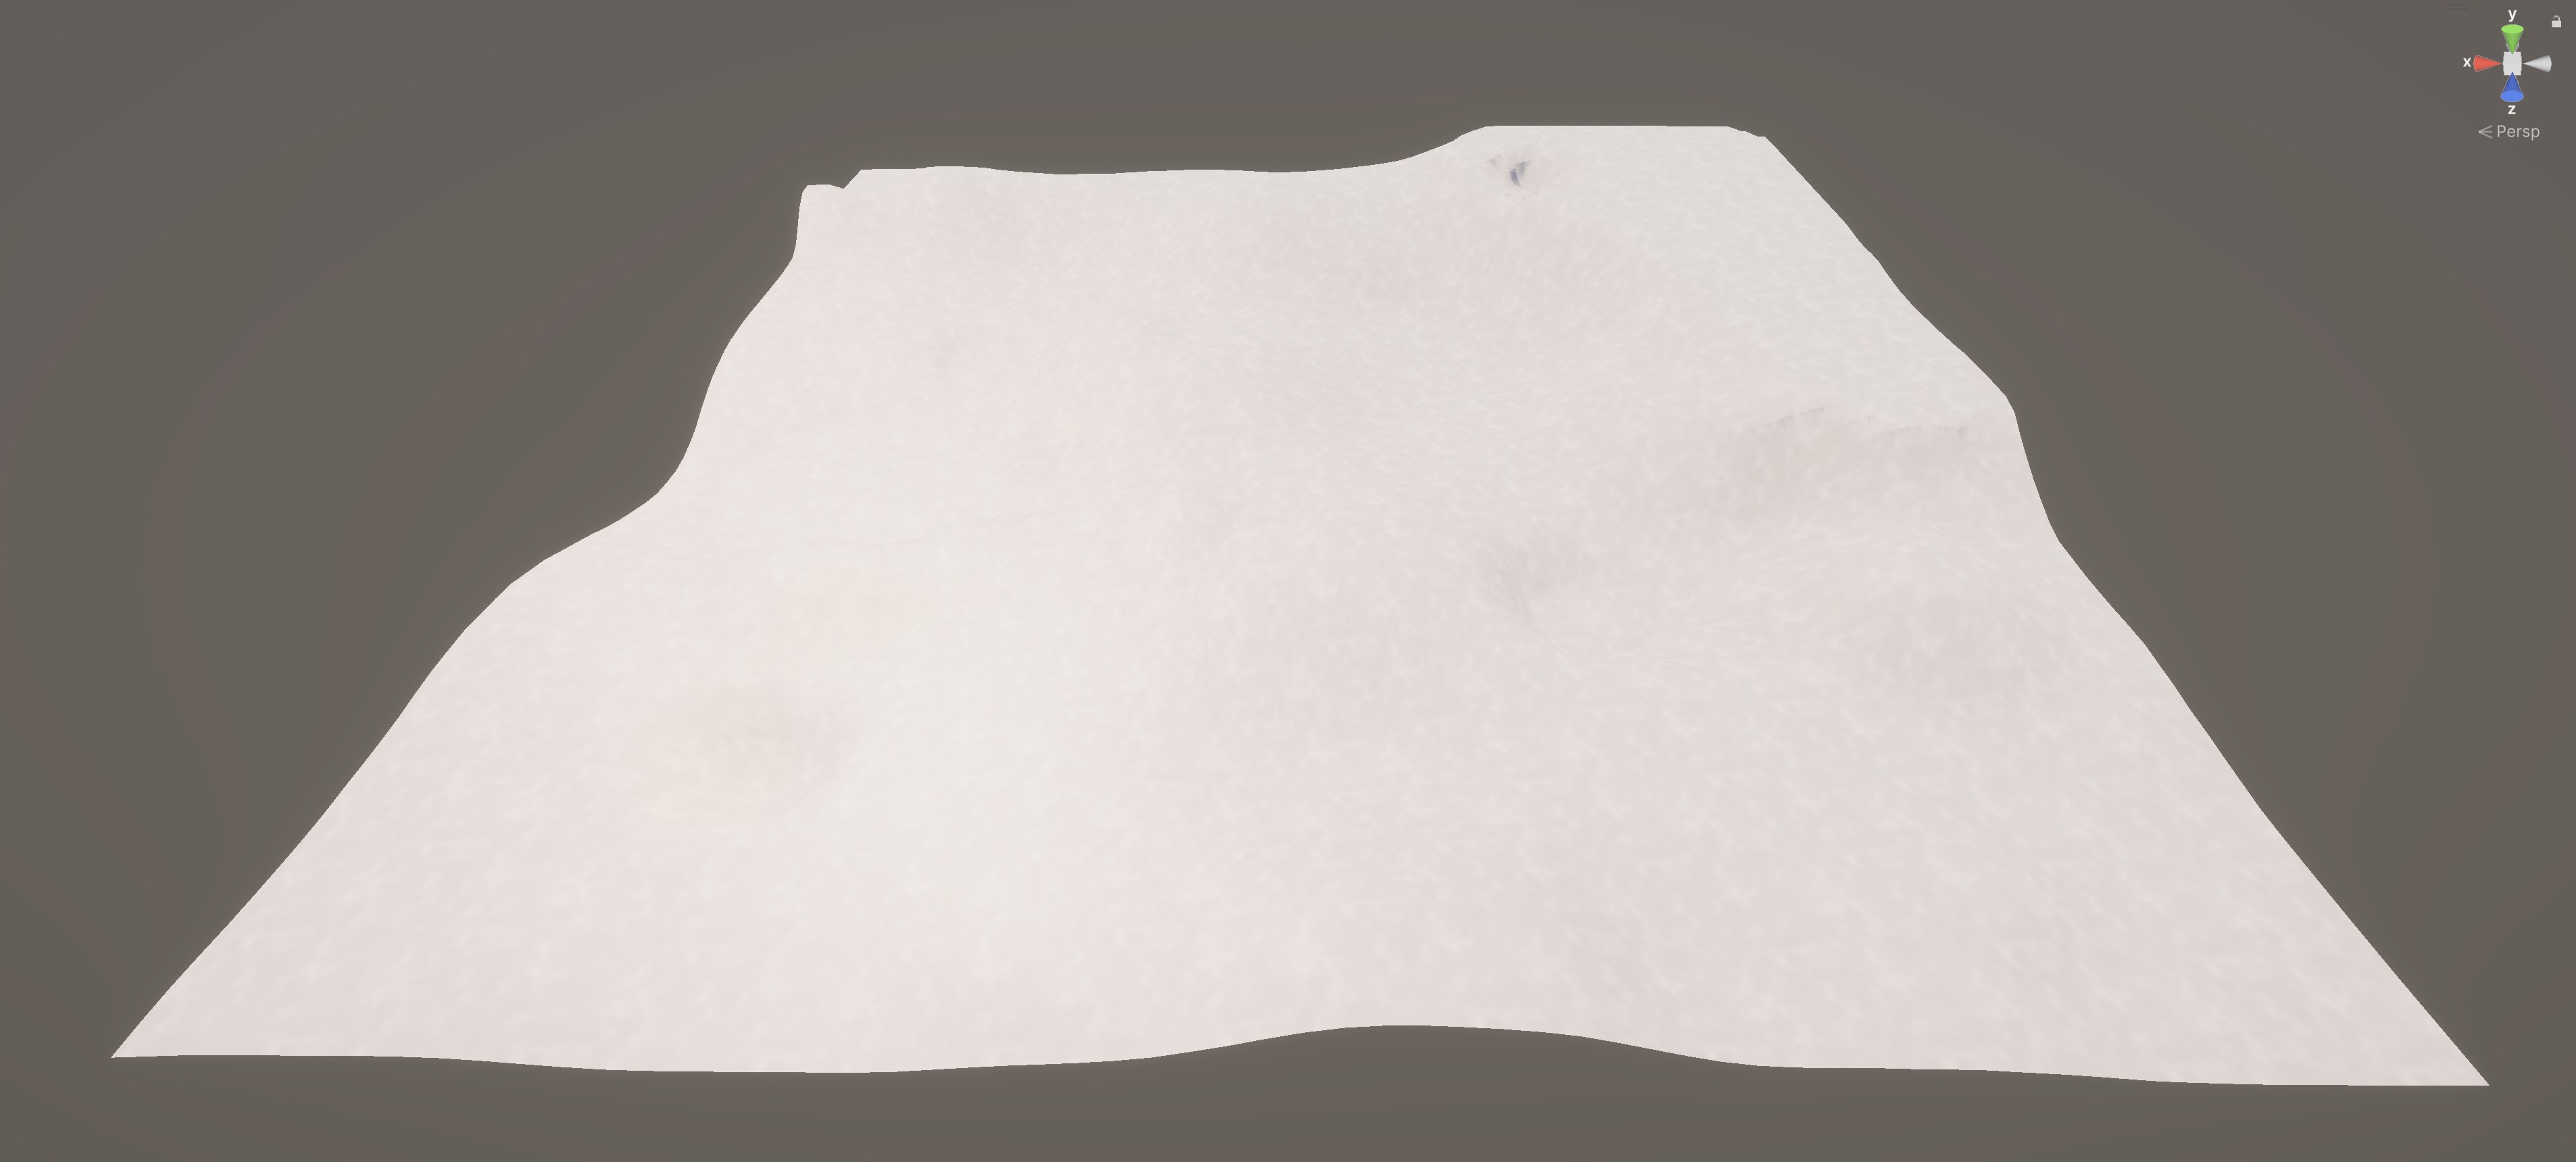
So instead, we'll calculate the normals manually by probing the adjacent texels on the heightmap. Before we dive into the details, here's the outcome for comparison:

To do these probes on nearby texels, the shader needs to know how "big" a texel actually is in world space and in normalized coordinates, i.e. size of the mesh / resolution of the mesh and 1 / resolution of the mesh.
We'll add both as a new shader parameters, HeightTexelUV and MetersPerTexel, with the default values matching your mesh. If you used the same parameters in Blender as I did above, that would be HeightTexelUV = 1 / 64 = 0.015625 and MetersPerTexel = 10 / 64 = 0.15625. We can add HeightTexelUV to the current u or v value and then query the corresponding other texel. We look how the height changes to the right and forward, then divide by the meters-per-texel to get true physical slopes. From those two slopes we build a normal vector (−slopeX, 1, −slopeY) and normalize it - this is just the math of the surface's tangent planes. The minus signs come from the cross-product direction, so the normal tilts opposite the direction the surface rises.
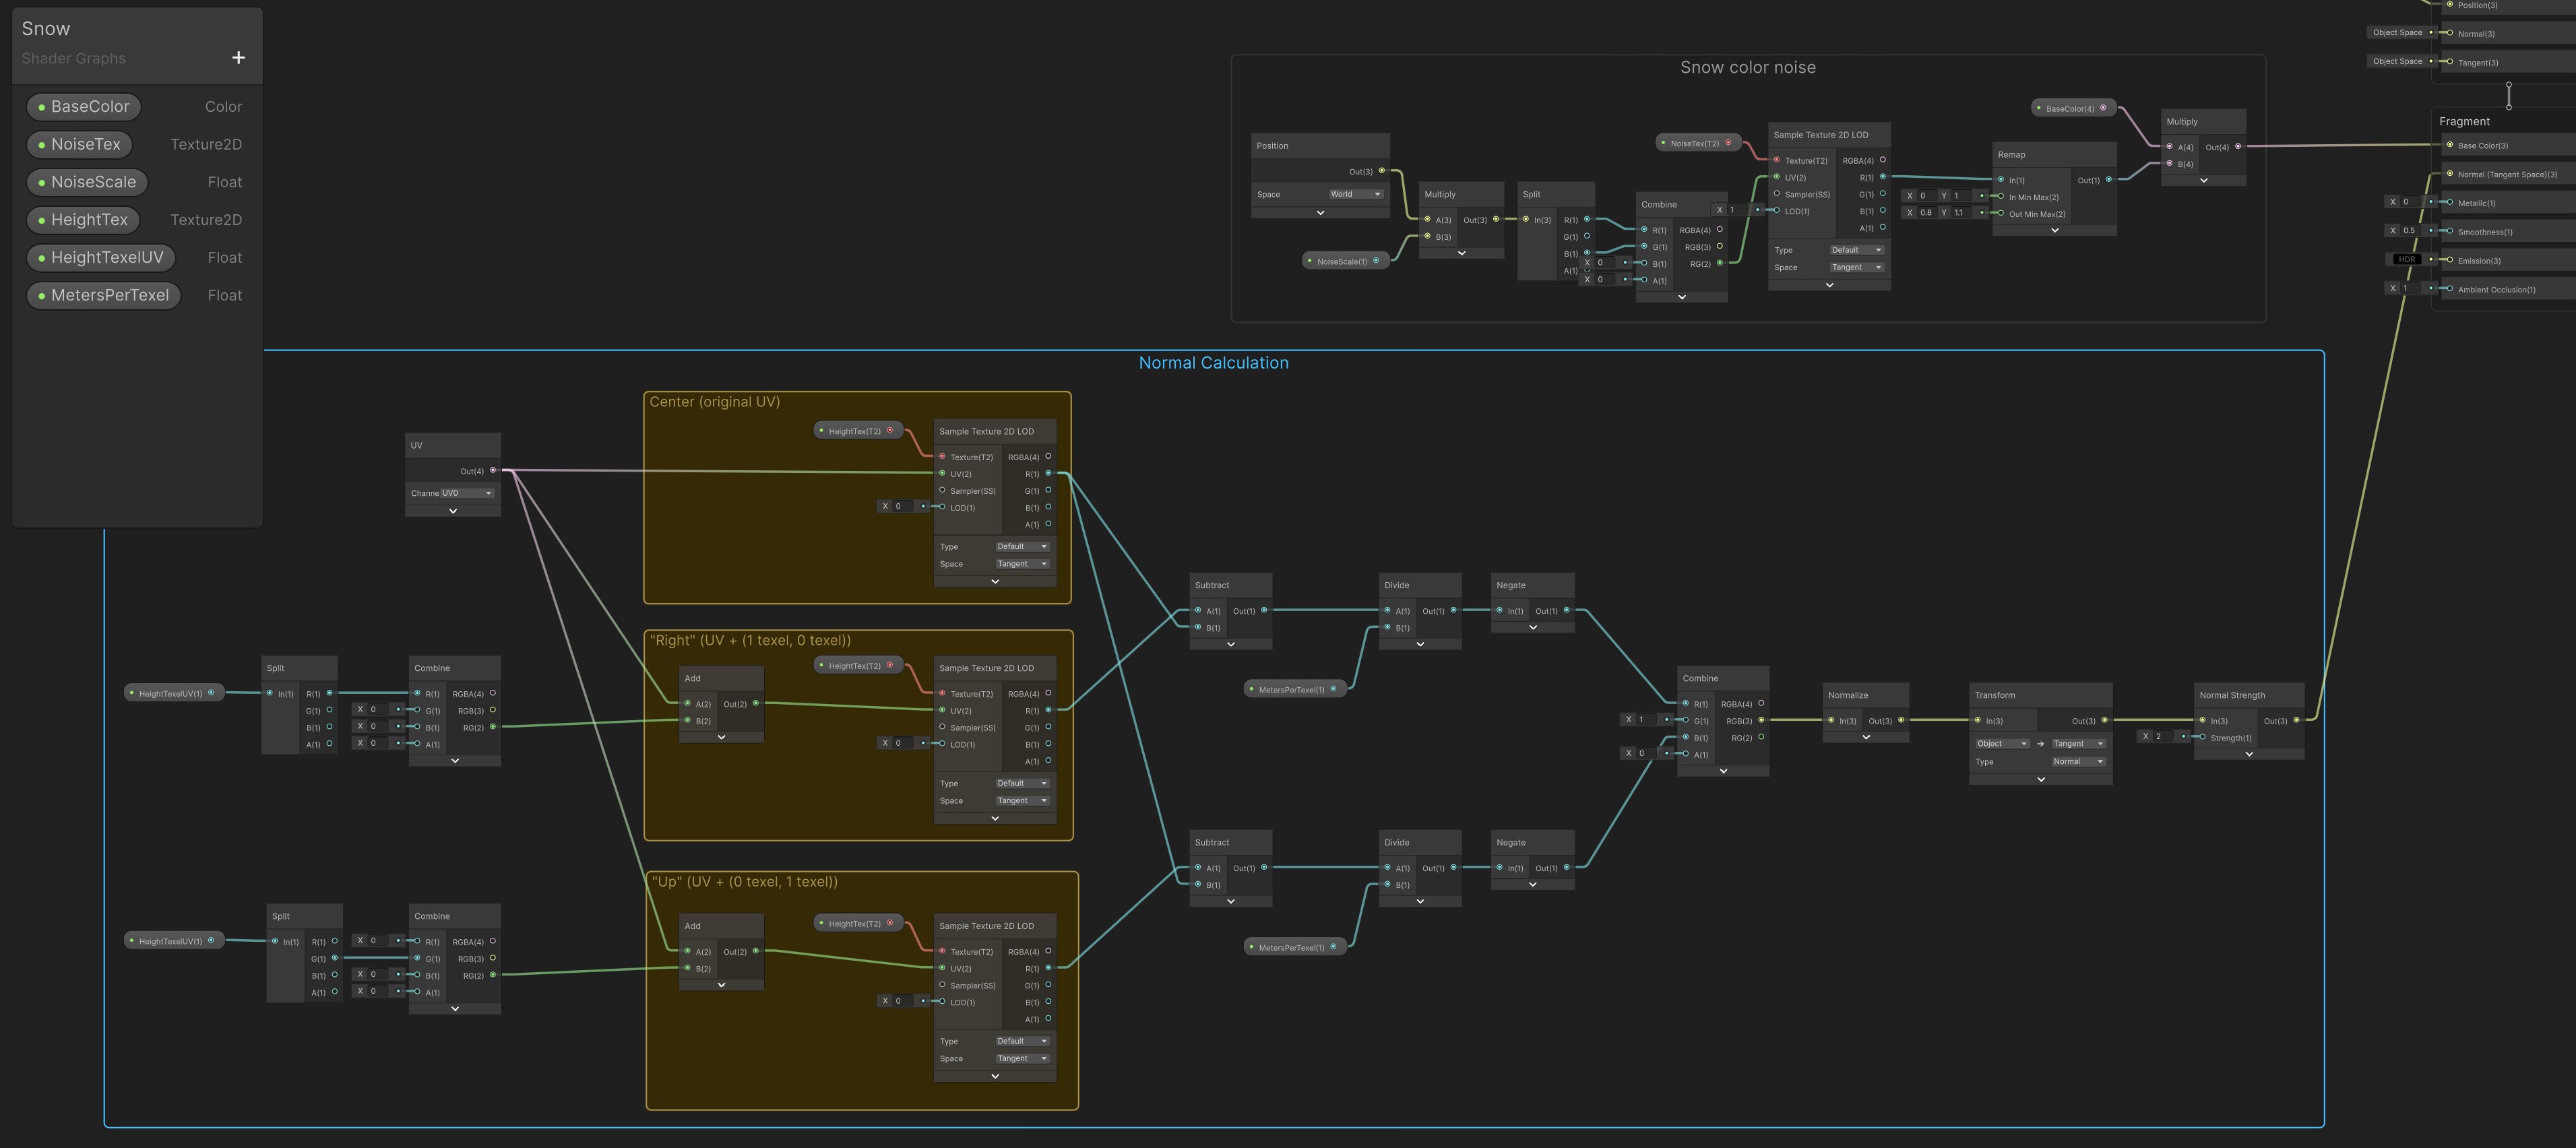
We could improve the results further by probing in the opposite directions, too, but this seems to be working well already.
Extra noise
As we're working in VR, the player is going to see the snow from very close. That's why an additional layer of noise would be helpful. However, this is only needed very close to the camera and can fade out further away to avoid too much noise in the distance. Here's a close-up of the effect we recorded while testing a Ho-Ho Hunt build.
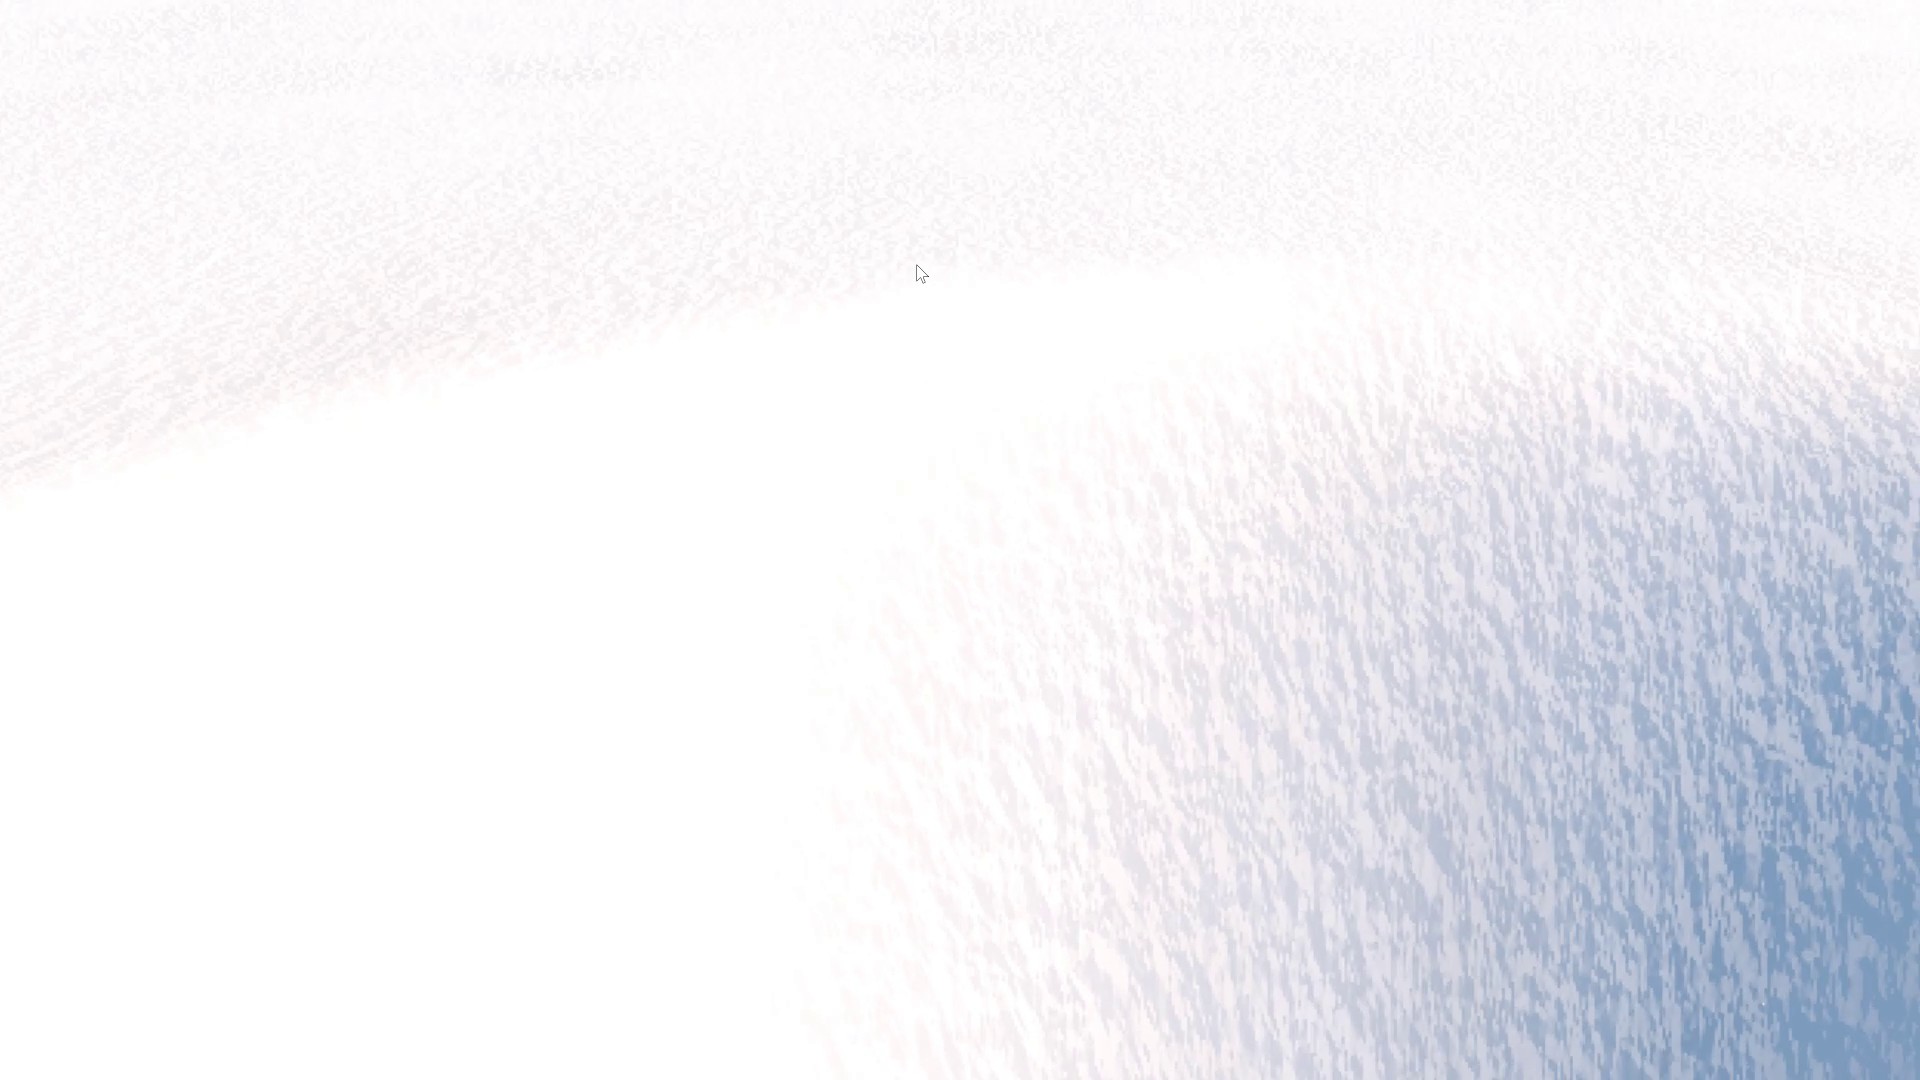
This extra noise is eventually just another noise texture, but this time as a normal map. The sampled value feeds into the normal calculation we just built, but with a much finer resolution than the larger snow noise we used at the beginning of this article. If you don't have a nice noise normal map available, you can duplicate the current noise texture, switch it to type Normal map and tick "Create from grayscale", just to see the effect.
So we'll add another Texture2D parameter DetailNormalTex and scaling parameter DetailScale, sample the value (remember to use type "Normal" here, it's easy to overlook!), and then control the strength based on the distance from the camera to ensure the effect fades out properly:
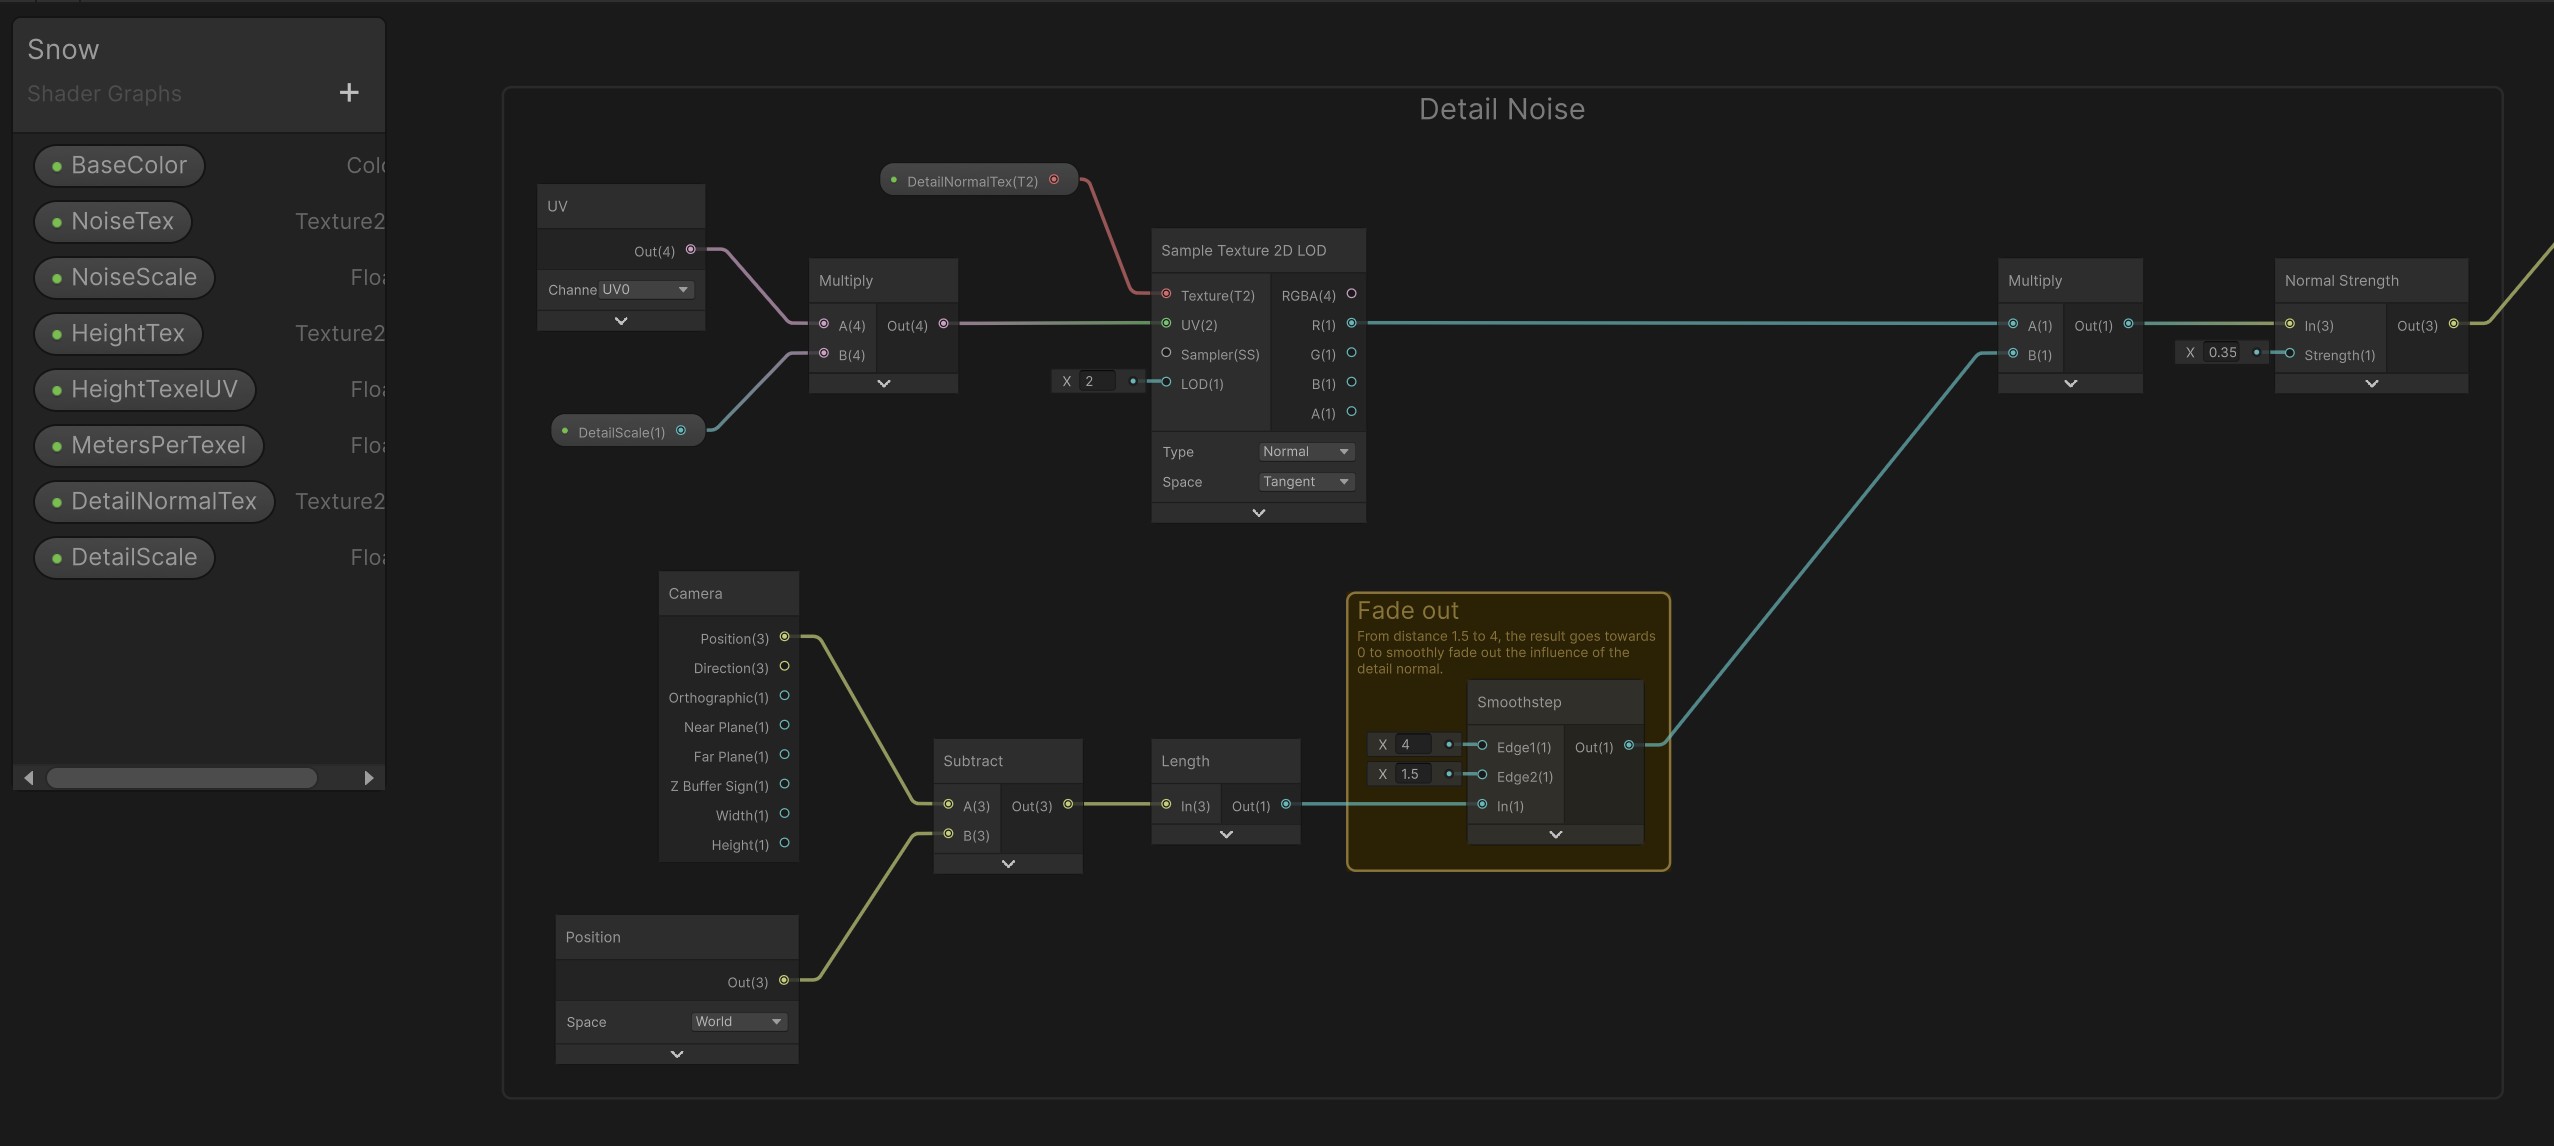
The output of this detail noise, and the output of the previous heightmap normal calculation, are now blended using the Normal Blend node. The output is fed into the Normal of the fragment stage.
I used DetailScale value 200 and used bumpiness 0.2 with smooth filtering in the normal map texture configuration, giving me the following results:
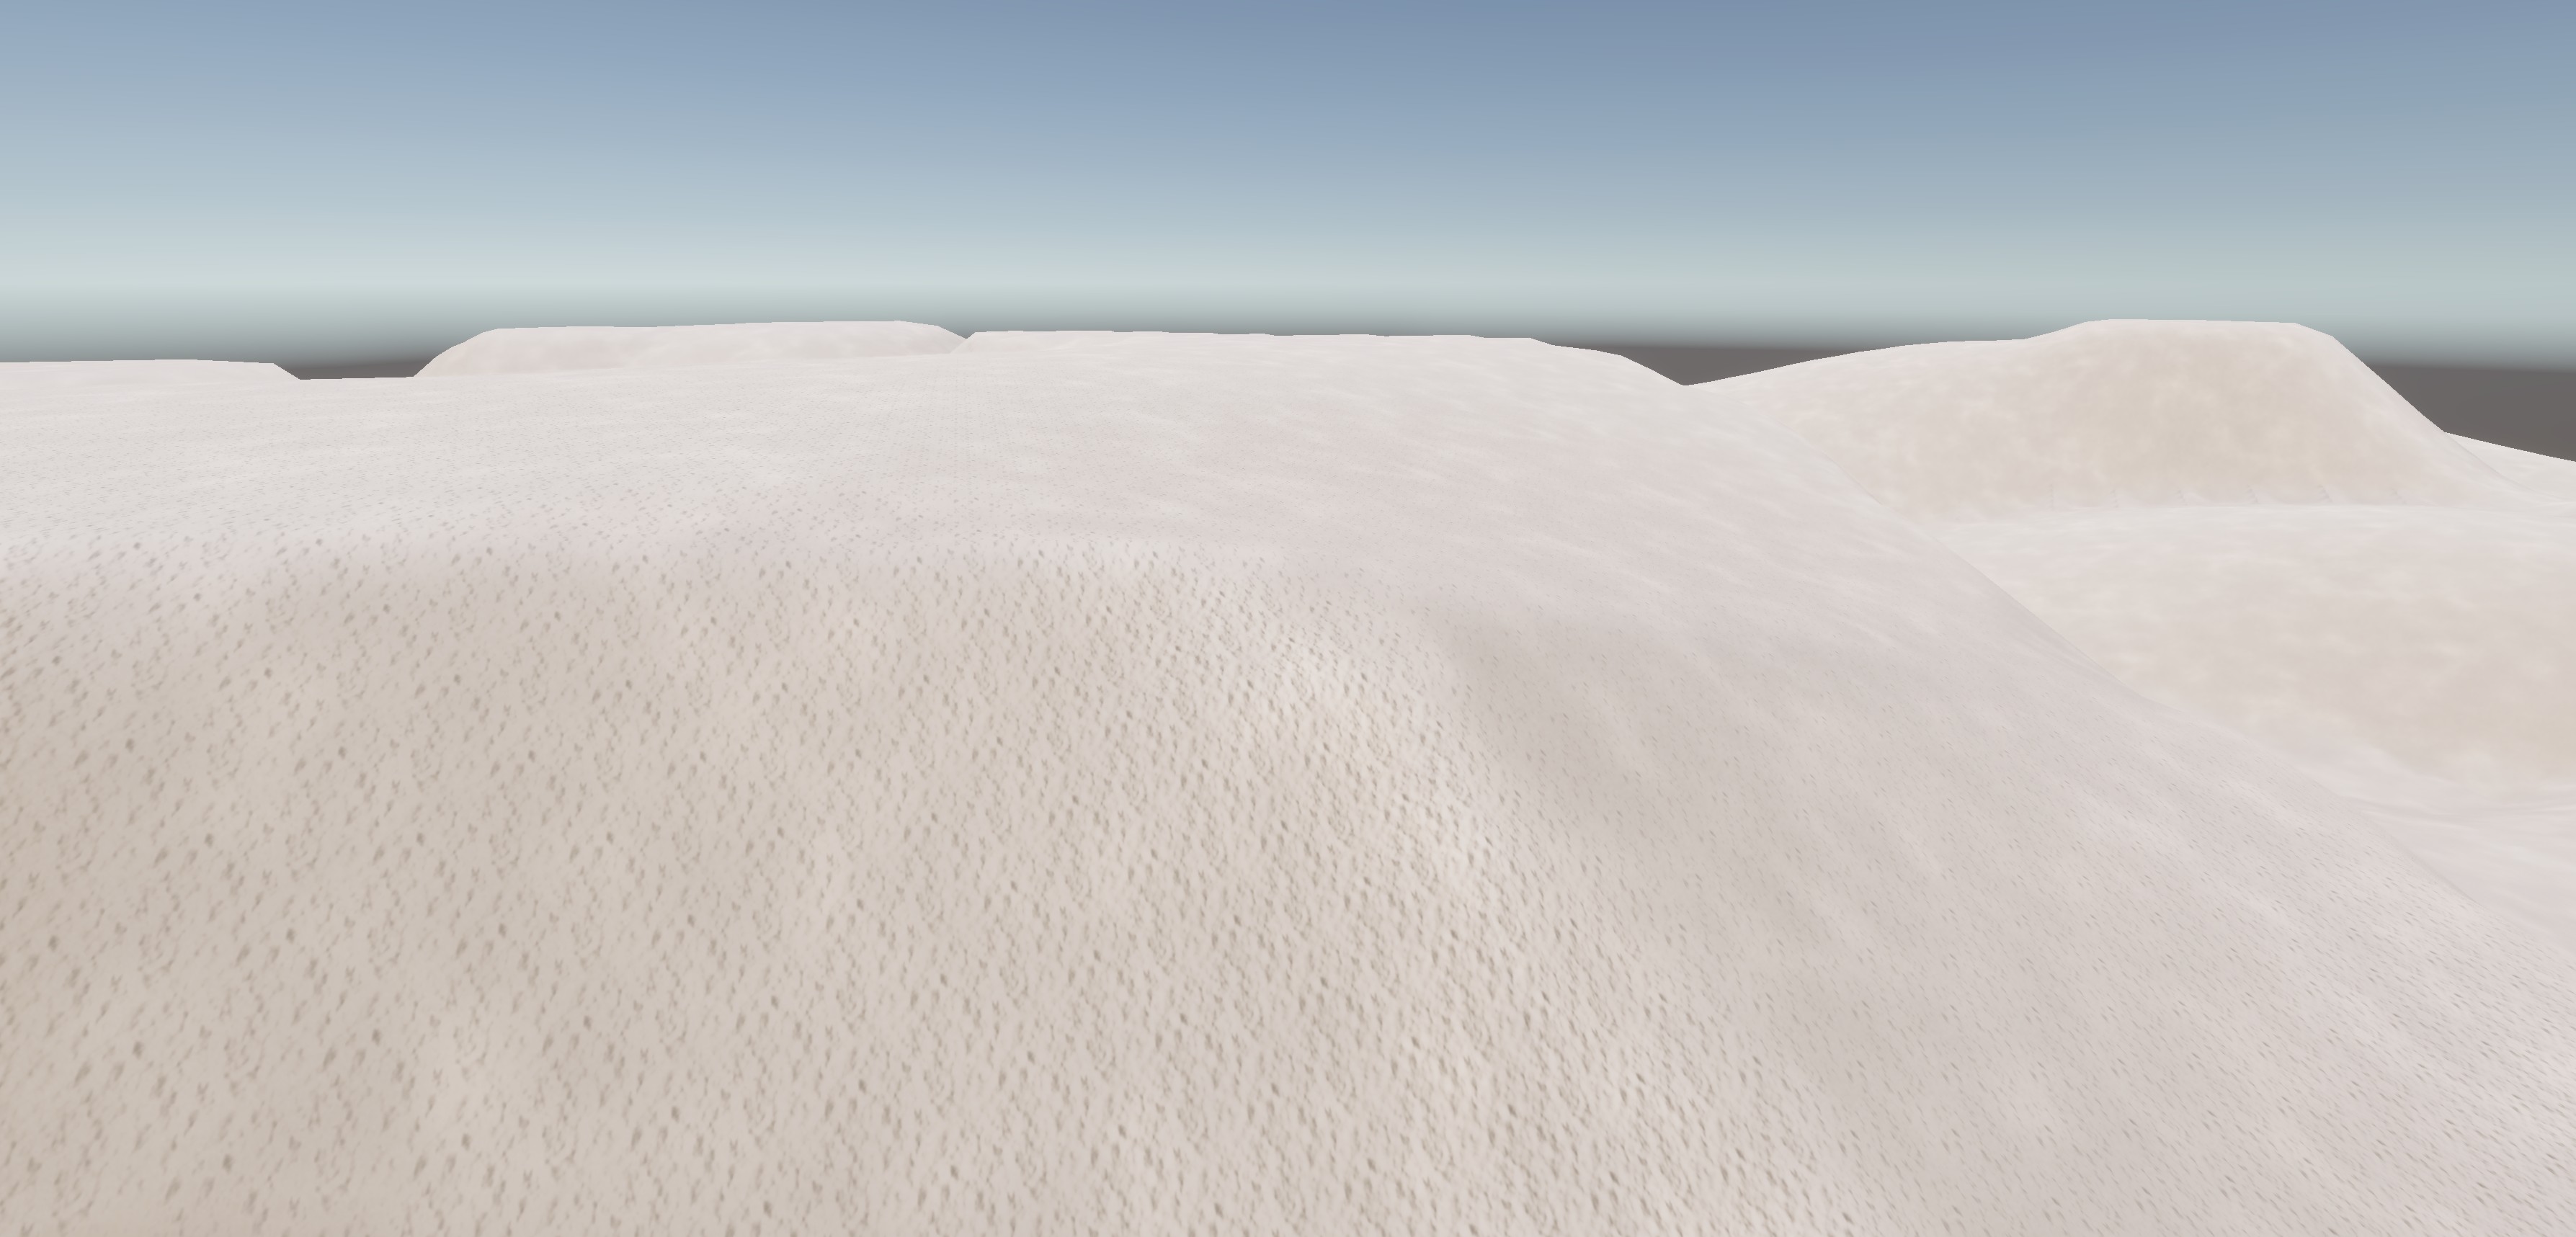
As you can see, the result in this example - which was built from scratch for this posting - looks a little different than the example from above from the actual game. This shows how the noise textures or scaling parameters affect the output, and it's worth experimenting and tweaking parameters for the best outcome.
Sparkle
We tried adding another sparkle layer to mimic the bright individual crystals which perfectly reflect the light on a winter day. However, this would have required emission with either baked lighting or bloom post-processing. The former wasn't possible due to the dynamic nature of the snowfield, the latter wasn't desirable due to the extra performance required, so we decided not to add sparkle.
Additional notes
The beauty of this approach is that everything happens on the GPU - the textures are there, the shaders are there, and there's no back and forth between GPU and CPU. Even the polling of the heighmap for collision map updates happens asynchronously (using AsyncGPUReadback.Request) and doesn't really block anything. Perfect for mobile devices like the Quest!
This is obviously just a starting point for simple snow mechanics. While working on this, we experimented with many other things and fleshed out the core shoveling and rendering further.
What else to do with compute shaders
Our full compute shader in Ho-Ho Hunt brings a couple of extra functions. One is a method which closer resembles the blade of a shovel, another is a blur method which runs after certain actions in order to soften hard edges in the generated mesh and create the illusion of snow drift. A third method is to query the heightmap asynchronously in order to build a collision mesh out of it, but only whenever the snow actually changes.
Velocity based snow deposition
We also added snow deposit and particle system based snow spray depending on the shovel direction.
Clicking play will embed the YouTube player and may set third-party cookies and collect data from YouTube.
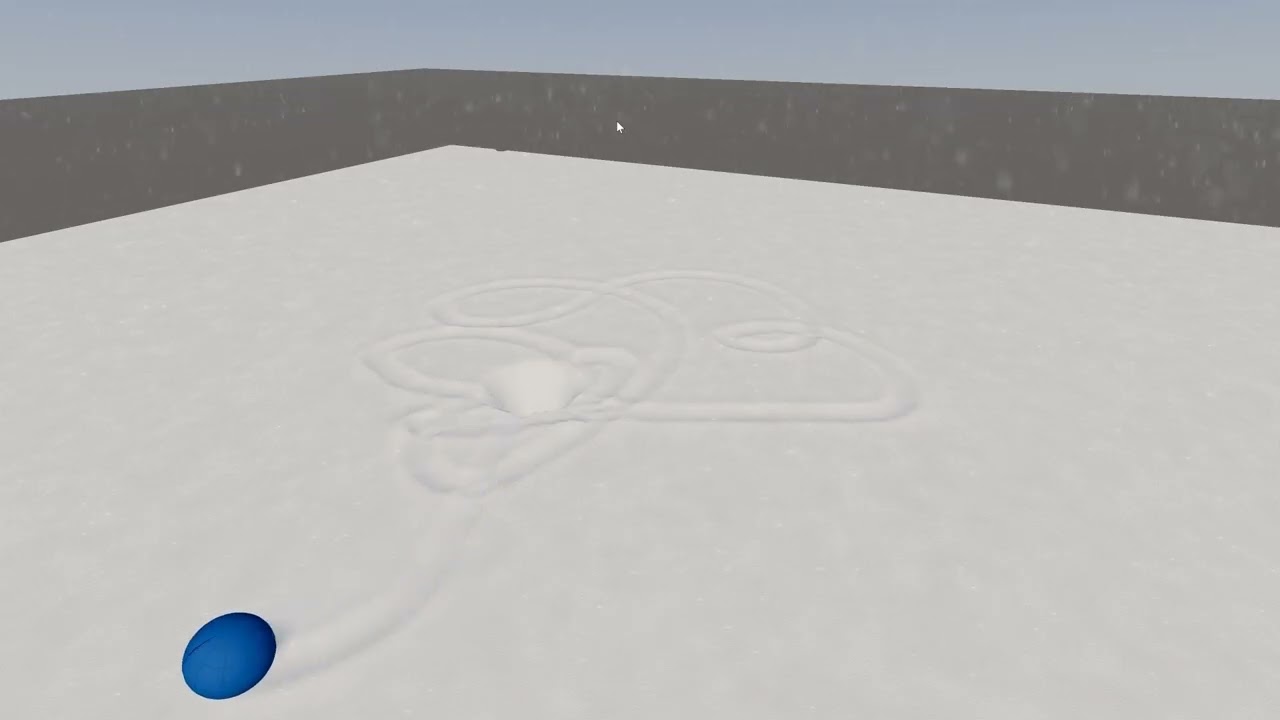
Snowball mechanic
This was a fun little diversion. Using the compute shader brush, we carved the path of a moving sphere into the snow. As you can imagine, it would be easy to let the sphere grow continuously as it moves through the snow, slowly turning into a part of a snowman.
Clicking play will embed the YouTube player and may set third-party cookies and collect data from YouTube.
Optimization
We've created the render target using standard parameters, even though we're using only one channel - we're only querying the R value. You can save some bandwidth by changing the type accordingly, or add additional information if needed. In our implementation, we also integrated a compaction map to make snow feel harder if compressed, but disabled it to ease gameplay.
When working with noise, it's tempting to use the function nodes in Shader Graph instead of texture lookups. While these may be sufficient for initial prototyping, they are typically more expensive and should be replaced. Plus, switching out a texture gives more creative control to designers and is usually easier than rewiring a graph.
Precision is another thing to consider. By default, a Shader Graph is created with "Single" precision. To save some bandwidth, we changed it to "Half" precision and forced "Single" precision only on a specific subgraph.
Conclusion
This ends our little behind the scenes look into how we built Ho-Ho Hunt. If you would like to license Ho-Ho Hunt or one of our other experiences for your business, or if you would like to discuss your own ideas, do not hesitate to reach out!