
In this post, we look at building a slingshot in Unreal Engine, as an alternative to typical gun mechanics to shoot a projectile. A slingshot is a 2-handed tool, one hand to hold and aim it, and the other hand to grab and pull back the projectile to determine the final aim and launch speed, and releasing the projectile to launch it.
Tech Stack
For this exploration, we're using the following tech stack:
Slingshot breakdown
We break down the slingshot implementation in the following parts:
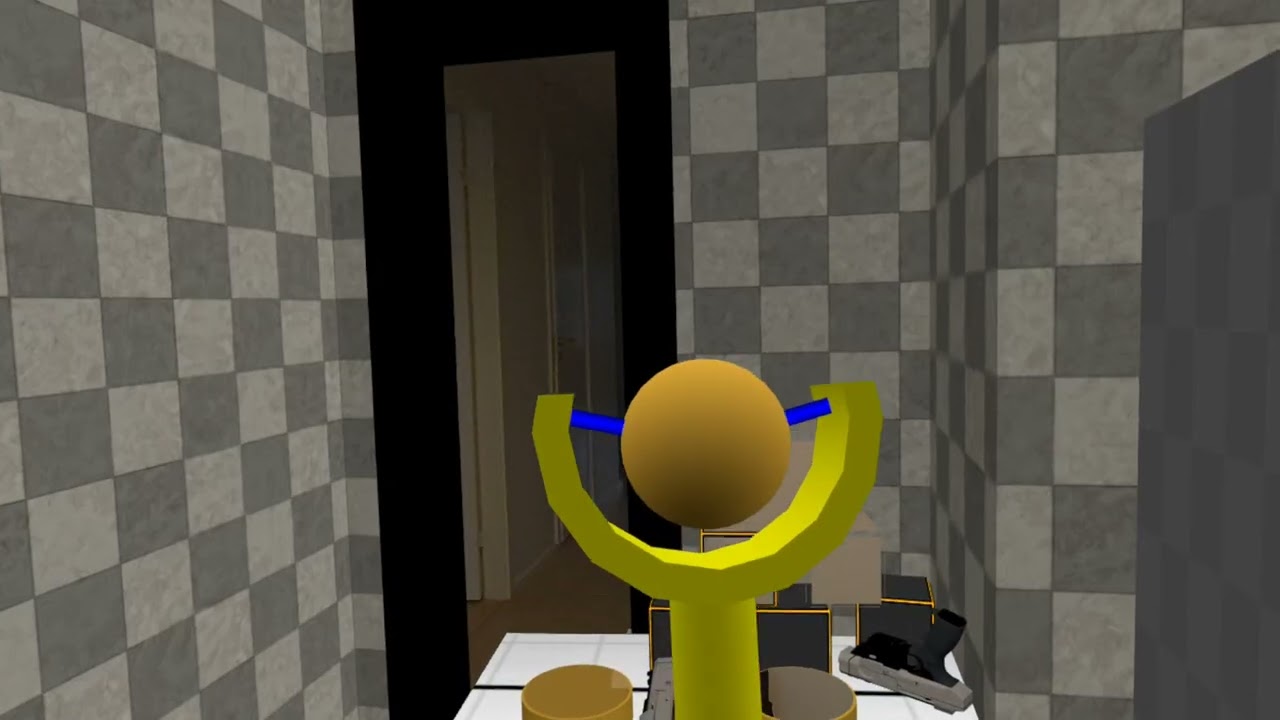
- Slingshot mesh - a Y-shaped mesh that can be grabbed
- Projectile mesh - a sphere mesh that can be grabbed when the Slingshot is being held by the other hand
- Actor Blueprint - combines the various components and adds logic e.g. to launch a projectile
- Projectile grab/release handling - the logic to move the projectile when grabbed, and launch a projectile when released
- Sling Niagara system - displays the dynamic sling between the Slingshot mesh and the projectile before the projectile is launched
- Aim Niagara system - displays a laser beam in the direction where the projectile will be launched to help aiming
- Physics Constraint - simulates the projectile hanging in the sling to give it a bit more dynamic while moving around
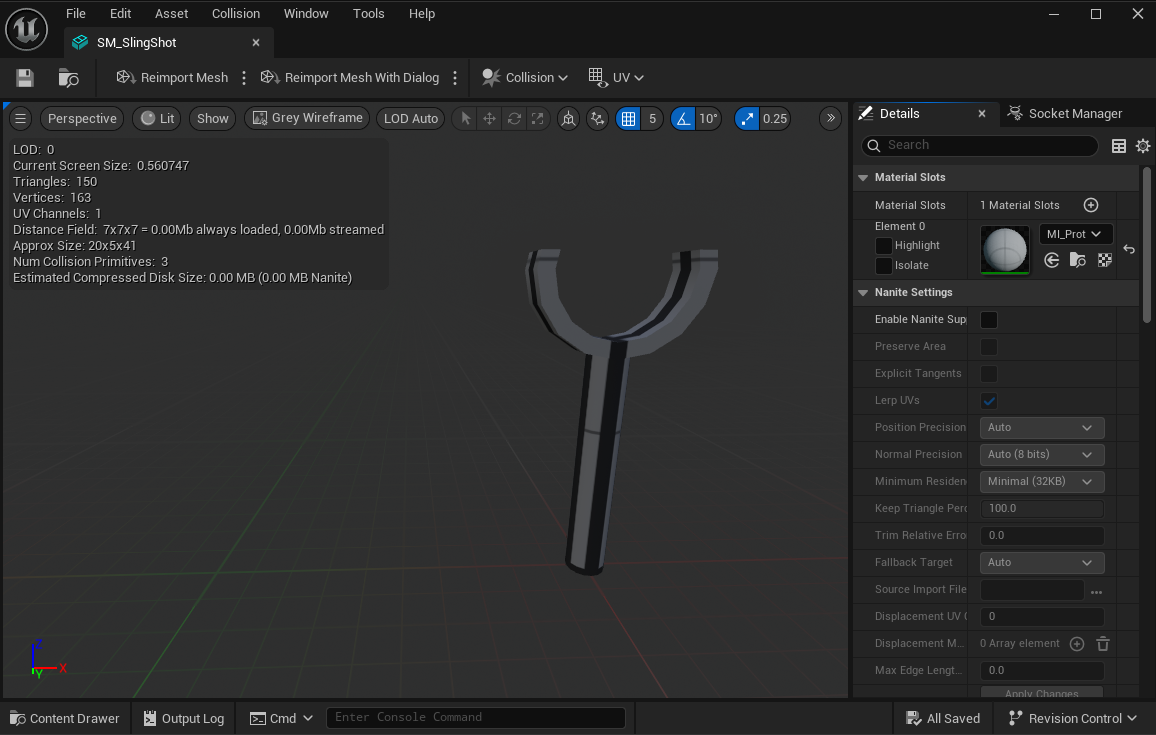
Slingshot Mesh
Any Y-shaped mesh can be used to represent the slingshot. If no such mesh is available, we can easily create it with Unreal Engines Modeling Mode using the following steps:
- Create a thin cylinder for the I-part
- Create a larger cylinder and subtract a smaller circle from its center to create an O-shape
- Plane-cut the O-shape to create a U-shape
- Place the U-shape on top of the I-shape, and merge them to create the final Y-shape
- Move the pivot to center-min-Z so it's at the bottom
In the Static Mesh Editor, we can add some Sockets to mark the position and orientation of significant points we'll use later in the Blueprint:
Grip- this is where the hand will snap to when grabbing the slingshot, so that it is always held in the same position/orientationAim- this is where we'll place the Aim Niagara systemProjectile- this is where we'll place the Projectile when it is not held by the other handSlingLeft- this is where we'll attach the Sling Niagara system on the left sideSlingRight- this is where we'll attach the Sling Niagara system on the right side
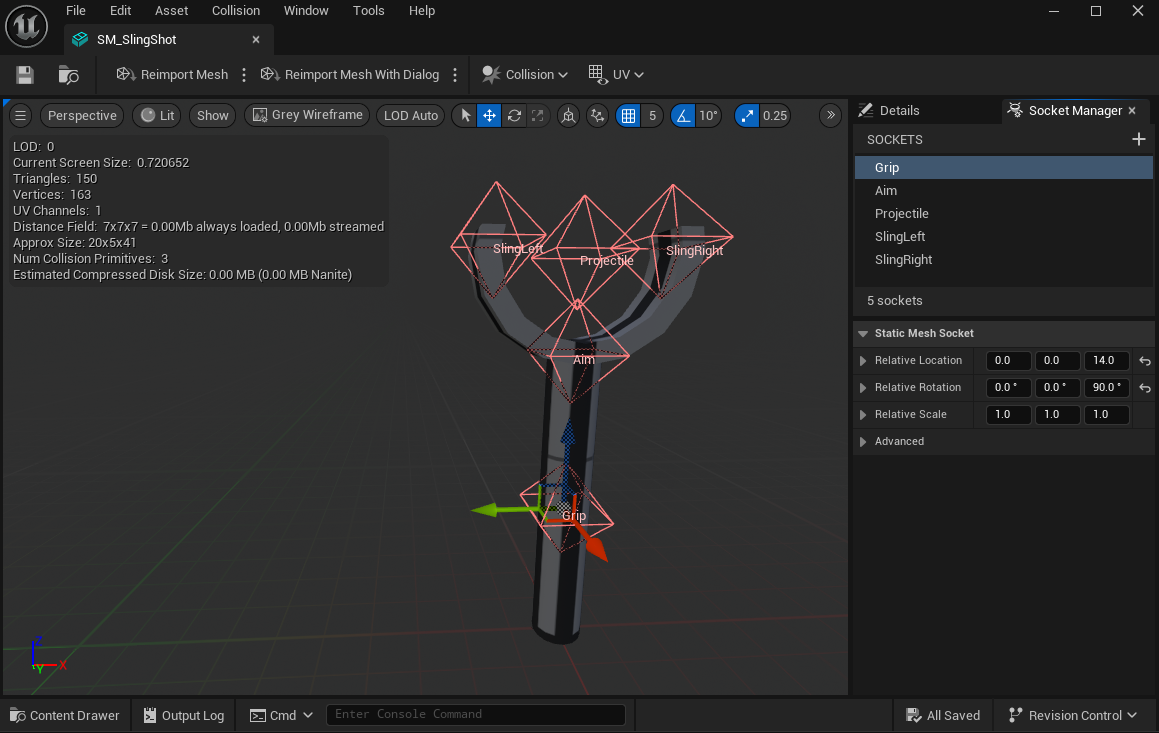
Using sockets makes it easier to later use different slingshot meshes with the same Blueprint.
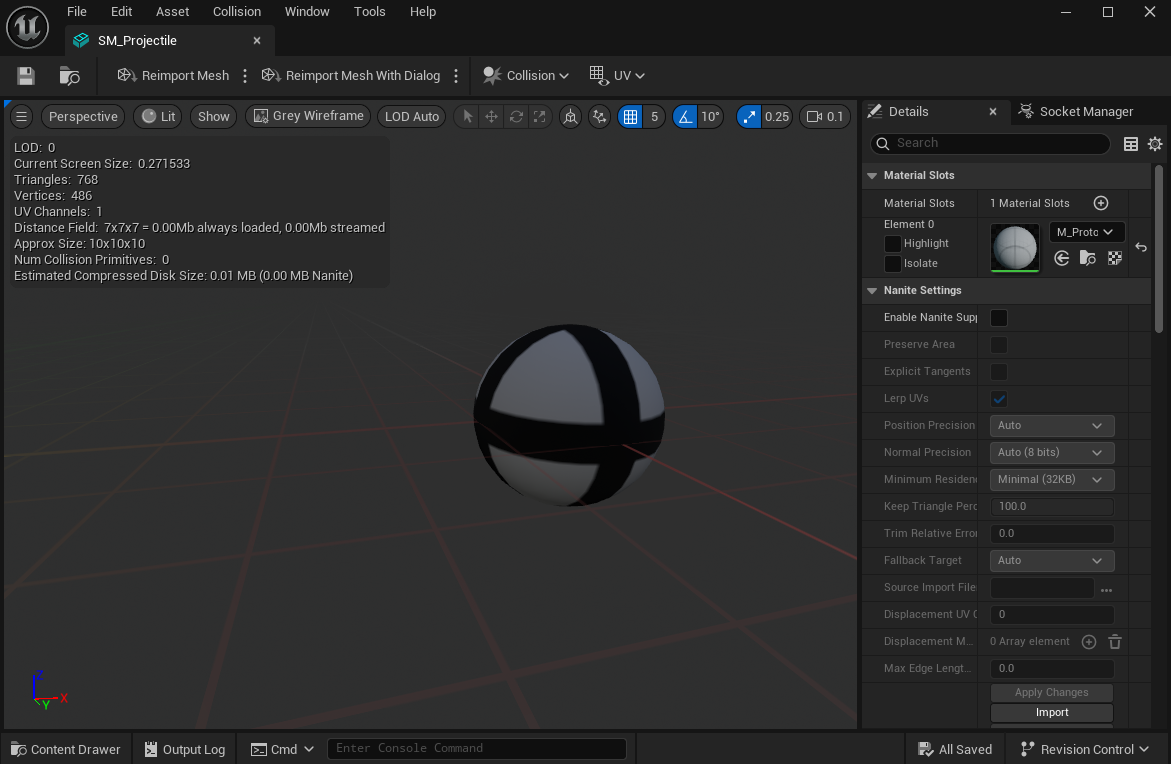
Projectile Mesh
For the Projectile mesh we use a simple Sphere with the pivot in the center.
Actor Blueprint
We create a new Blueprint with GrippableStaticMeshActor from the VR Expansion Plugin as the parent-class, which already implements the VRGrip Interface and provides an excellent basis for our slingshot:
- We configure the actor properties
- Use the slingshot mesh as Static Mesh in the root component
Slot Default Grip Typeis set toAttachment Gripso that the slingshot is attached to the hand while being grippedGameplay Tagsare set toDropType.OnPrimaryGripReleaseandGrabType.OnPrimaryGripto allow grip/drop with default controls- Enable
Simulate Physicsso the slingshot does not float in the air while not being held - Collision presets are set to
PhysicsActor

Blueprint using the slingshot mesh - We add a
Hand Socket BasecomponentPrimaryGripfor the primary grip location/orientation, and adjust the hand-pose so that it properly wraps the slingshot- Enable
Flip For Off Handso that a left hand grap uses the mirrored pose - Enable
Use Custom Pose Deltasso that the hand pose we've configured is actually used
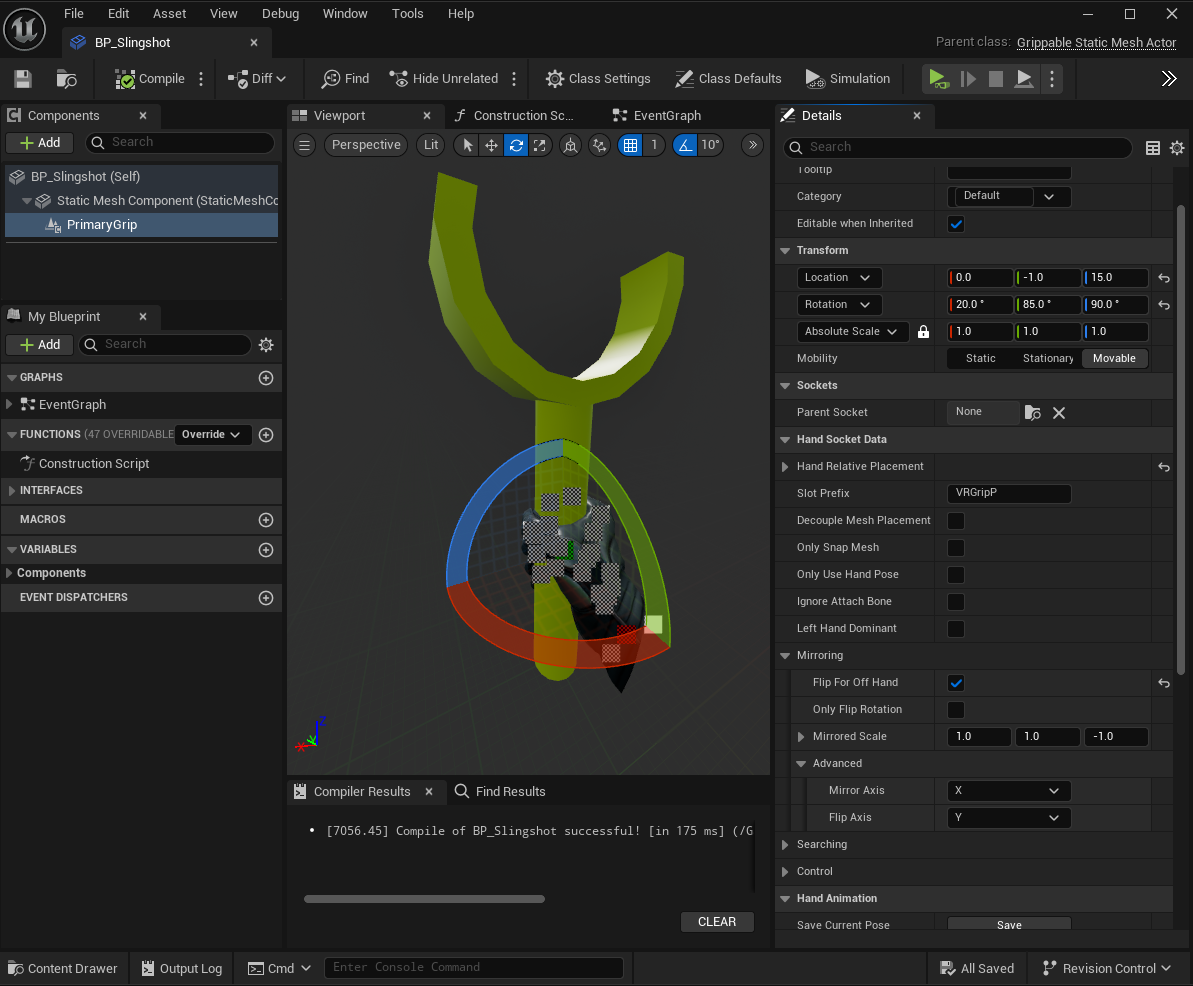
PrimaryGrip component with hand pose - Enable
- We add a
ScenecomponentProjectileOriginand attach it to theProjectilesocket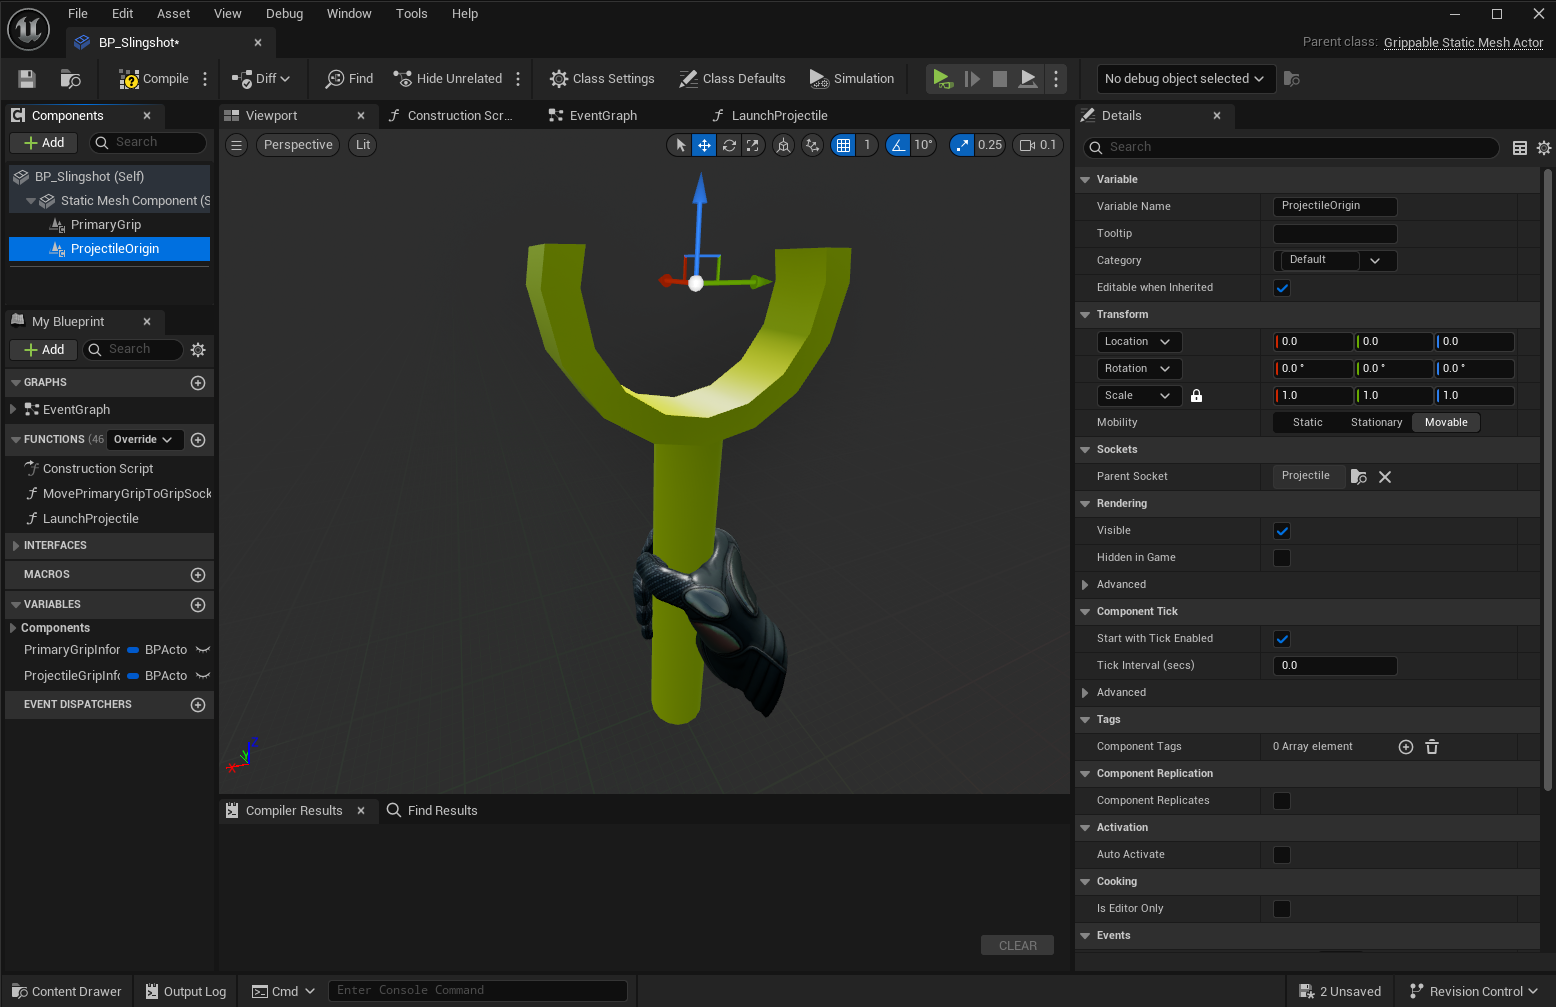
Projectile origin component - We add a
GrippableStaticMeshComponentProjectileand attach it to theProjectileOrigin, and configure it properly:Slot Default Grip TypeandFree Default Grip Typeare set toCustom Gripas we will have customized behavior while the projectile is heldGameplay Tagsare set toDropTypeandGrabTypeso disable grab/drop by default (we will only enable it when the Slingshot itself is held)
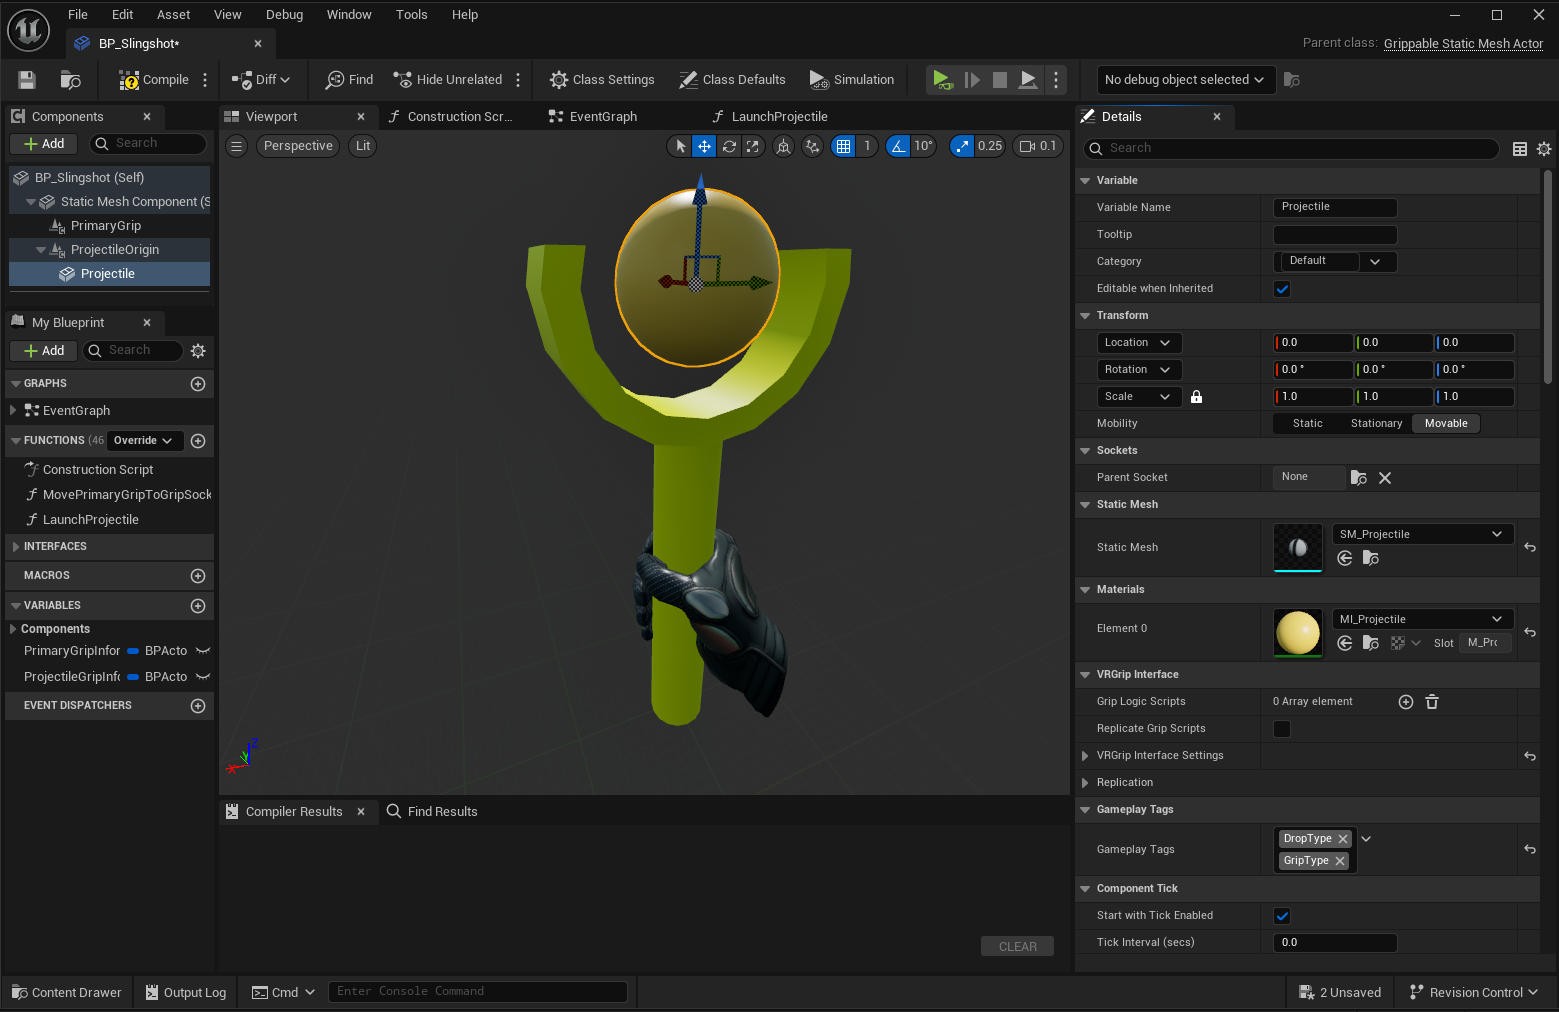
Projectile component - We add a
Hand Socket BasecomponentProjectileGripfor the projectile grip location/orientation, and adjust the hand-pose so that it properly wraps the projectile- Enable
Flip For Off Handso that a left hand grap uses the mirrored pose - Set
Mirror AxistoYso the hand pose is correct when using left hand to grab the projectile - Enable
Use Custom Pose Deltasso that the hand pose we've configured is actually used
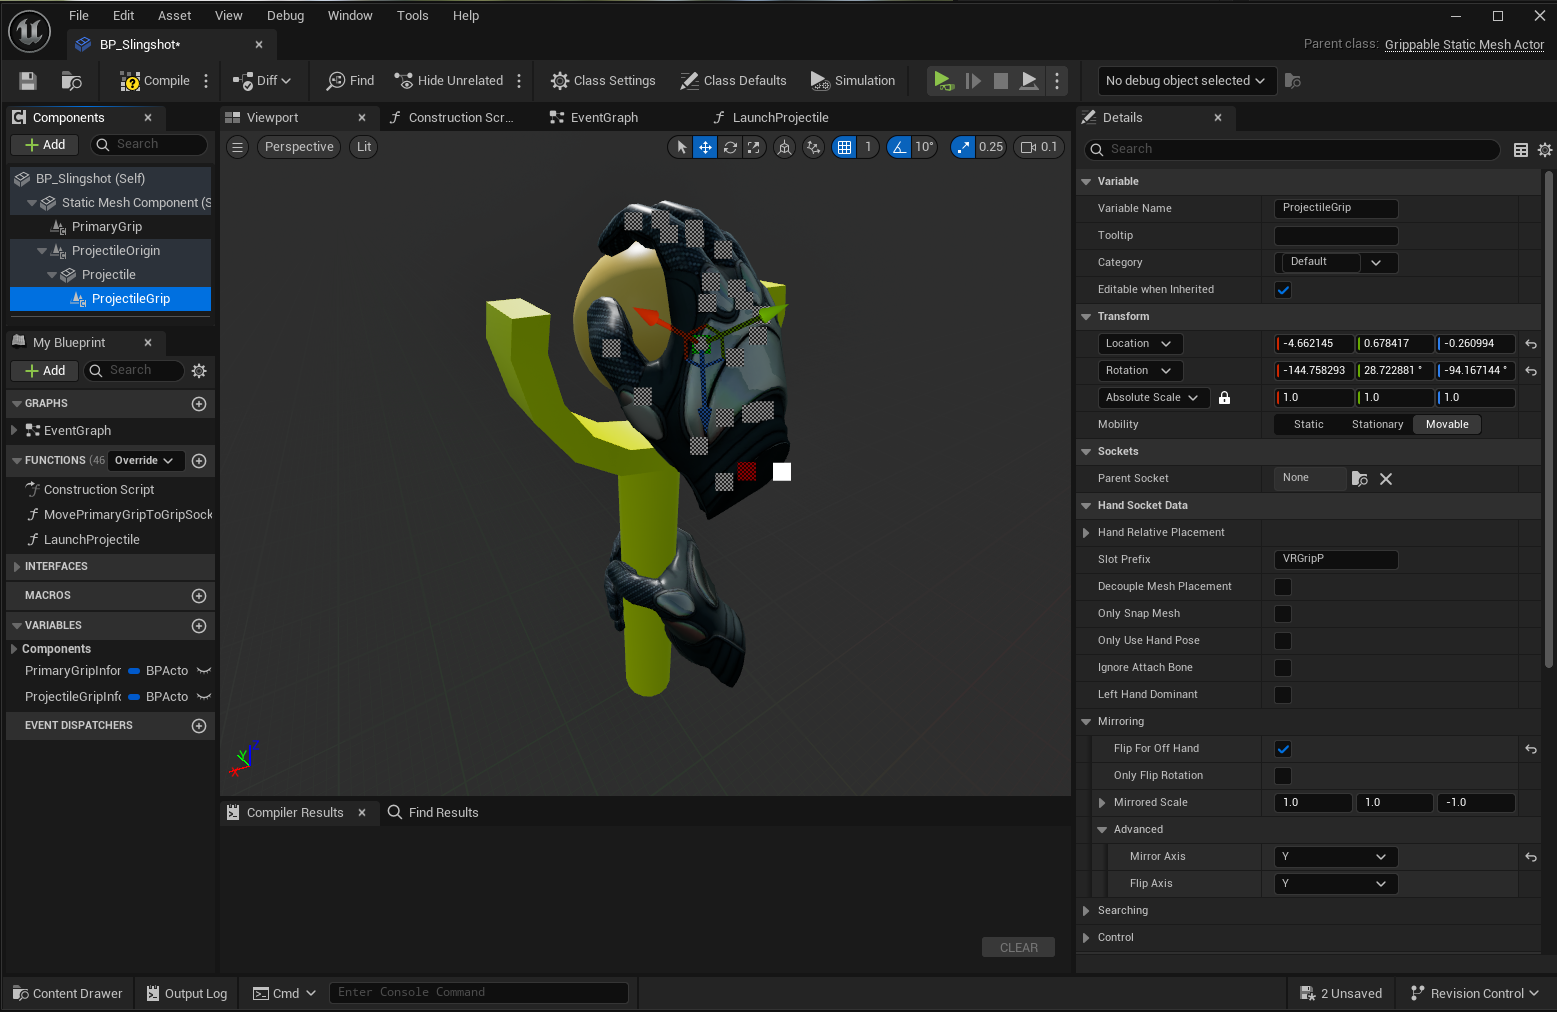
ProjectileGrip component with hand pose - Enable
Note: Normally we would attach the PrimaryGrip component to the Grip socket of the slingshot mesh, however this component does not work well with sockets. So instead, in the Begin Play event, we set its location/orientation to that of the socket.
Projectile Grab/Release Handling
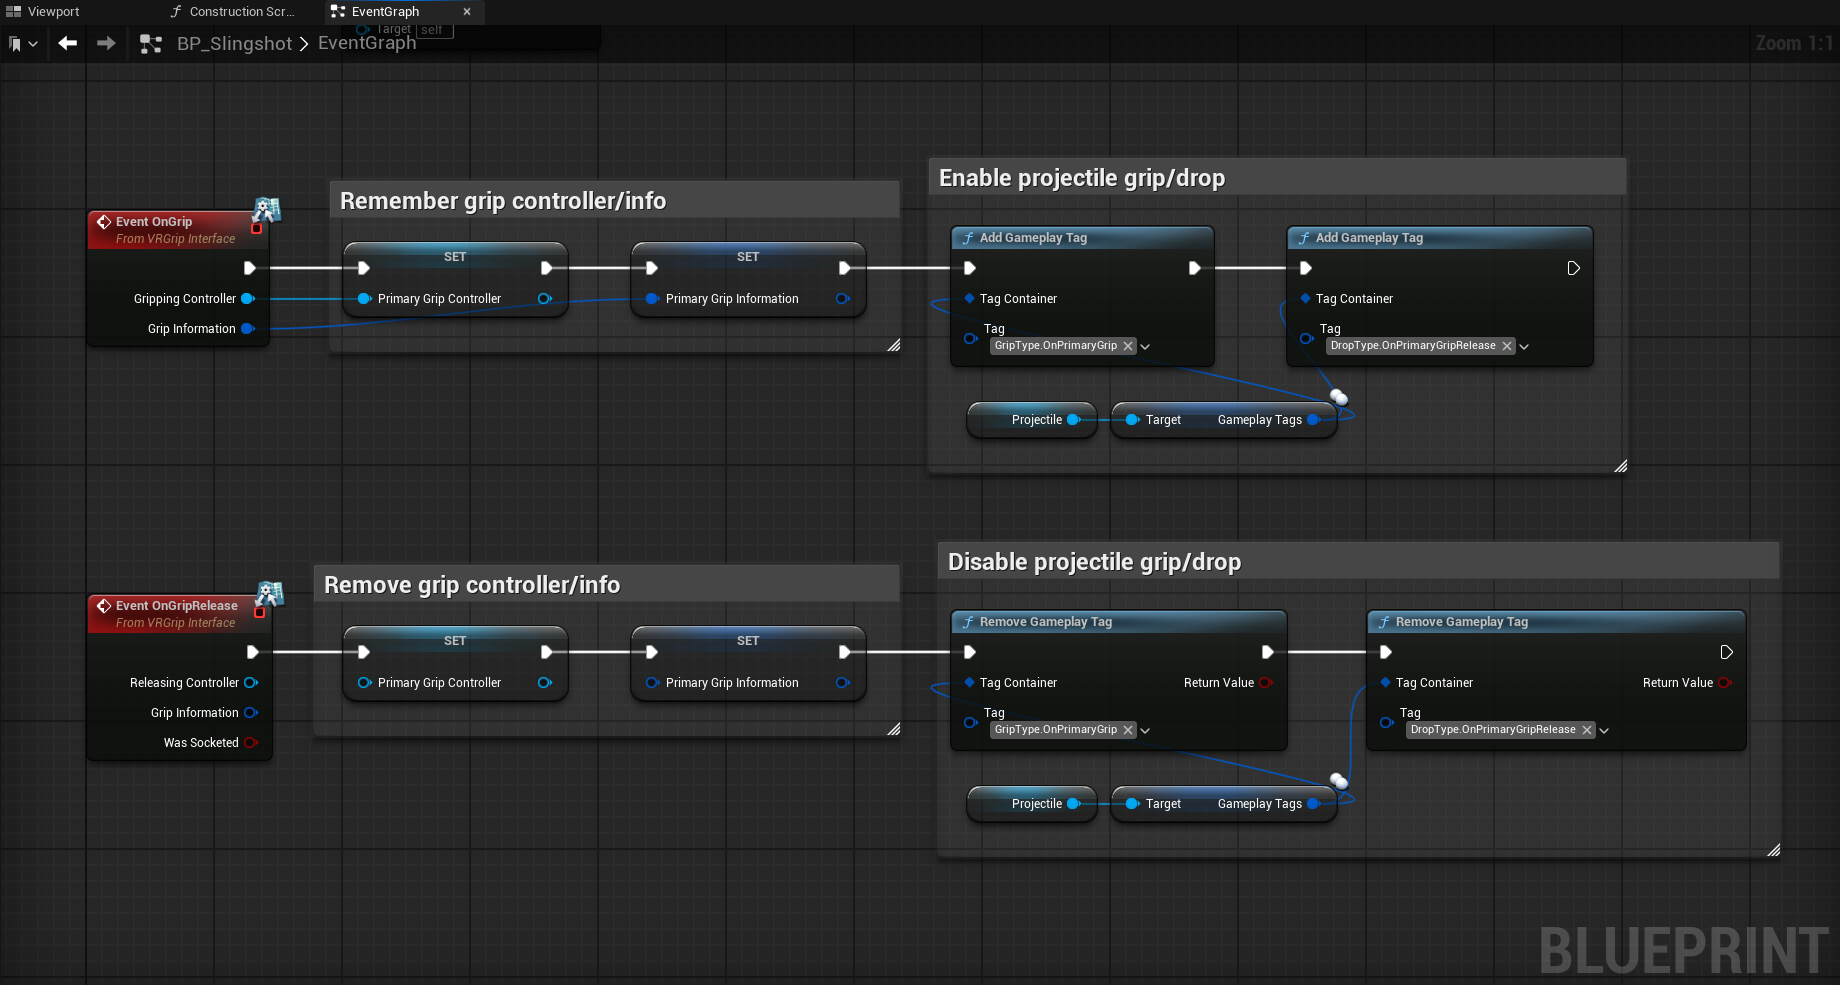
Currently we can grab the slingshot with either hand, but we cannot yet interact with the projectile, as we've set the defaults to ignore any grab/release actions.
Thus, we add some logic when the slingshot is grabbed/released to enable/disable the projectile grab, by implementing the corresponding VR Grip Interface methods on the actor:
OnGrip- enable the projectile grab/release by adding the Gameplay TagsGrabType.OnPrimaryGrip/DropType.OnPrimaryGripReleaseto the projectile componentOnGripRelease- disable the projectile grab/release by removing the Gameplay TagsGrabType.OnPrimaryGrip/DropType.OnPrimaryGripReleasefrom the projectile component
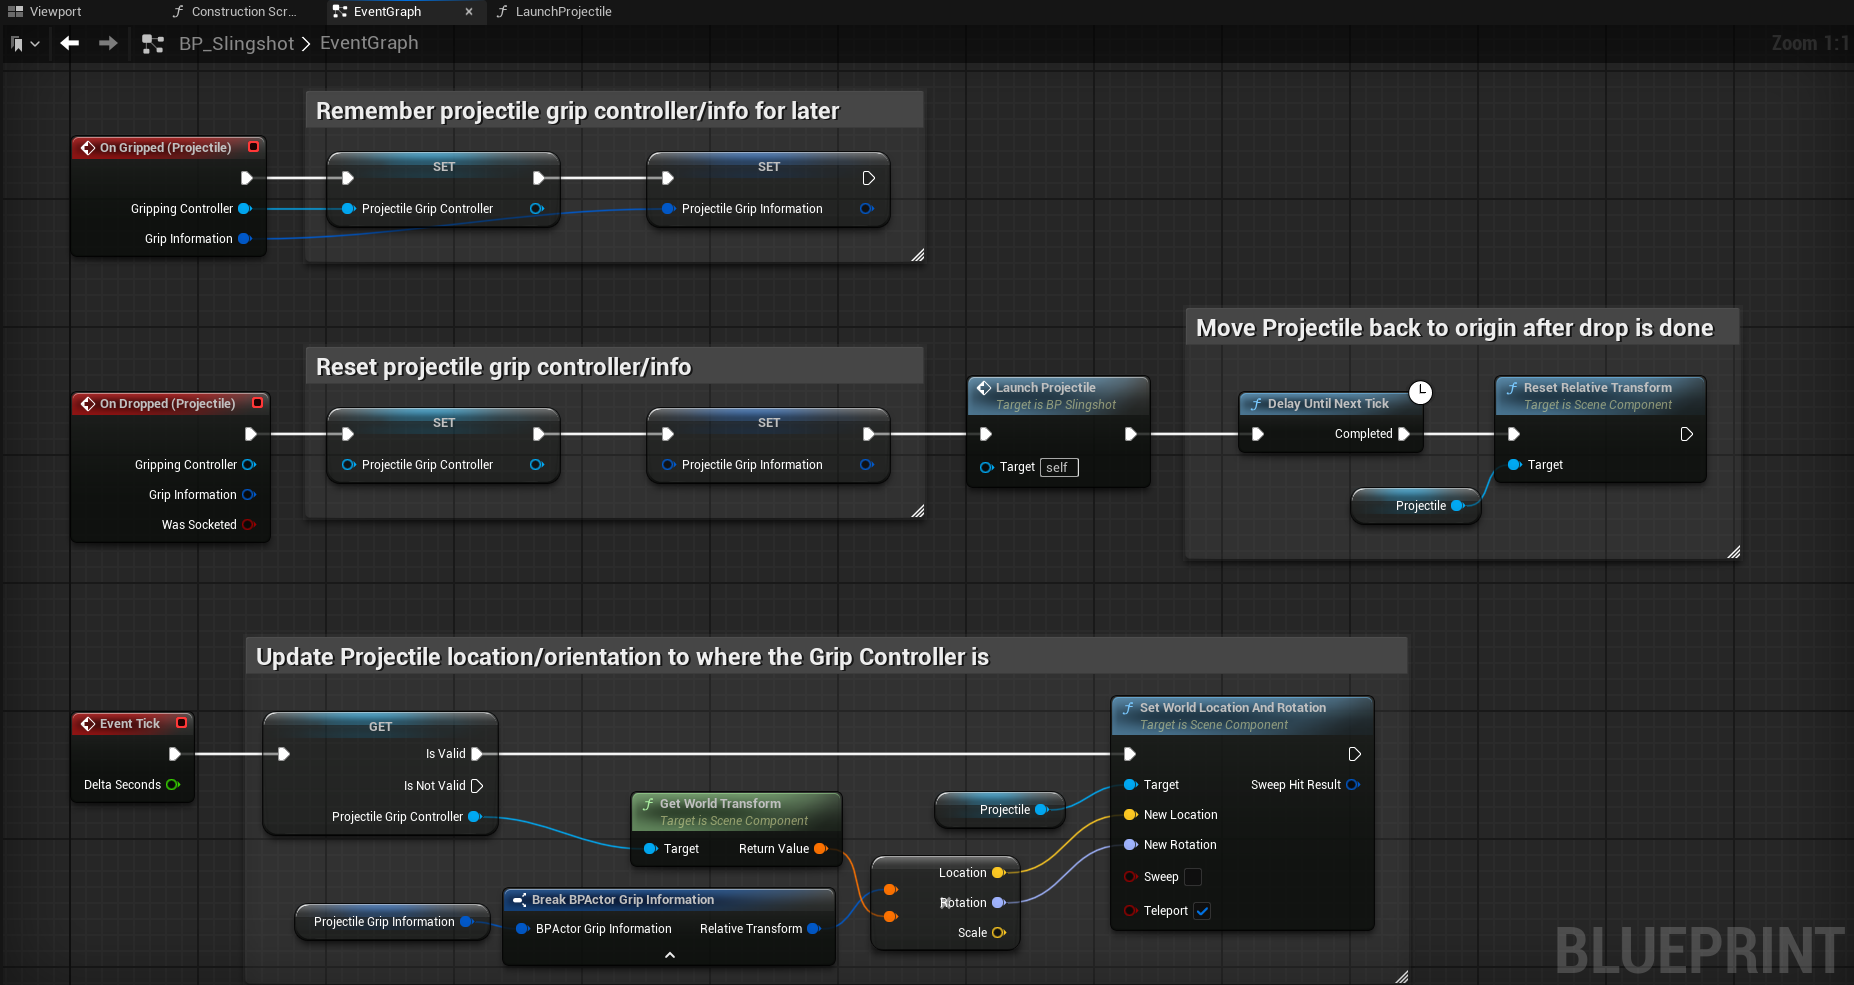
Now we need to handle when the projectile itself is grabbed by implementing the corresponding events on the Projectile component:
OnGripped- store the grip information, and start updating the projectile component location/orientation based on the hand location/orientation in the actorTickeventOnDropped- launch a projectile and return the projectile component back to its original location/orientationEvent Tick- if the projectile is being held, update its position/orientation to that of the hand that holds it
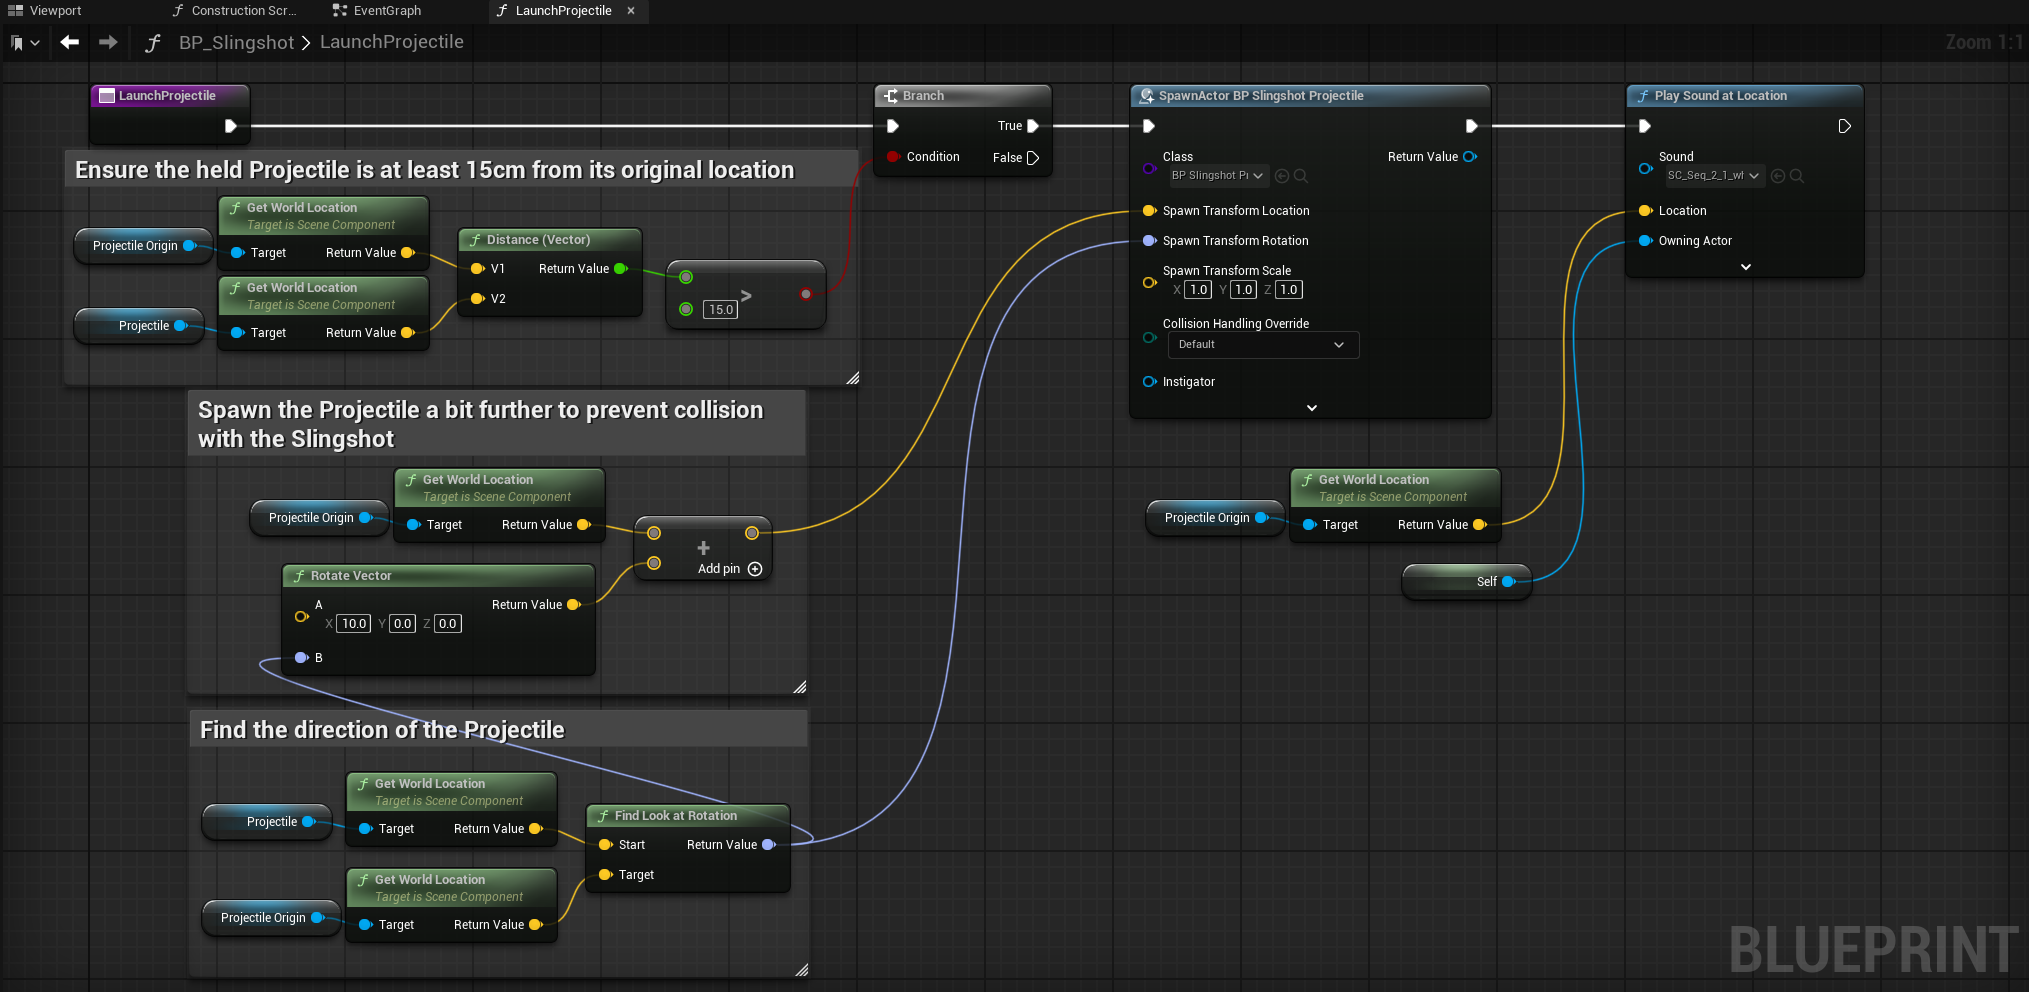
In order to launch a projectile when the projectile component is dropped, we implement our LaunchProjectile method:
- We ensure that the projectile component is in a valid range (e.g. at least 20 cm behind its original position), otherwise we don't launch a projectile, so that the projectile can be put back without being launched
- We determine the direction of the launch by finding the
Look At Rotationfrom the projectile component to where its original position currently is - We spawn a new
BP_Projectileand set its orientation according to the launch direction - We play a 'whoosh' sound to indicate a successful launch
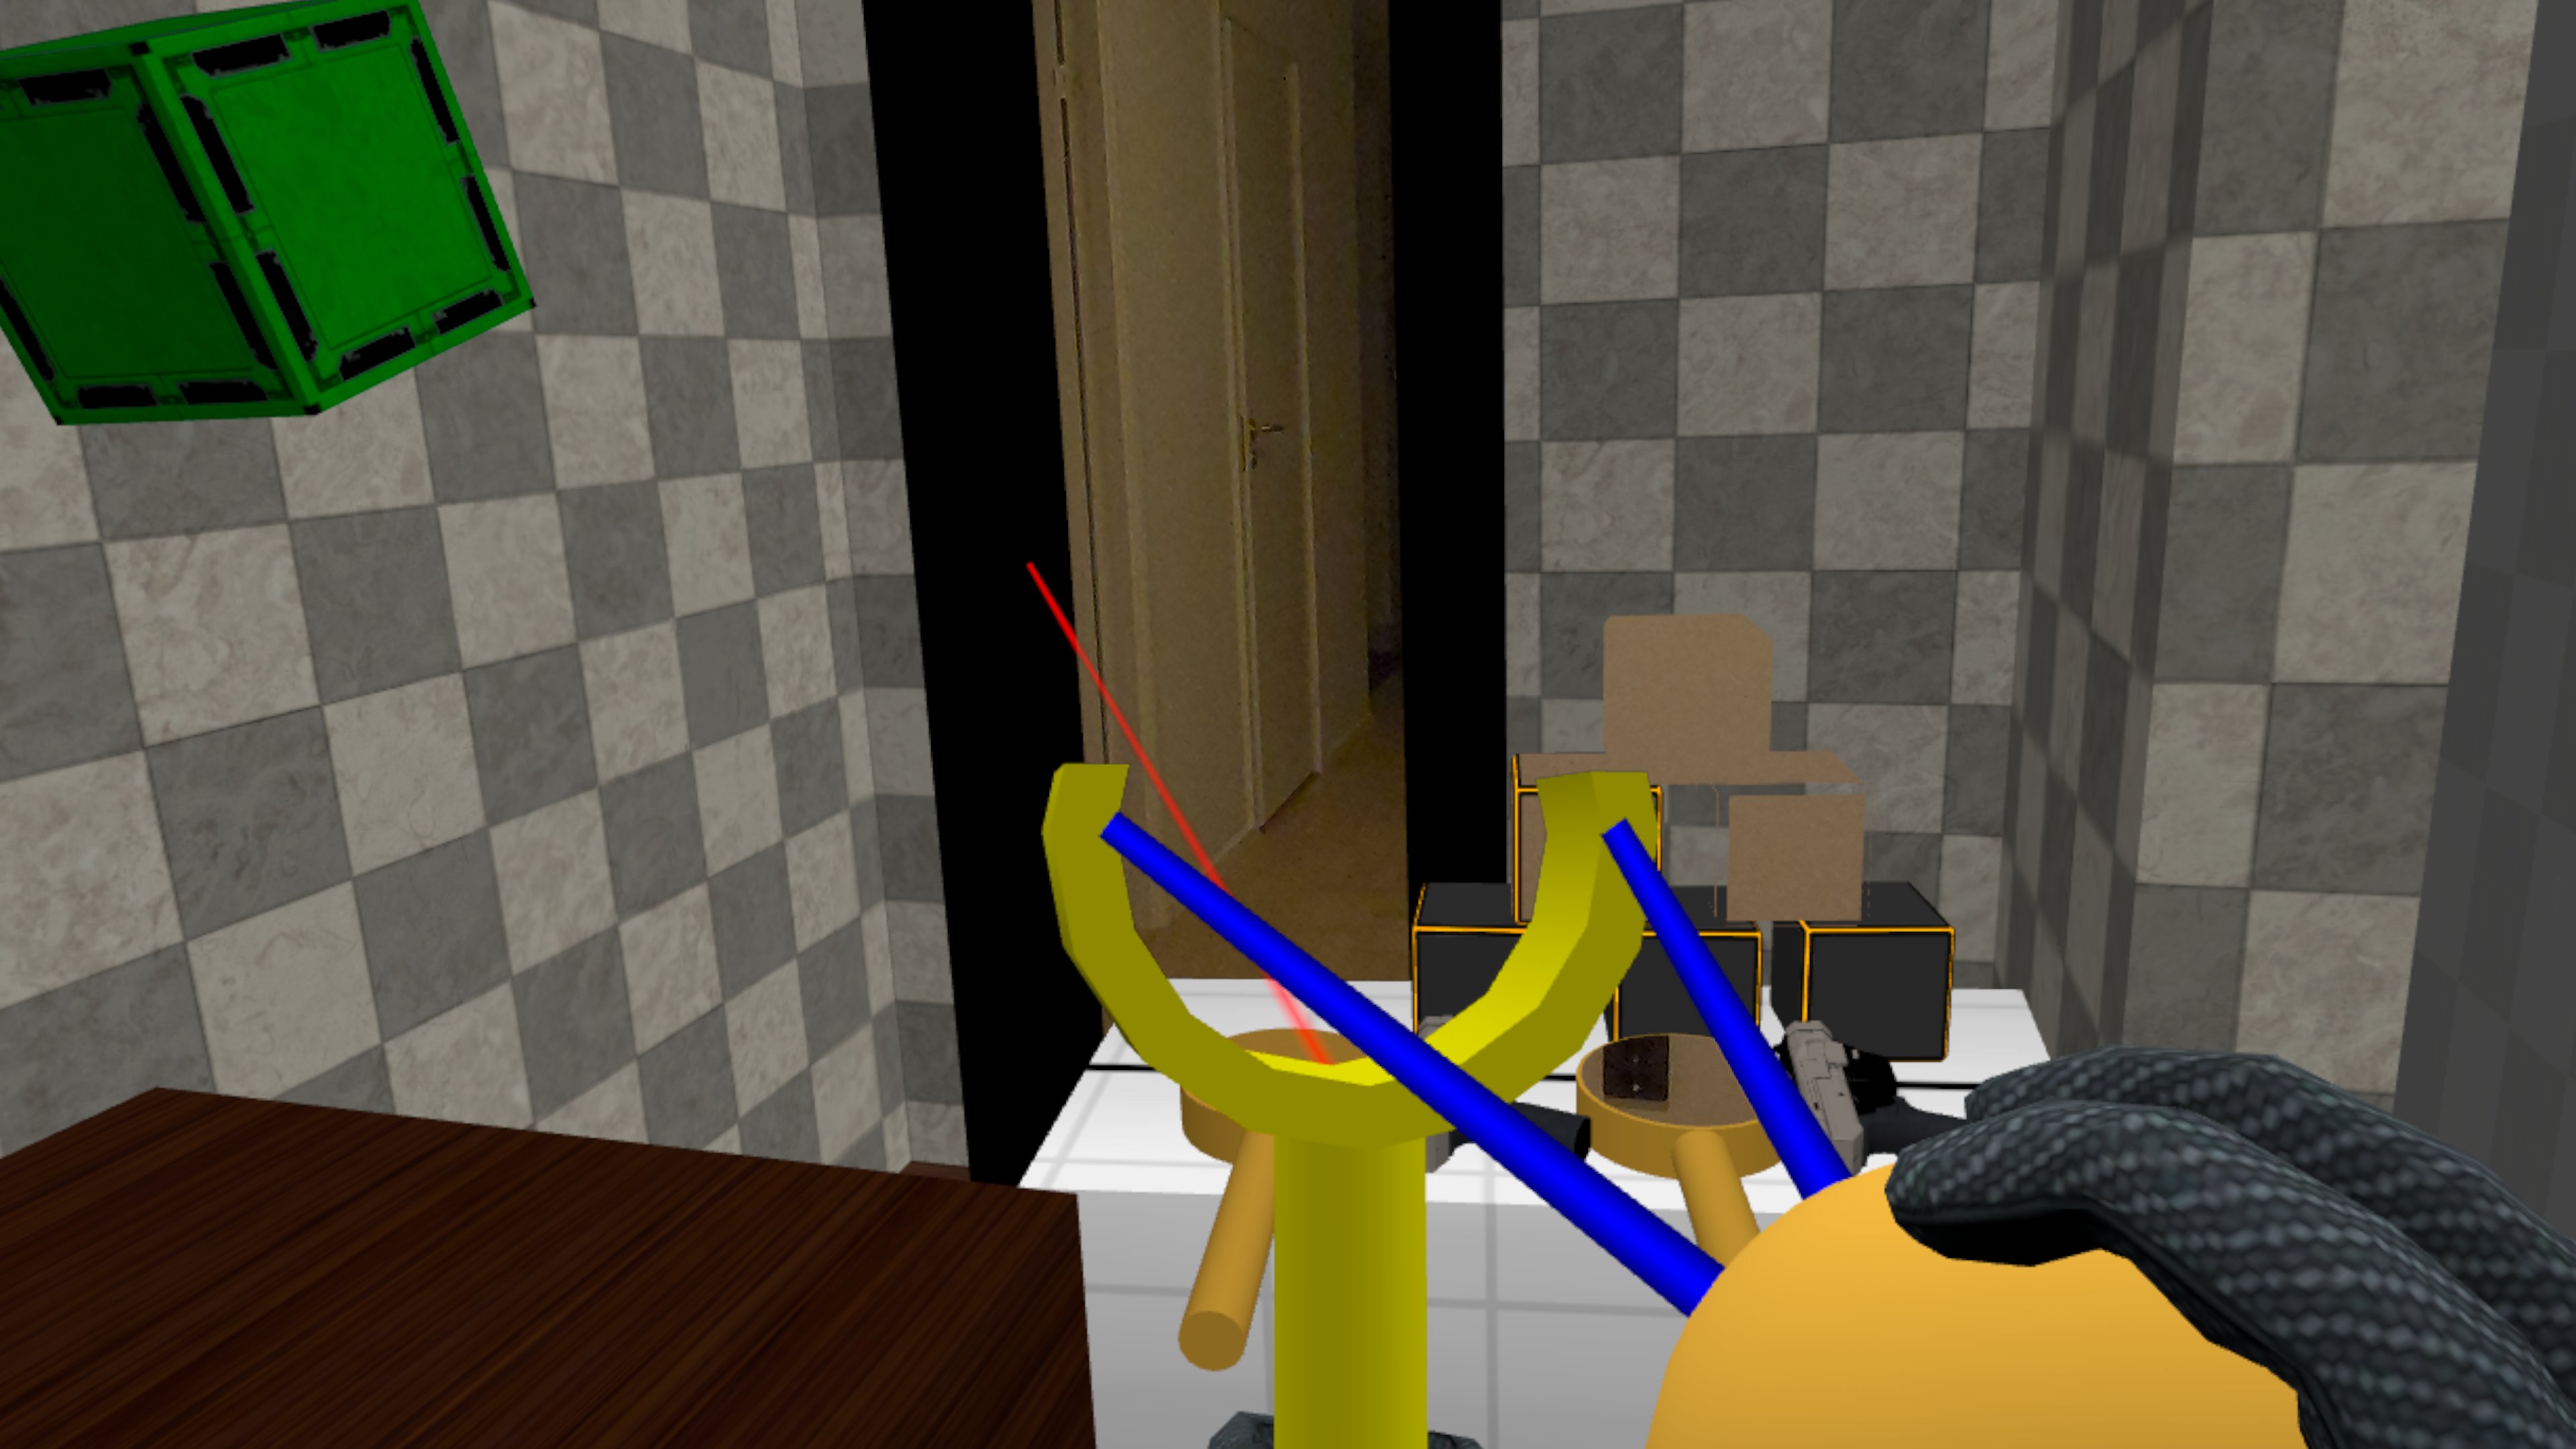
Intermediate Result 1
The video below shows we now have a functional slingshot in our Mixed Reality test map.

Clicking play will embed the YouTube player and may set third-party cookies and collect data from YouTube.
Of course, we can add a lot of improvements, some of which we'll cover in the following sections.
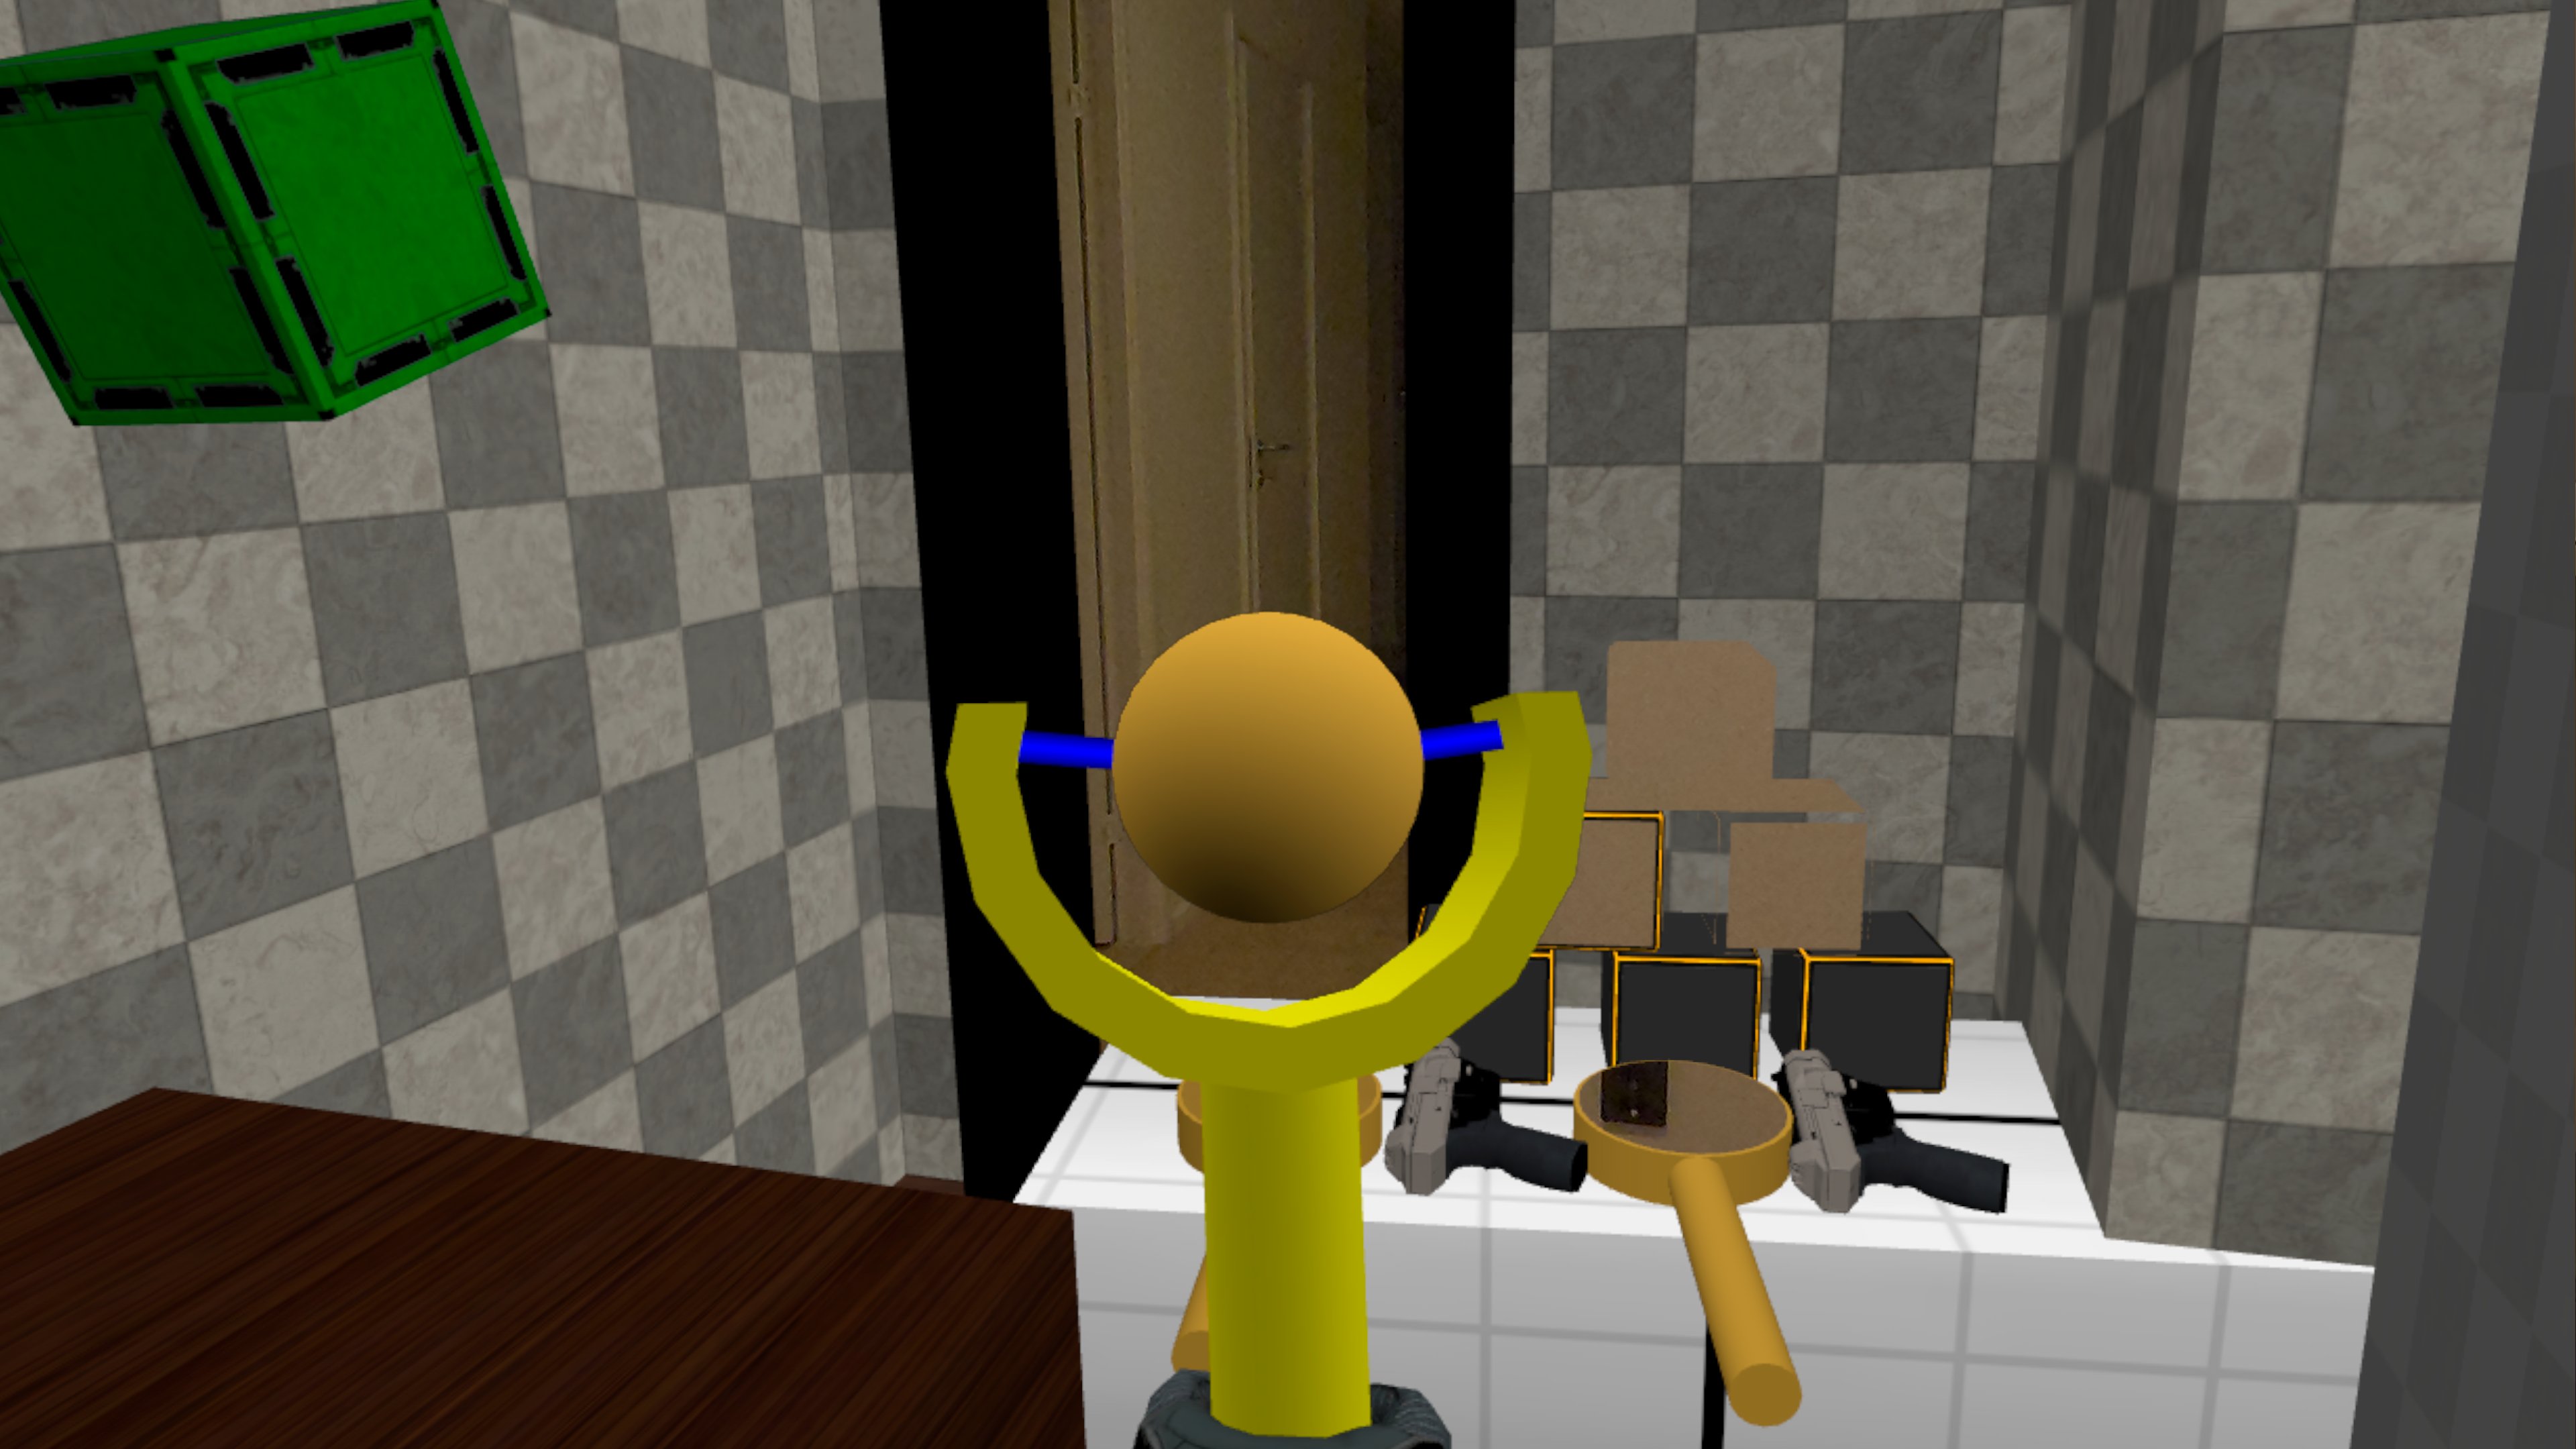
Sling Niagara System
Currently the projectile seems to be floating in the slingshot, so let's make a sling between the slingshot and the projectile.
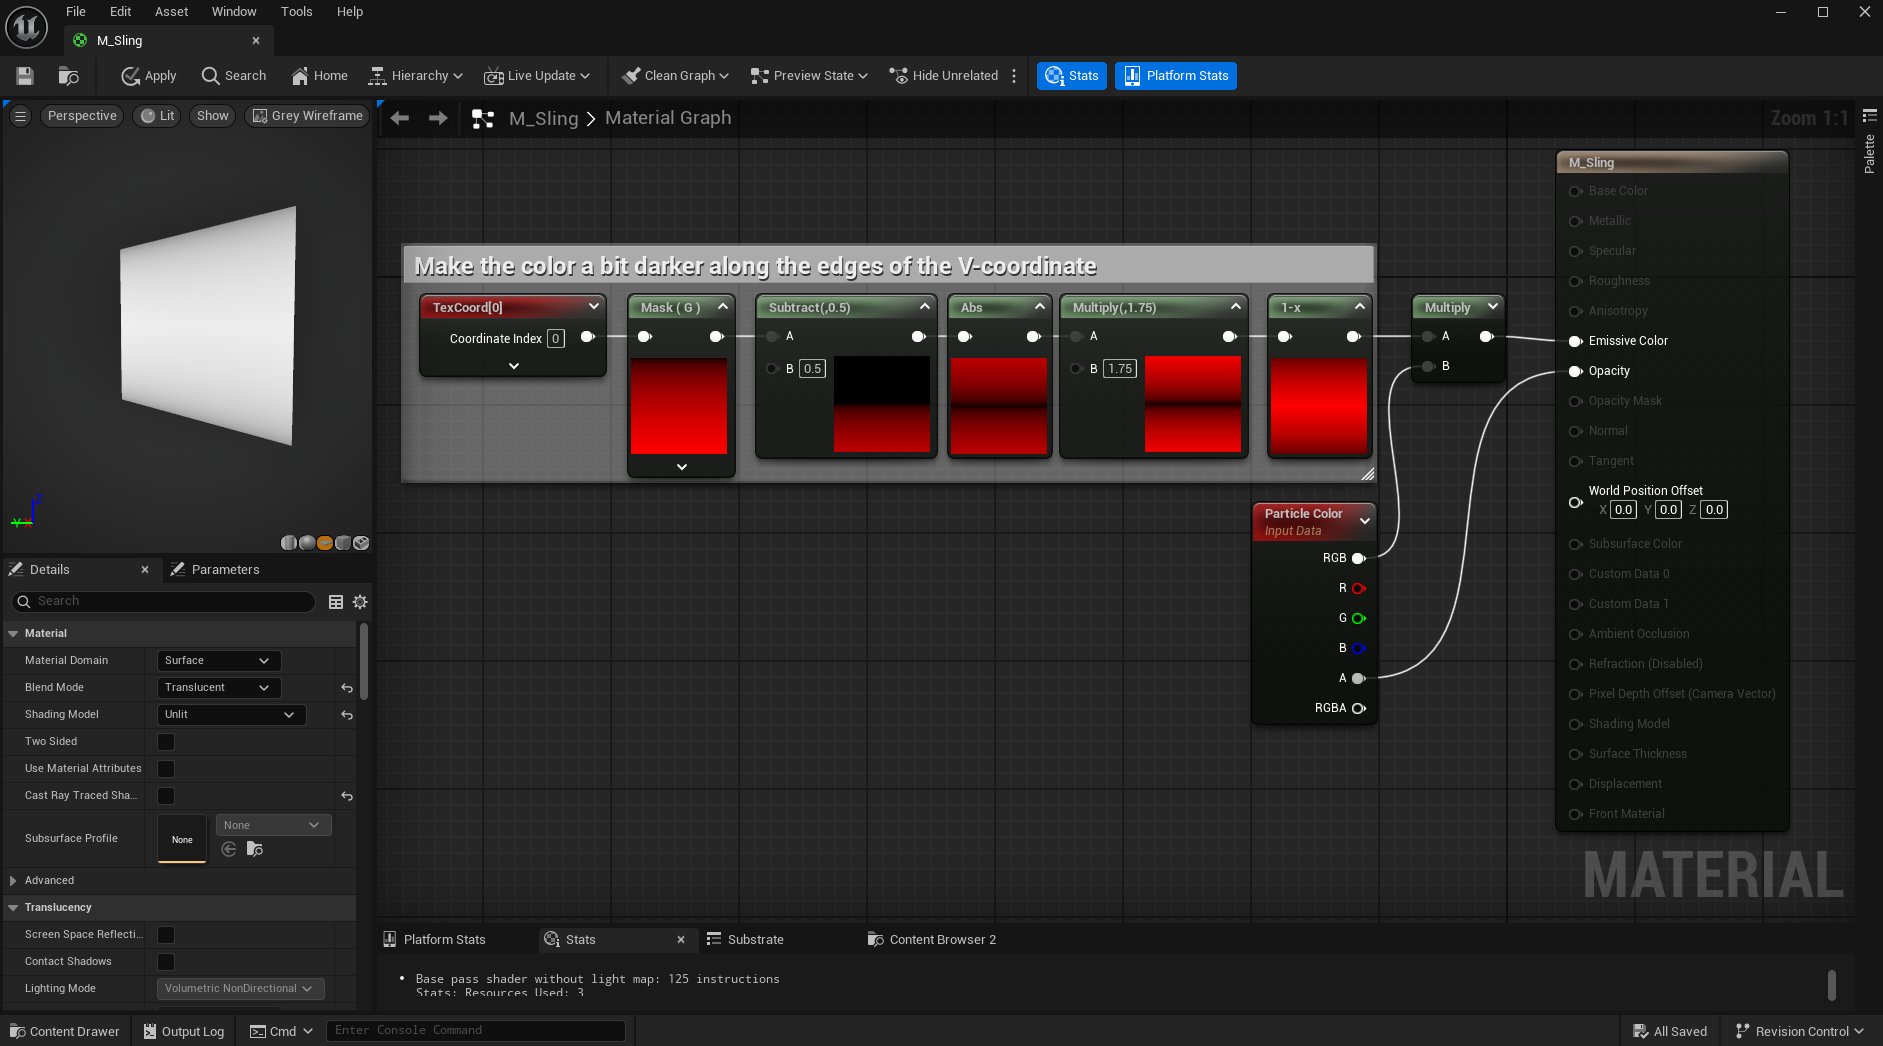
First we create a material for the sling as shown in the image below. Since we'll be using Niagara beams for the sling, and the default beam material is additive and has a gradient (meaning it is not fully opaque), we create our own beam material that can be fully opaque, and even adds a little bit of fade along the beam-edge to give the idea of a non-flat beam.
Then we create a Niagara System with 2 emitters, one for each side of the sling.
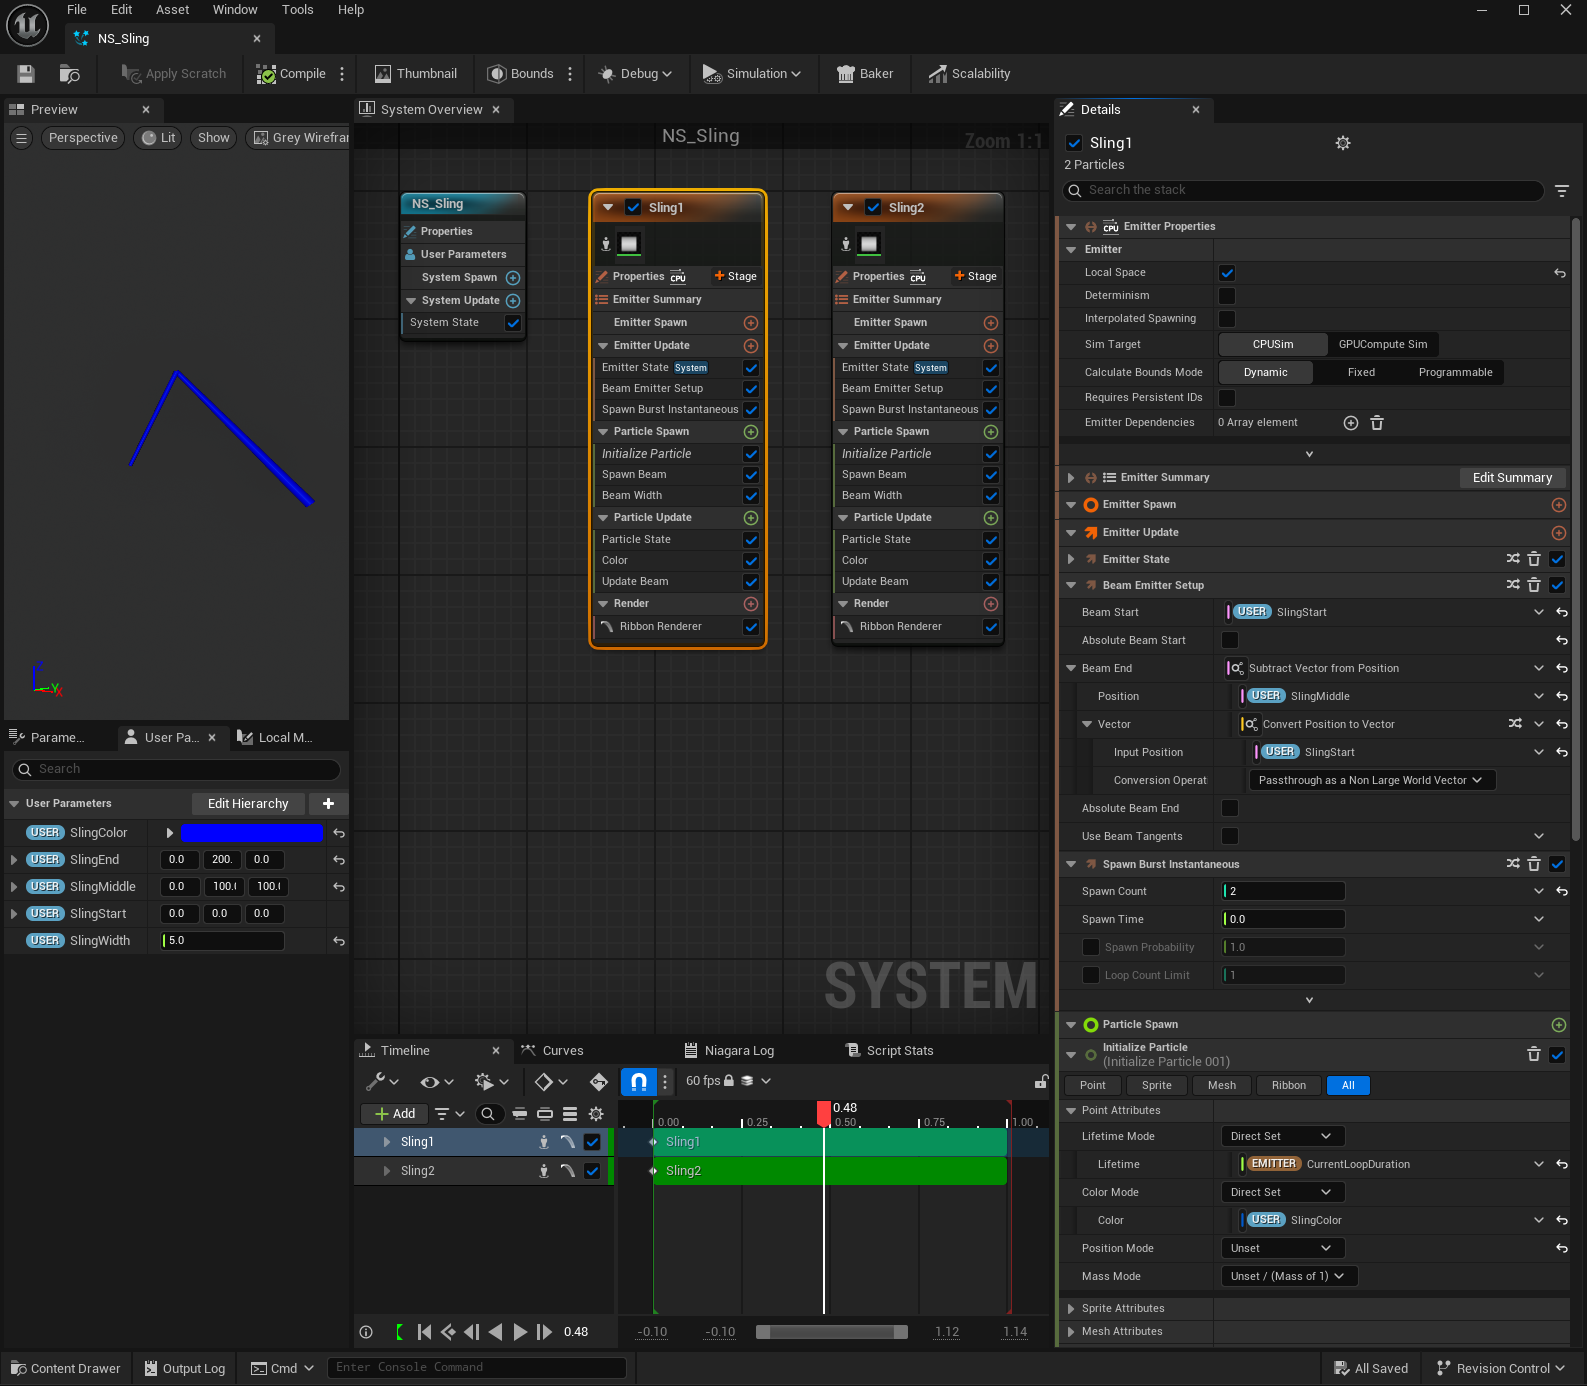

The emitters are set to Local Space so that the sling moves with the slingshot, otherwise the slings may lag behind when moving the slingshot around. As a bonus, we don't need to update the start and end point every frame, as they remain constant relative to the slingshot.
We define 5 parameters to control the sling from the blueprint:
SlingStart- the start of the first half of the sling, relative to the Niagara system componentSlingMiddle- the end of both halves of the sling, relative to the Niagara system componentSlingEnd- the start of the second half of the sling, relative to the Niagaray system componentSlingColor- the color of the slingsSlingWidth- the width of the slings
Note: the Beam End location is relative to the Beam Start, so in the emitter we have to subtract the Beam Start value from the SlingMiddle value to ensure a correct position for the Beam End.
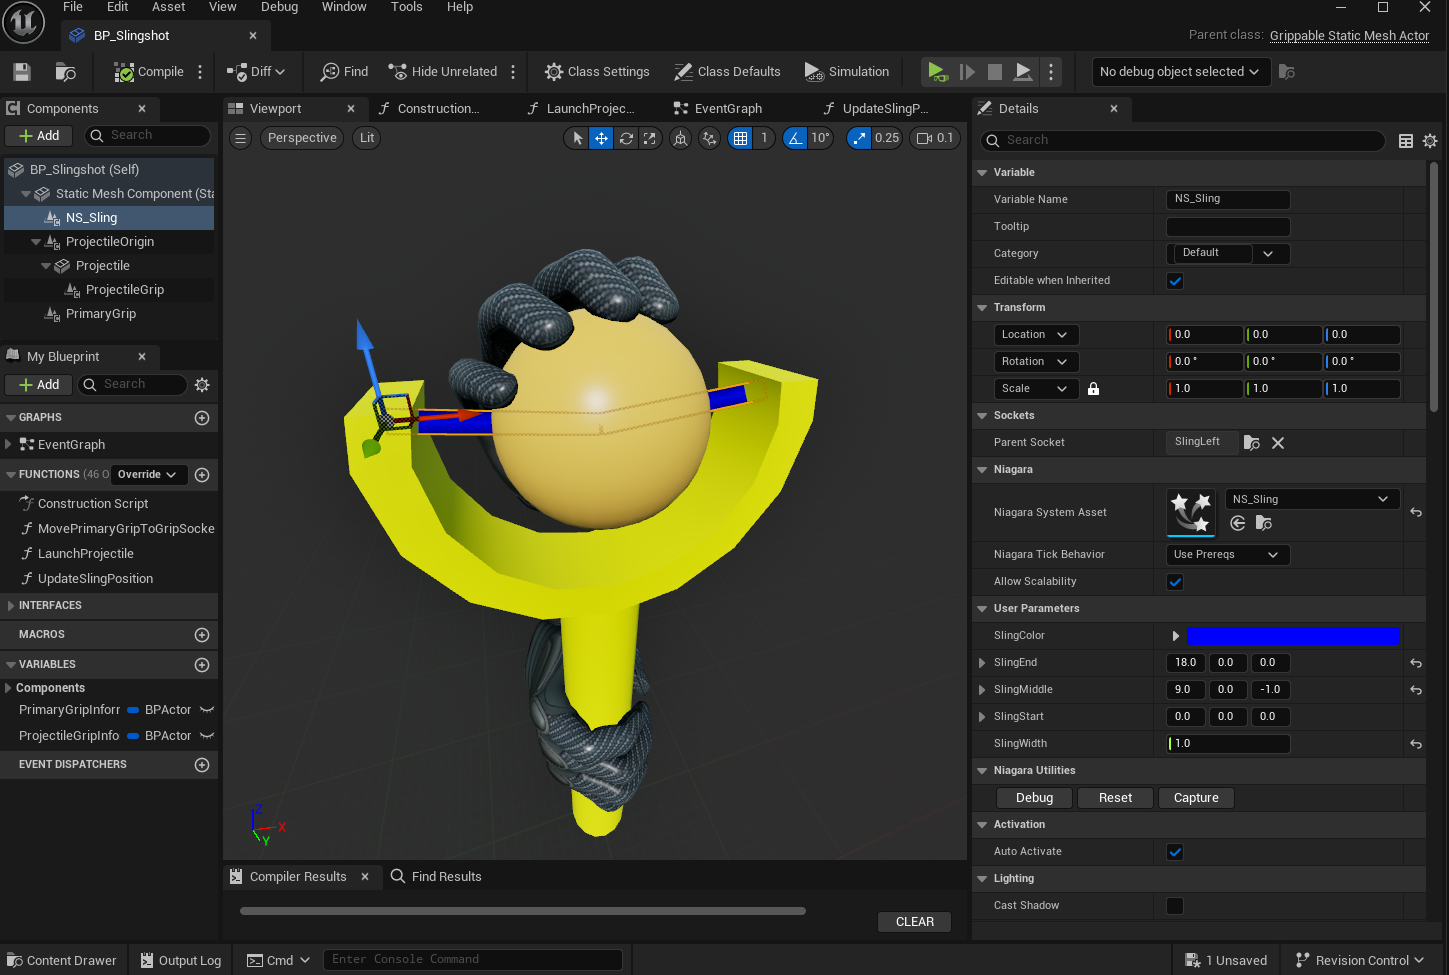
Now that the Niagara System is ready, we add it to the slingshot blueprint, attach it to the SlingLeft socket, and provide some meaningful default values for the parameters:
SlingStartremains at(0, 0, 0)which corresponds to the location of theSlingLeftsocketSlingMiddleis set to(9, 0, -1)which corresponds to the middle of the projectileSlingEndis set to(18, 0, 0)which corresponds to the location of theSlingRightsocket- We could add some logic to
Begin Playto actually take the proper value from the socket and set it, we leave this as an exercise to the reader
- We could add some logic to
SlingWidthis set to1.0which is thick enough for the sling
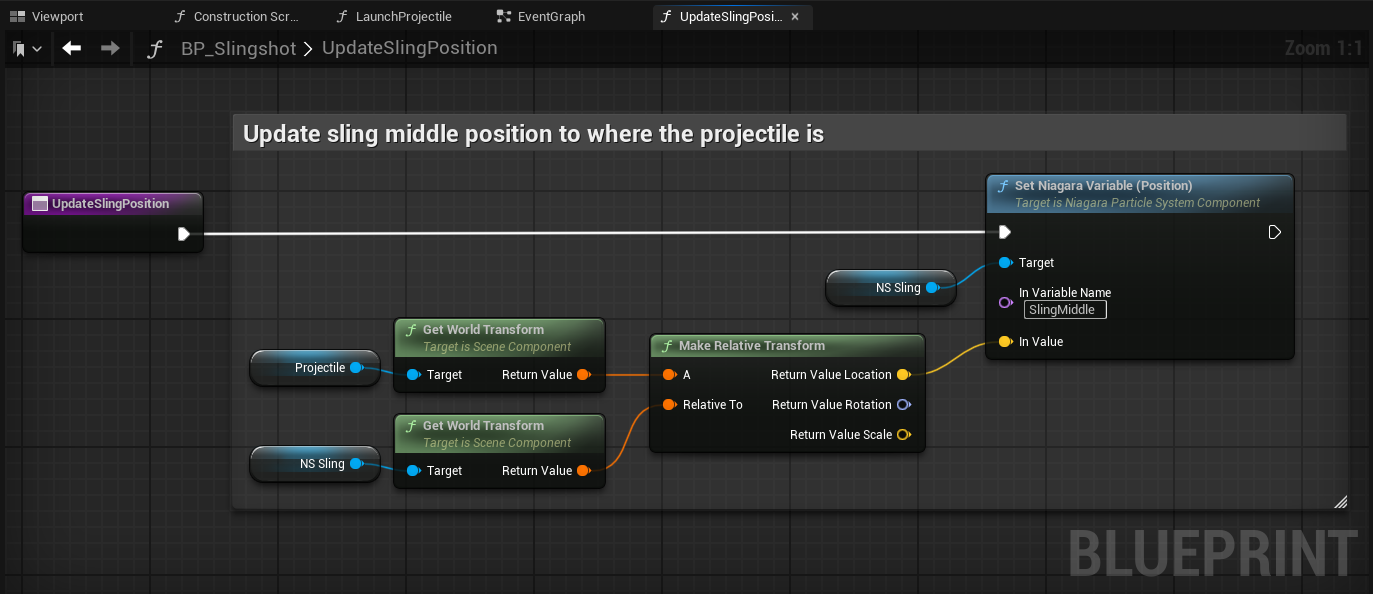
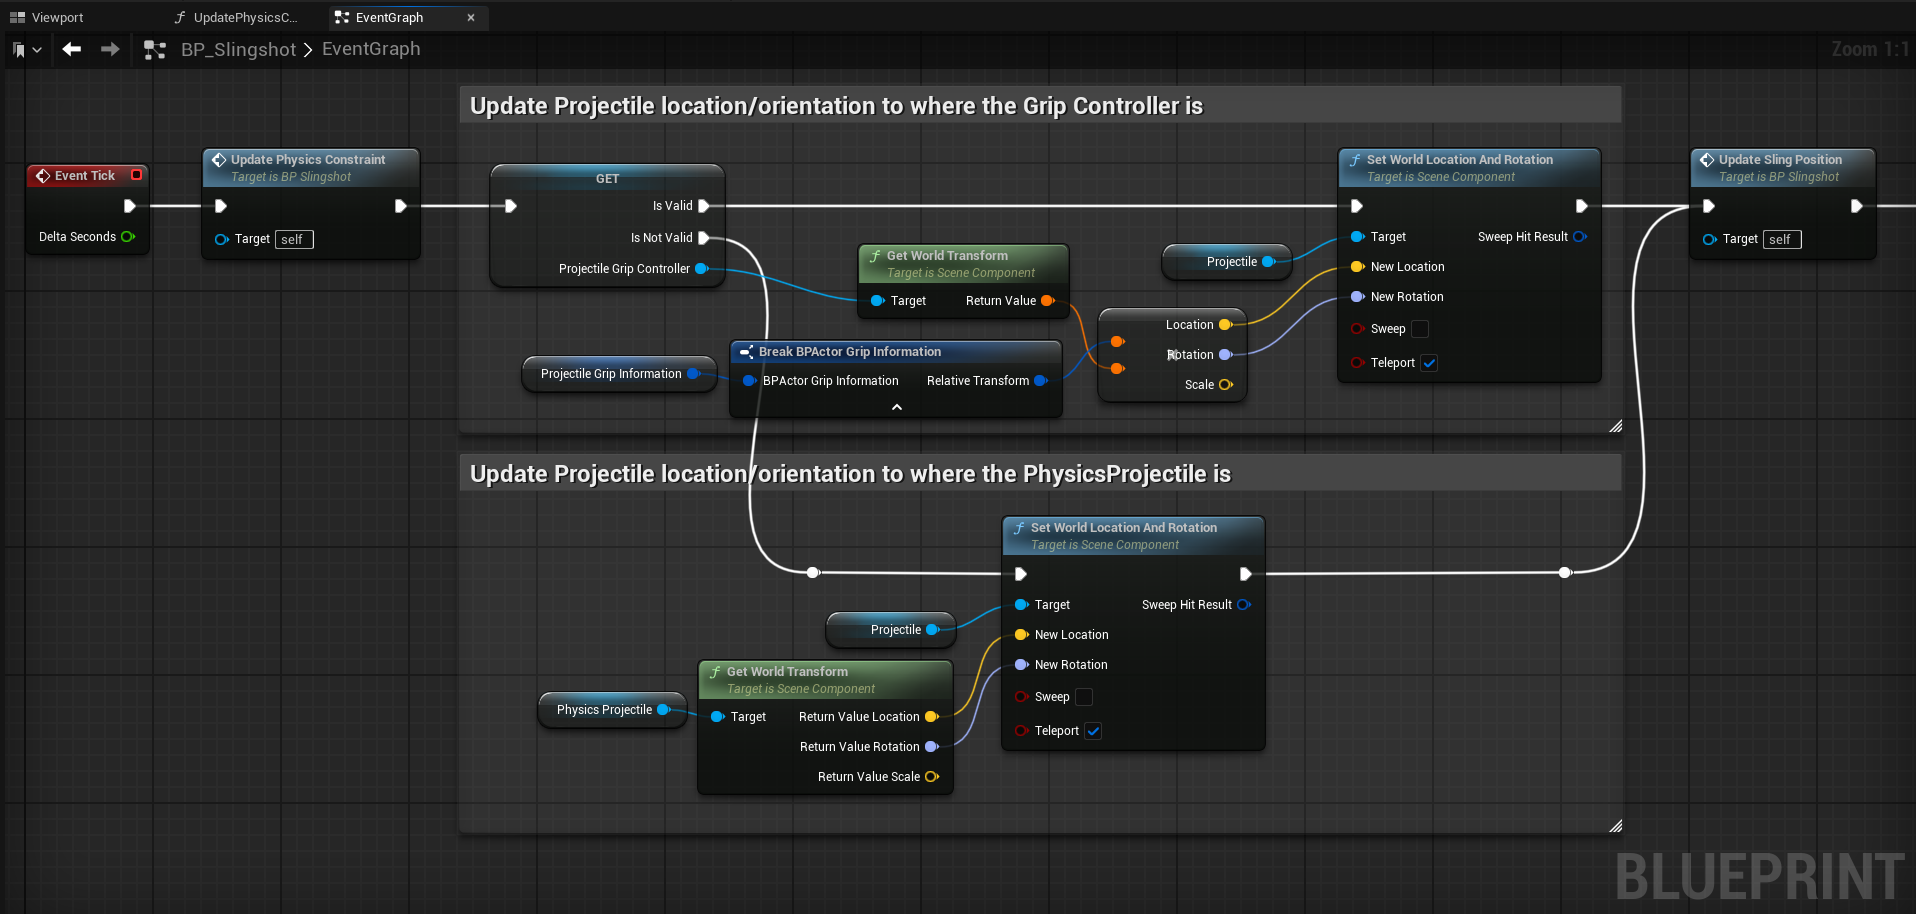
Now we need to ensure that the middle of the sling always corresponds with the location of the projectile, so we add a new function UpdateSlingPosition to the blueprint, and call it in 2 locations in the EventGraph:
- After the projectile has been moved back to its initial location after being dropped
- After the projectile has been moved to the location of the gripping controller when being held
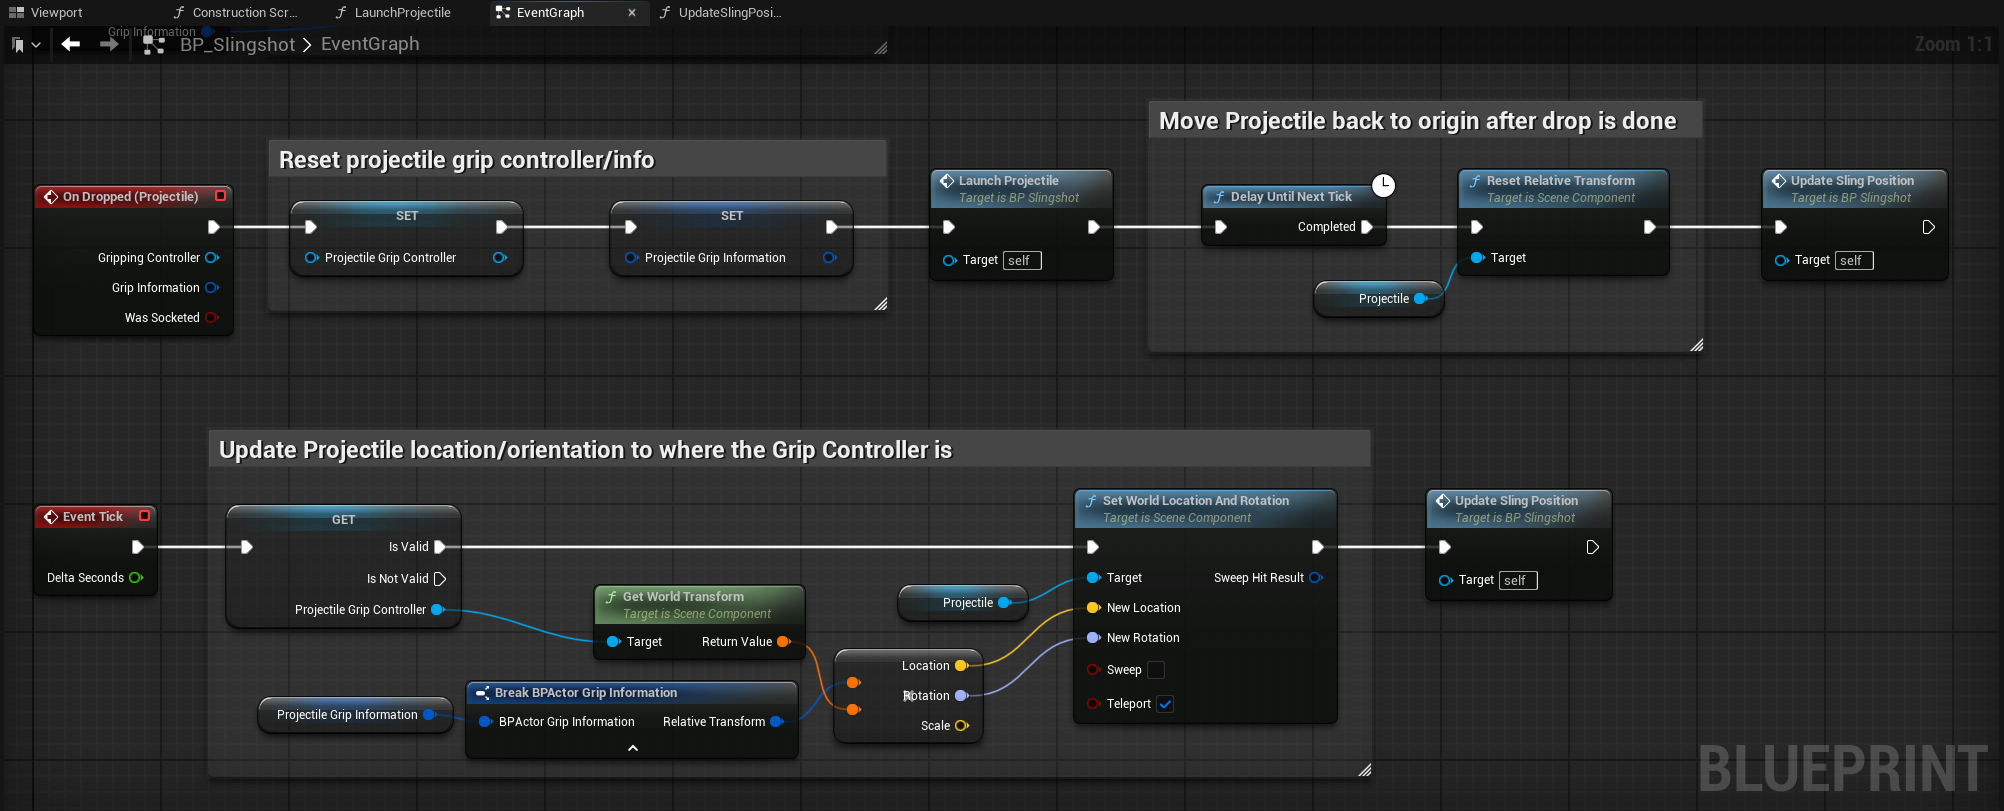
When updating the middle of the sling we must ensure the position we set is relative to the Niagara System component, as this is what our Niagara System expects.
Now we have a functioning sling that moves with the projectile, which already improves the slingshot a lot. In future iterations we could make it even better, for example by:
- Adjusting the color and width of the sling when it gets longer (by grabbing the projectile and moving it backward) to indicate increasing tension on the sling
- Adding a 'bucket'-mesh that holds the projectile, and attach the sling to it (instead of connecting the sling to the center of the projectile)
Aim Niagara System
To help the user aim the slingshot, we add another Niagara system for a laser that points in the direction where the projectile will be fired at. It also indicates when the projectile will be launched when dropped, as we only enable the laser when the projectile is more than 15cm from its original origin.
First we create a material for the aim as shown in the image below, so that we have a bit more transparency towards the edges of the beam. Instead of Additive we use a Translucent material, so that it is also visible in areas where passthrough is enabled.

Then we create a Niagara System with 1 emitter.
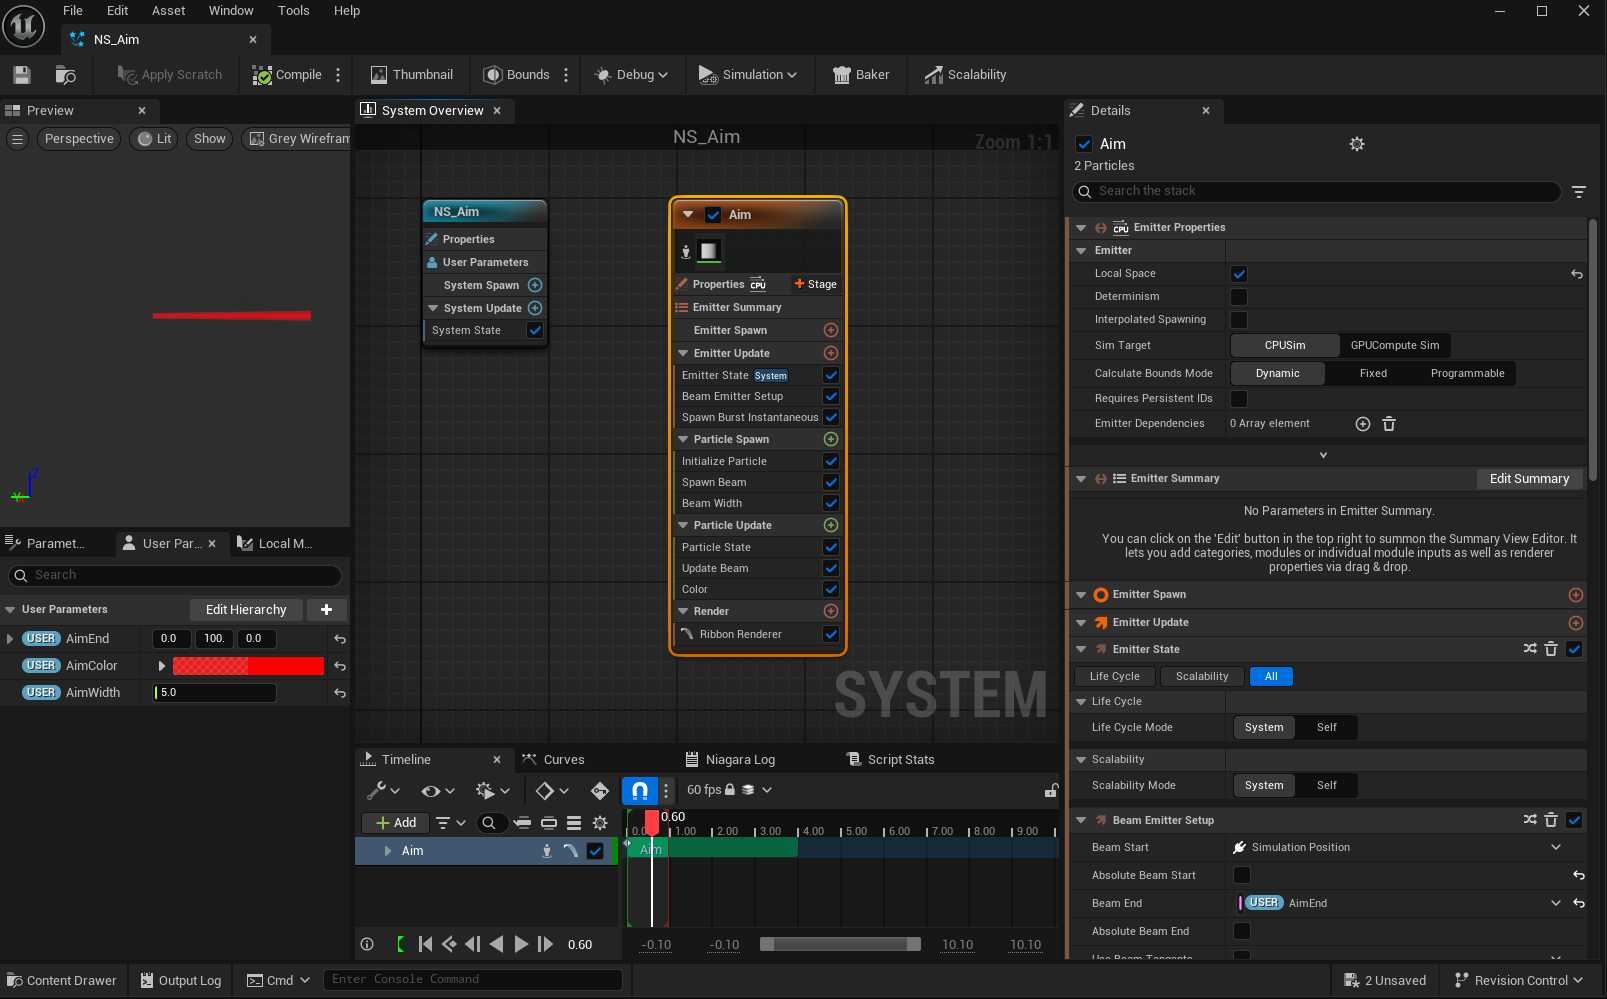
The emitter is set to Local Space so that the aim moves with the slingshot, otherwise the aim may lag behind when moving the slingshot around. Here we assume that the start of aim beam is always at the location of the Niagara system component.
We define 3 parameters to control the aim from the Blueprint:
AimEnd- the end of the aim beam, relative to the Niagaray system componentAimColor- the color of the aim beamAimWidth- the width of the aim beam
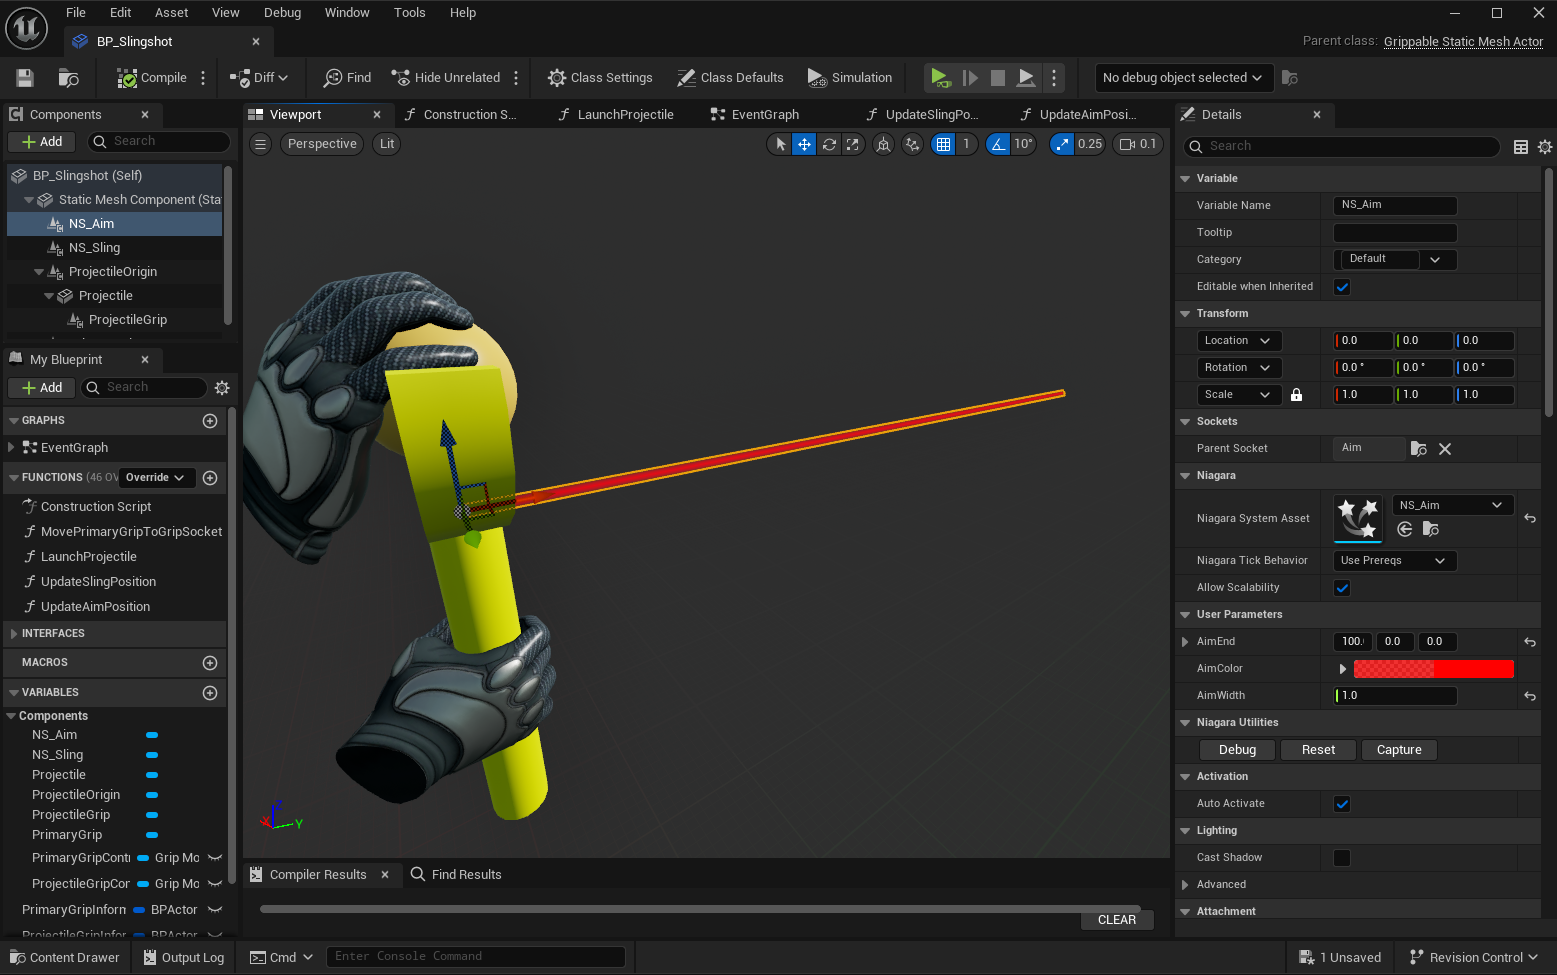
Now that the Niagara System is ready, we add it to the slingshot blueprint, attach it to the Aim socket, and provide some meaningful default values for the parameters:
AimEndis set to(100, 0, 0)so we can see it in the blueprint viewport and verify it's in the correct location and has the correct orientationAimWidthis set to1.0which is thick enough for the aim
Now we need to ensure that:
- the aim beam is only visible when the projectile is at least 15cm from its original origin (where dropping it would launch a projectile), and
- the direction of the aim beam matches the direction that the projectile would launch to right now, and
- the aim beam stops at the first visible object/surface it hits (it shouldn't passthrough any solid objects/surfaces)
For this, we add a new function UpdateAimPosition to the Blueprint, and call it in 3 locations in the EventGraph:
BeginPlayevent - this ensures the aim beam is hidden at the start of the level, assuming the projectile is at its origin- After the projectile has been moved back to its initial location after being dropped
- After the projectile has been moved to the location of the gripping controller when being held
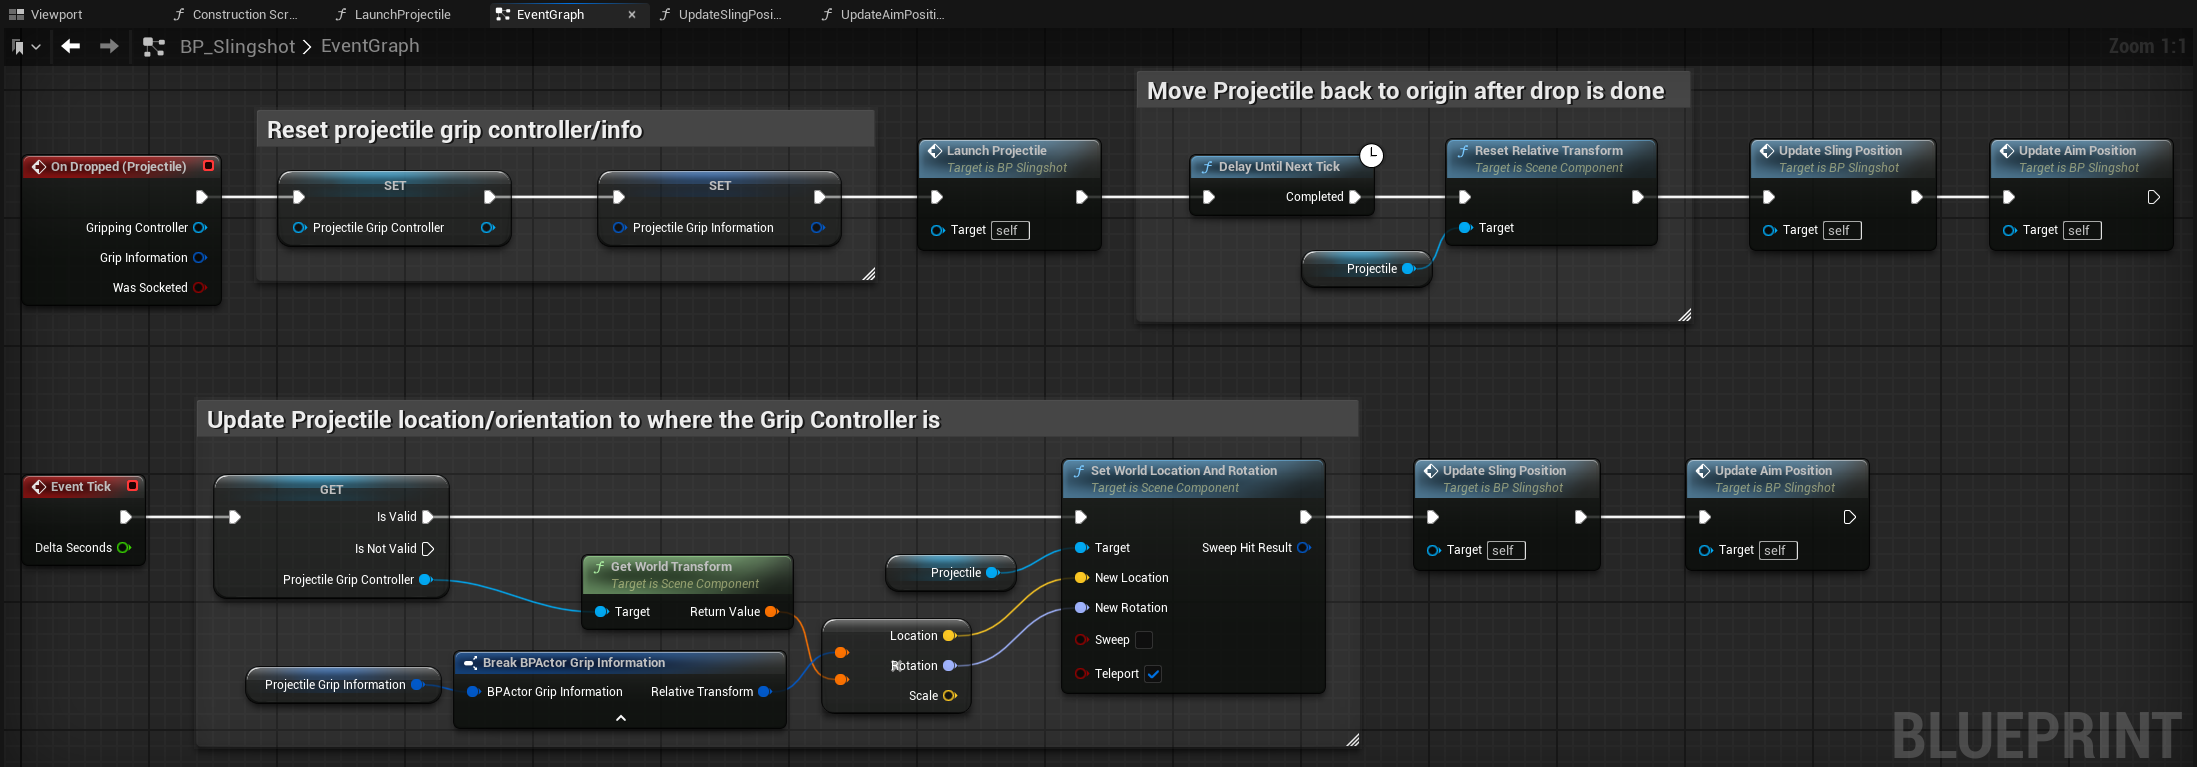
The implementation basically does the following steps:
- Show or hide the aim based on the current distance between the projectile and its original origin
- Set the direction of the aim beam to the direction of the projectile if it would be launched right now
- Do a visibility LineTrace from the aim start location in the aim direction, and adjust the aim beam length accordingly (so it doesn't go through solid objects/surfaces)

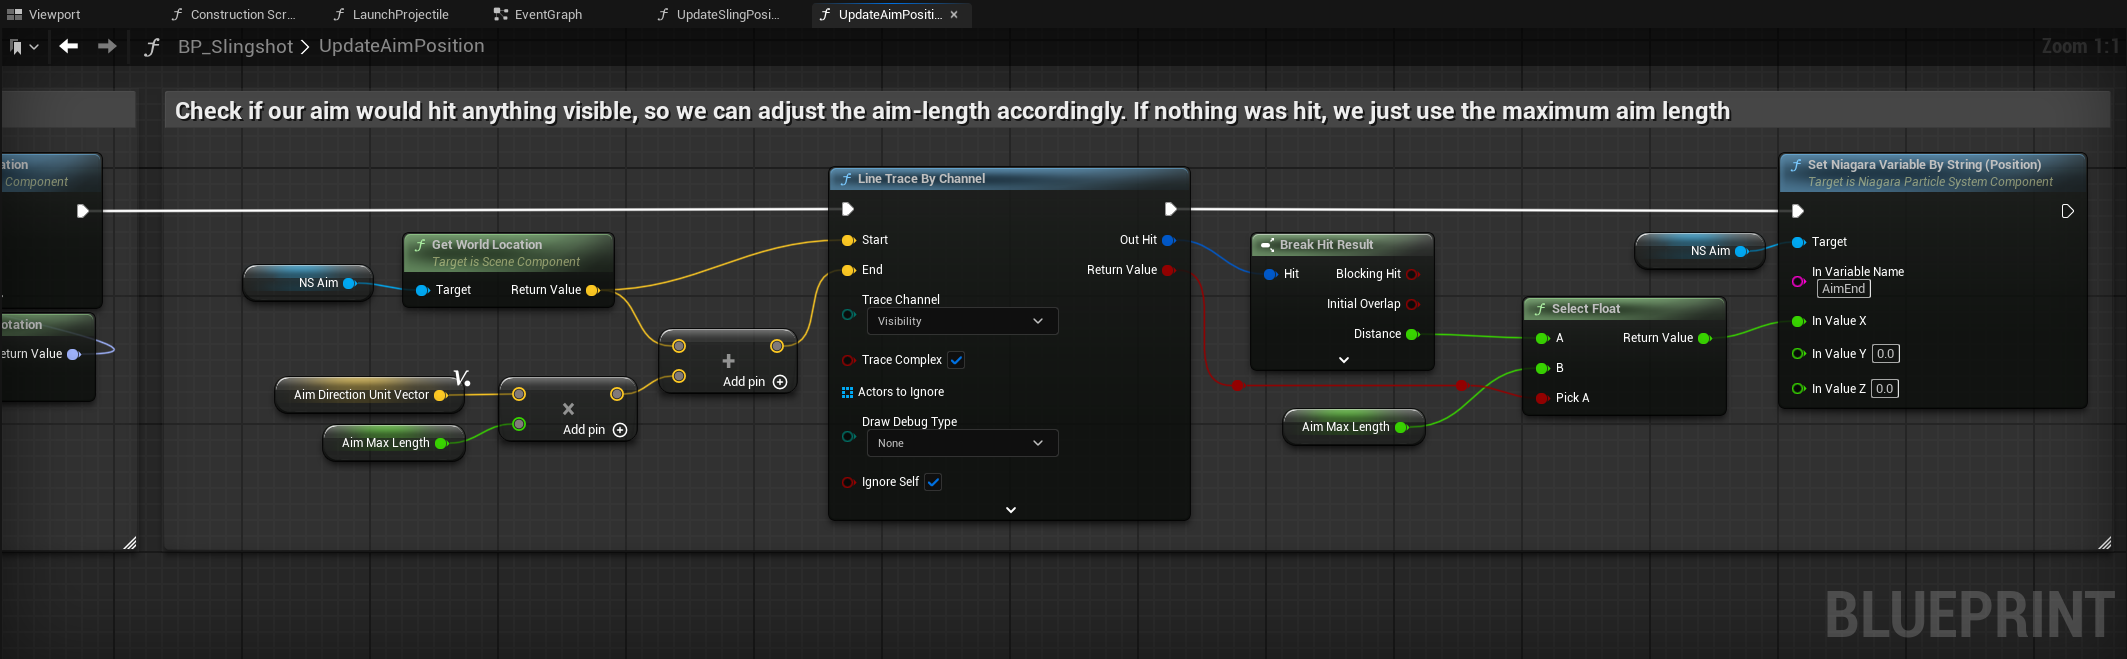
Now aiming is a lot easier, even when the aim start position is slightly below the actual projectile launch location. This is not a big issue, given the relatively high launch velocity, and the fact that currently the projectile is affected by gravity, while the aim is a straight line.
Intermediate Result 2
The video below shows we now have a slingshot in our Mixed Reality test map with a functioning sling and aim, which also indicates to the user when a projectile would be launched when dropping the projectile, or when it would simply return to its original origin.

Clicking play will embed the YouTube player and may set third-party cookies and collect data from YouTube.
Of course, we can still add some improvements, specifically a way to make the projectile location less rigid when it's not being held, so that it looks like the projectile is hanging in the sling.
Physics Constraint
Currently the projectile is hanging very rigidly in the slingshot, which is not very nice. To make the projectile move around a little based on the slingshot movement, we can add a PhysicsConstraint to the slingshot.
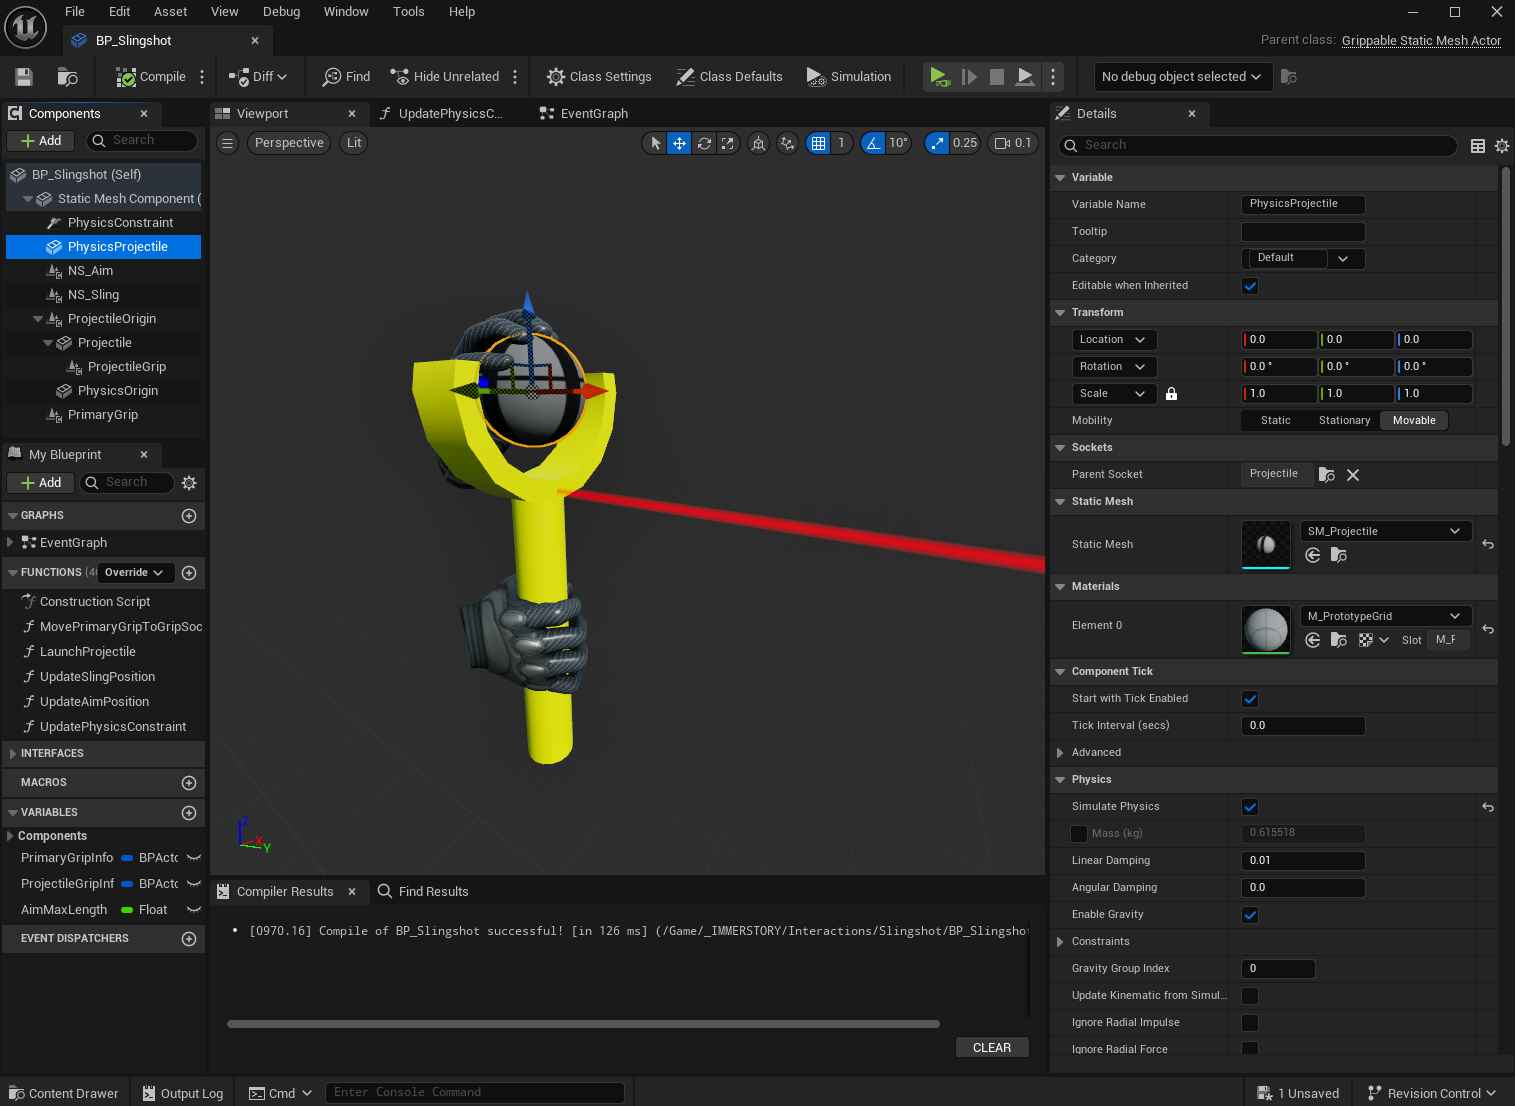
We've decided to simulate an invisible proxy for the projectile (PhysicsProjectile), and update the visible projectile location to the proxy location whenever it's not being held. That way we don't need to break / reset the PhysicsConstraint whenever the user grabs or releases the projectile.
For this setup, we need 3 additional components:
- A
PhysicsOrigincomponent which is the fixed point of the constraint, which does not simulate physics and is not affected by gravity - A
PhysicsProjectilecomponent which is the invisible proxy for the projectile, which simulates physics and is affected by gravity - A
PhysicsConstraintcomponent that links both components and keeps the PhysicsProjectile in the correct place, even if we move or rotate the slingshot
The PhysicsOrigin has the following properties:
- It is placed slightly above the
ProjectileOrigin, in this case 1 cm Collisionis set toNo CollisionHidden in Gameis enabled, as we only use this as a reference point for the PhysicsConstraint

The PhysicsProjectile has the following properties:
Simulate Physicsis enabledCollisionis set toPhysics Only, and all collision responses are set toIgnoreHidden in Gameis enabled, as we only use this for the simulation while the projectile is not being held
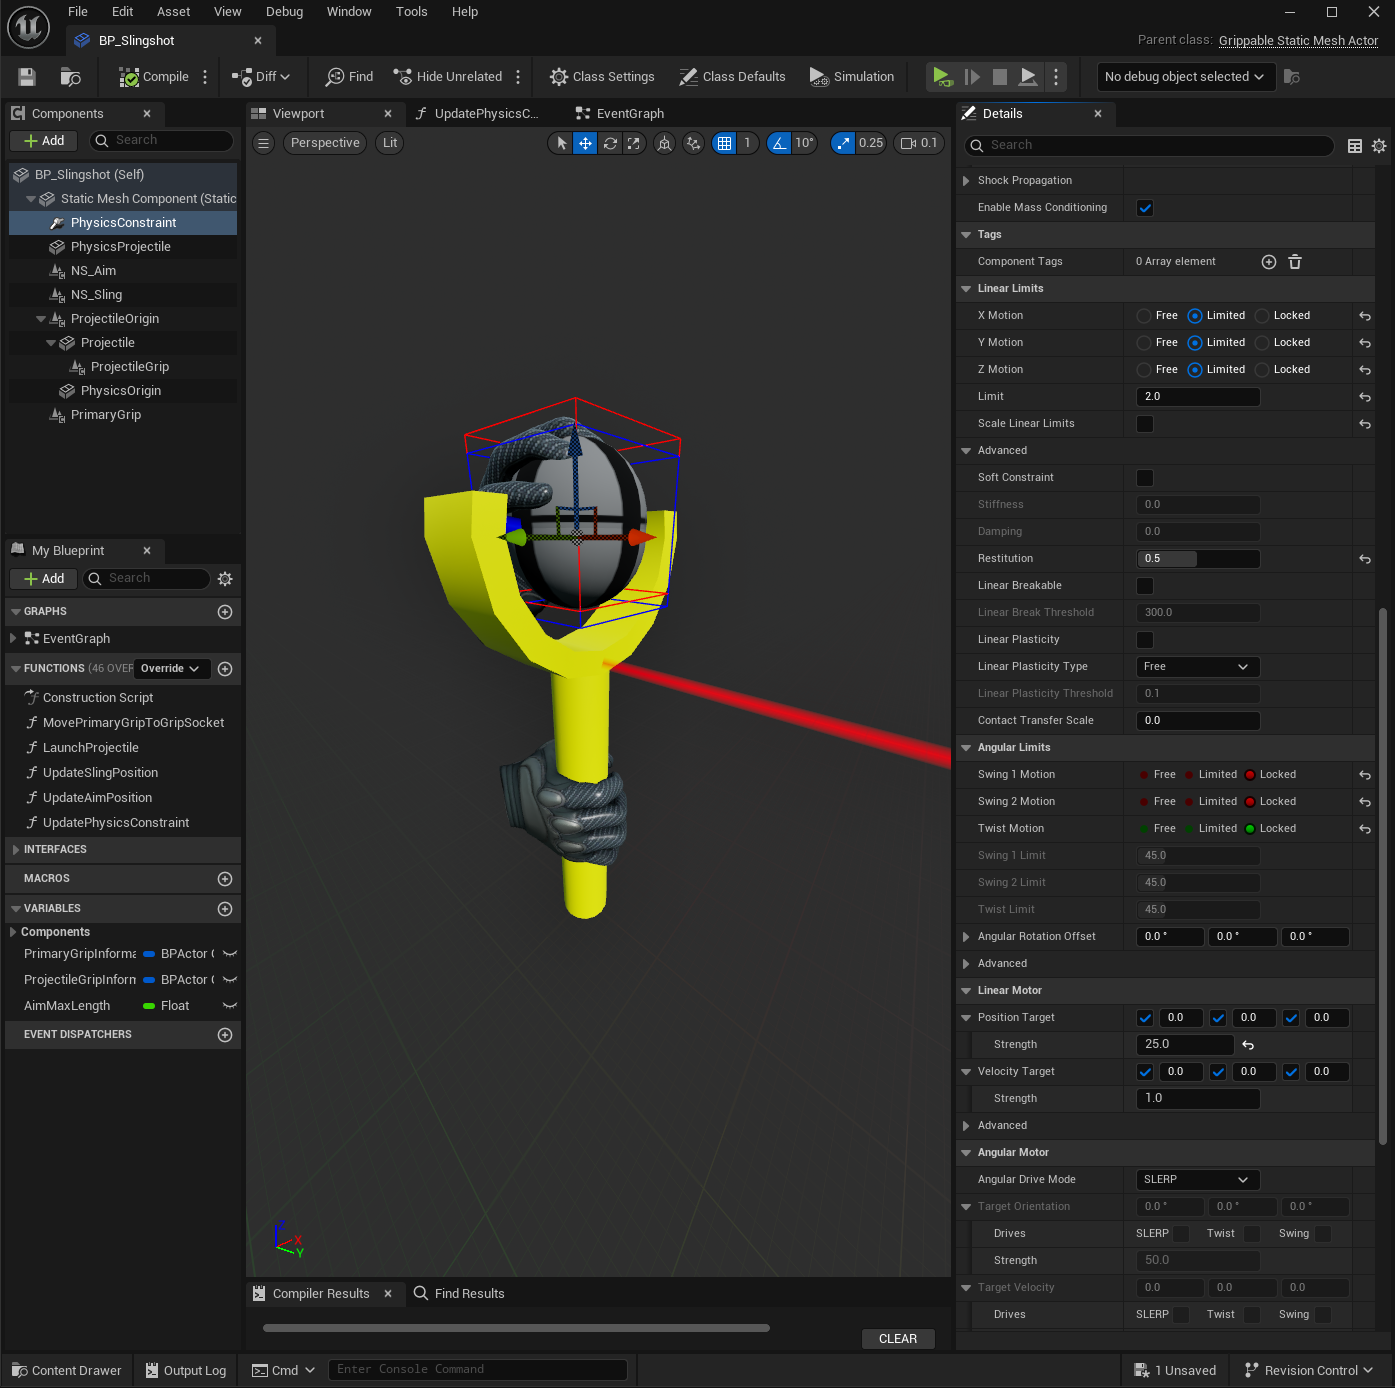
The PhysicsConstraint has the following properties:
- It is placed at the
Projectilesocket of the slingshot - The constraint
Component Namesare set toPhysicsOriginandPhysicsProjectile(this has to match the component names exactly) Disable Collisionis enabled, as we only let the PhysicsProjectile move very limited amount (2cm) within the slingshotParent Dominatesis enabled, as we only want the move the PhysicsProjectile, and consider the PhysicsOrigin a fixed reference point within the slingshot- We set
X / Y / Z MotiontoLimitedand set theLimitto 2 cm - We set the
Angular LimitstoLockedas we're not interested in rotations for now - We set the Linear Motor
Position Targetto0, 0, 0with 25 strength - We set the Linear Motor
Velocity Targetto0, 0, 0with 1 strength

In order to make this work properly when moving the slingshot, we need to wake the PhysicsProjectile and adjust the Reference Frame every tick. We do this by adding a new function UpdatePhysicsConstraint, and calling this at the start of the Event Tick in the EventGraph.

The result can be seen in the video below, which looks a lot nicer with the hanging projectile now.
Clicking play will embed the YouTube player and may set third-party cookies and collect data from YouTube.
Further improvements
The slingshot we've built so far already works pretty well, but of course there are further improvements that can be done:
- Enable the tick-processing only when the slingshot is being held
- Use a
GrippableSphereComponentfor the projectile grip (instead of aGrippableStaticMeshComponent), so we can make it a little bigger than the projectile itself to make the projectile grip easier for the user (currently the user may accidentally grip the slingshot itself when the hand is too much too the left or right from the projectile) - Separate the projectile from the slingshot (so that the user must pickup a projectile from somewhere else, and can then use it with the slingshot)
- Limit the range in which a projectile will be launched, currently any direction is allowed, even when it makes no sense (e.g. pull the projectile straight down through the slingshot)
- Adjust the launched projectile speed based on how far the projectile was pulled back from the slingshot
Conclusion
A slingshot is a nice variation of the traditional gun mechanics and can provide additional immersion by providing a fun way to aim and launch projectiles in a VR or MR environment.
We at Immerstory are excited to support our customers with their immersive experiences, and look forward to sharing more exploration progress soon.
What immersive experience would you like to see? Let us know!
Additional Resources
Documentation for the MetaXR plugin, specifically the Mixed Reality Utility Kit which was used for this demo, can be found here
Sound effects in the demo app have been thankfully sourced from Sonniss GameAudioGDC