

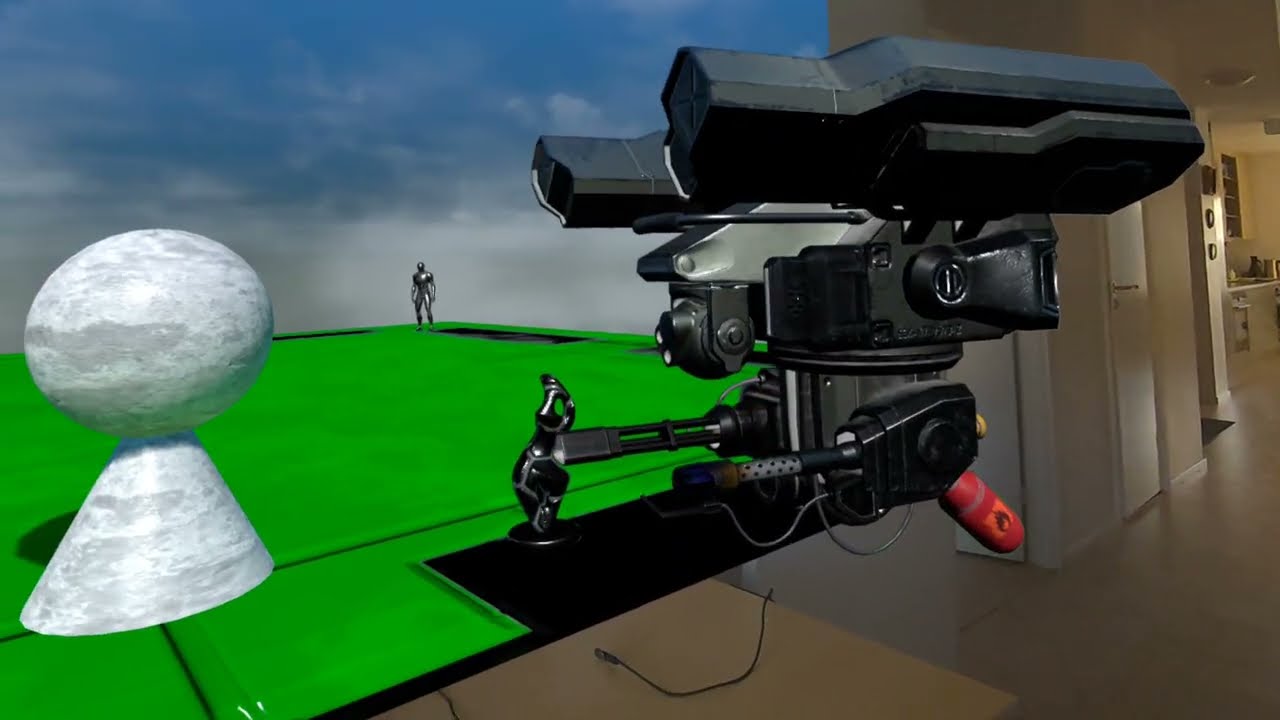
In this post, we add a player controlled drone to the mixed reality level. We start with a drone static mesh from the Fab store, add a custom skeleton and define procedural animations so it feels more natural during movement and aiming. The player will be able to control the drone using the motion controllers, which works really nicely in mixed reality setups where the motion controllers are not used for player movement. In addition, it allows the player to interact with the virtual world, which in our example is placed at a wall in the players room.
The drone will be semi-autonomous, it will periodically scan for targets and automatically lock on the best target with its camera and gun.
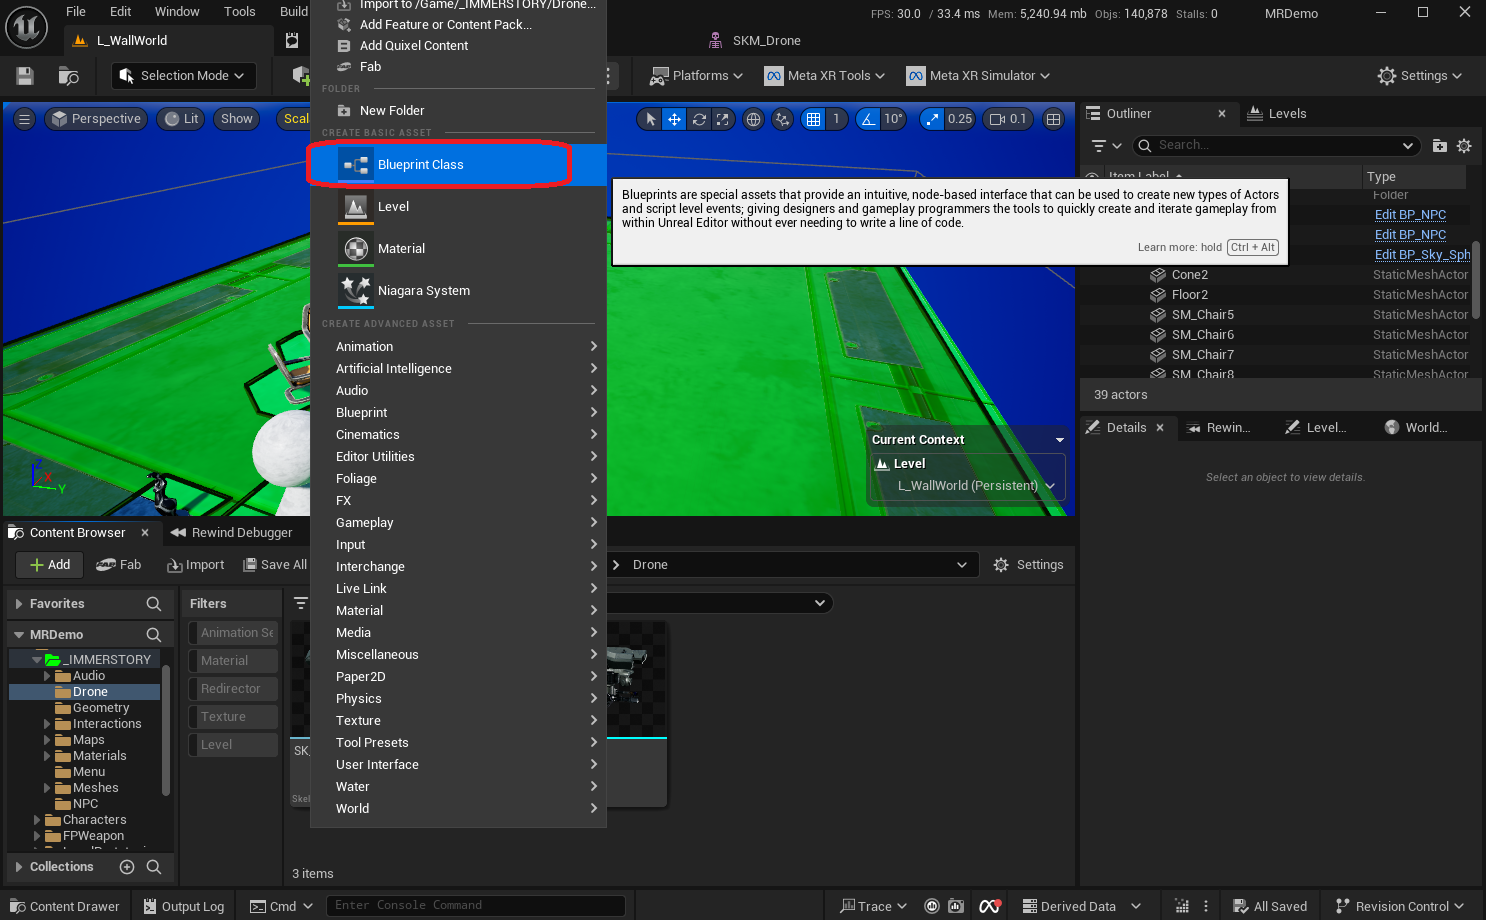
Tech Stack
For this exploration, we're using the following tech stack:
We continue from the setup we've discussed in the previous blog post Flexible and Performant AI Navigation for Dynamically Placed Sublevels in Unreal Engine. If you want to follow along, some basic knowledge of the tech stack is recommended, especially Unreal Engine concepts.
Drone Mesh
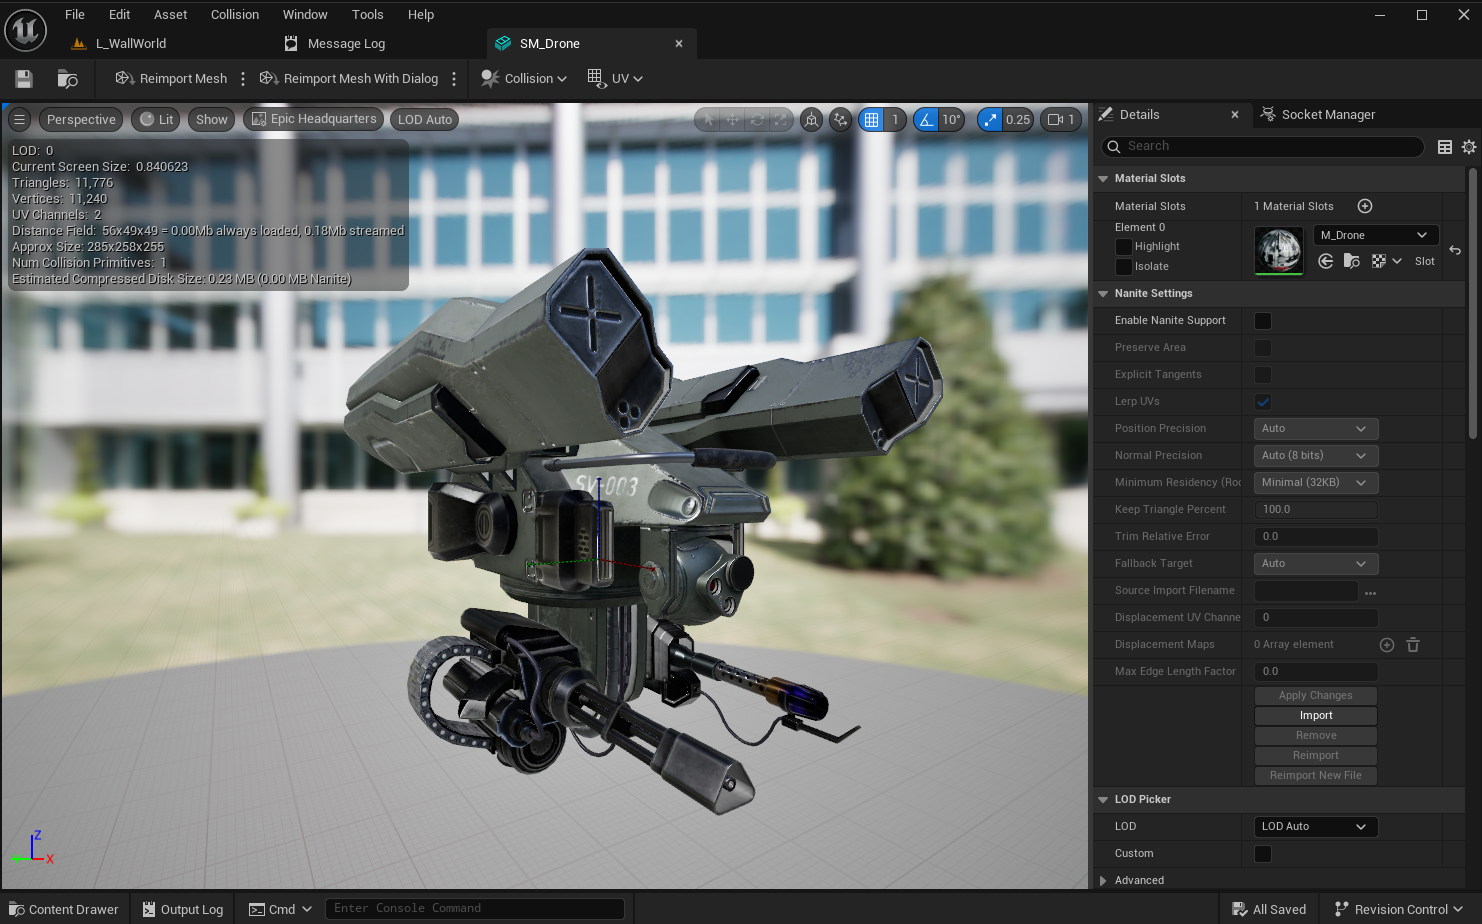
We found a cool drone on the Fab store, which came as a skeletal mesh with several animations. For the sake of this devlog, we've converted it to a static mesh and imported that into our project. This way, we can demonstrate the full process of creating the skeleton, skinning the mesh and creating the animation blueprint for procedural animations.
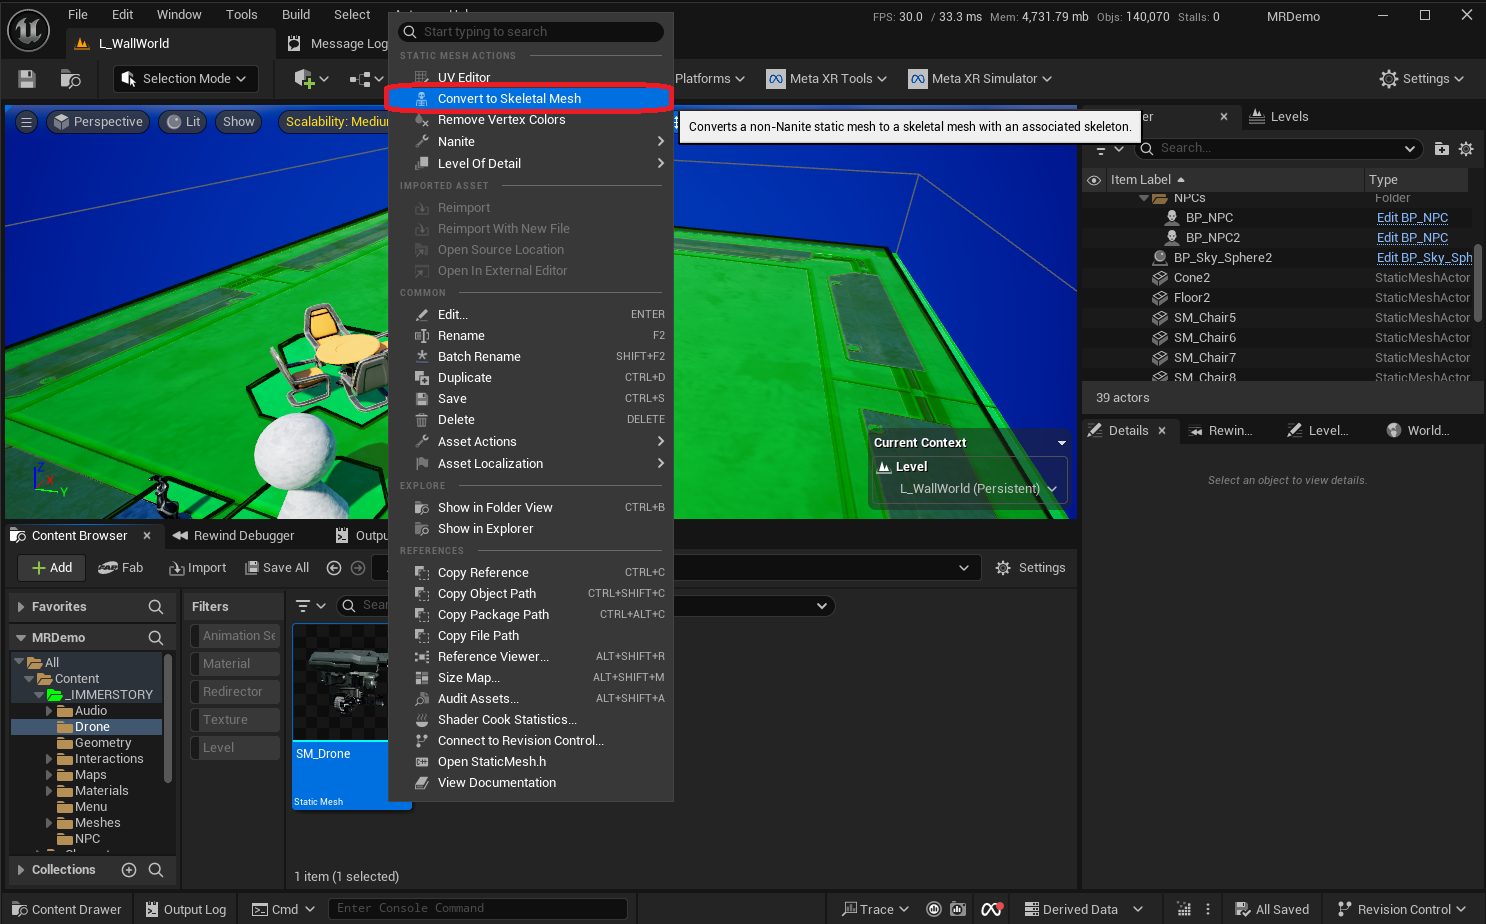
As we start with a static mesh, we first must convert it to a skeletal mesh using the context menu. After confirming the conversion dialog, a skeletal mesh and an empty skeleton are created.


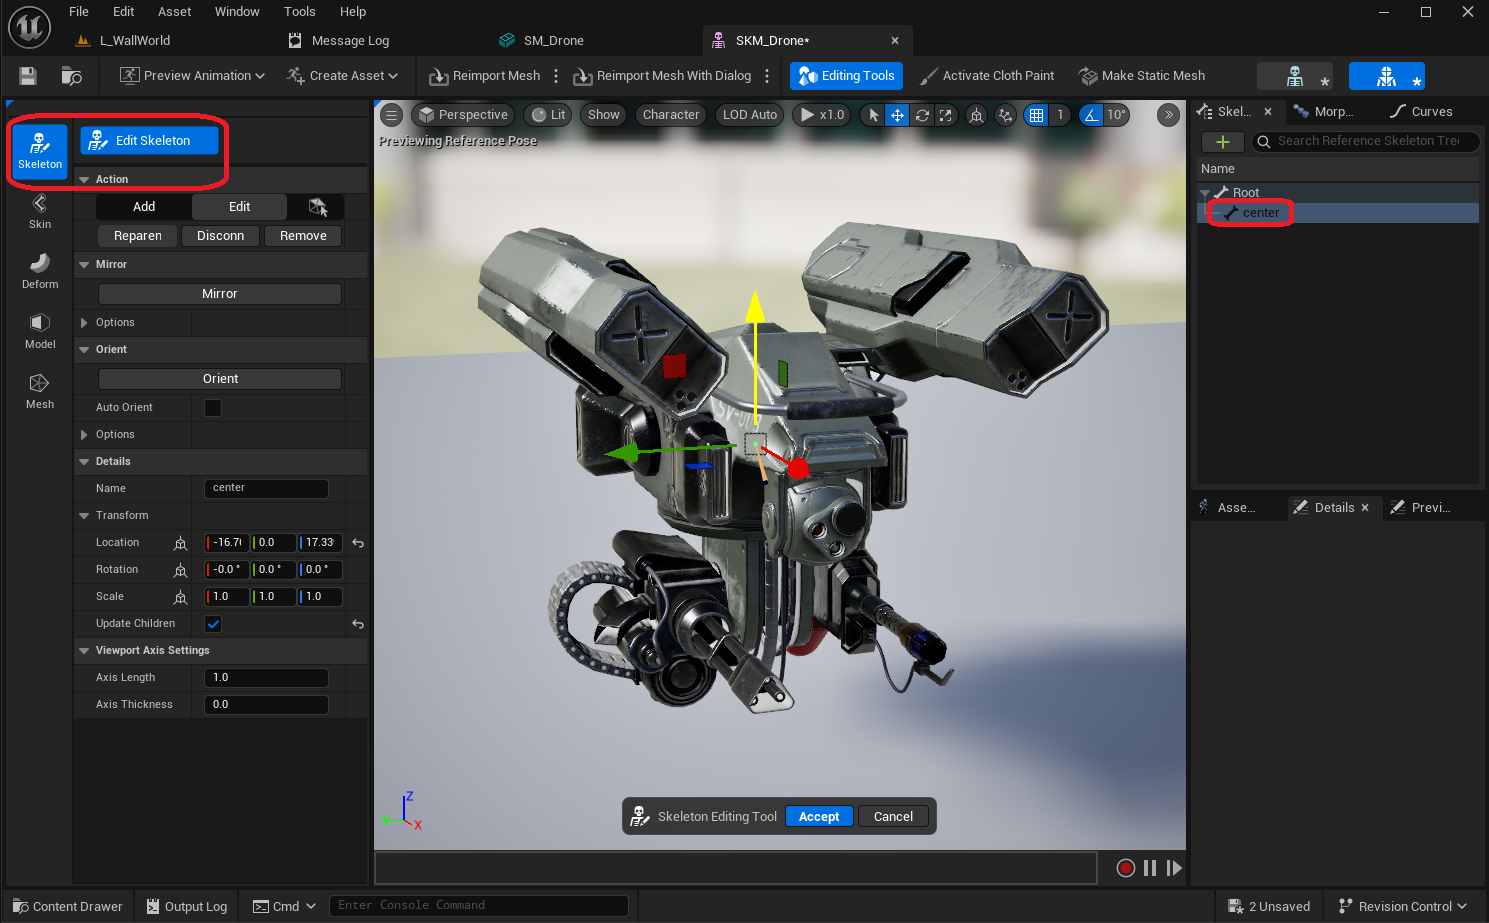
Now that we have a skeletal mesh, let's setup a custom skeleton with some bones and sockets for it, which we can later use to create procedural animations.
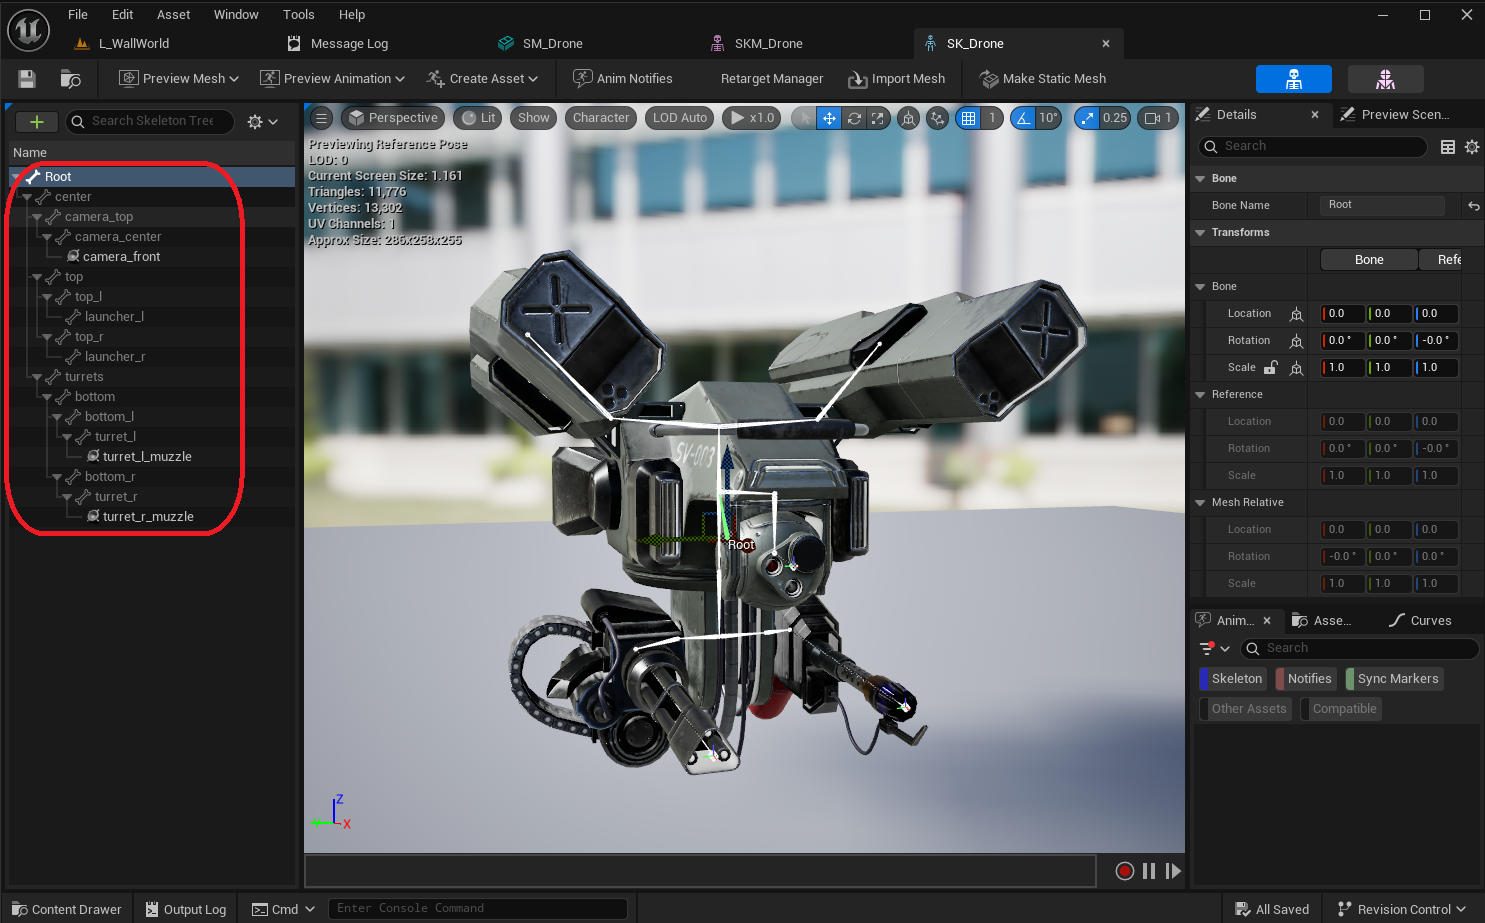
Custom Skeleton
A proper skeleton is important to setup the pawn, as we use sockets to position and orient certain elements. The following bones / sockets are most relevant for this devlog:
center- a bone that we'll use to lean the whole drone in the direction of movementturrets- a bone that rotates the whole lower section with the gun and the flamethrower from left to rightbottom_l- a bone that rotates the flamethrower up and downbottom_r- a bone that rotates the gun up and downturret_l_muzzle- a socket where the flames for the flamethrower can be generatedturret_r_muzzle- a socket where the bullets for the gun can be generatedcamera_top- a bone that rotates the camera-sphere from left to rightcamera_center- a bone that rotates the camera-sphere up and downcamera_front- a socket we can use for starting vision queries

Drone Pawn Blueprint
In order to place the drone into a level, and later control it with the motion controllers, we need to create a Pawn blueprint.
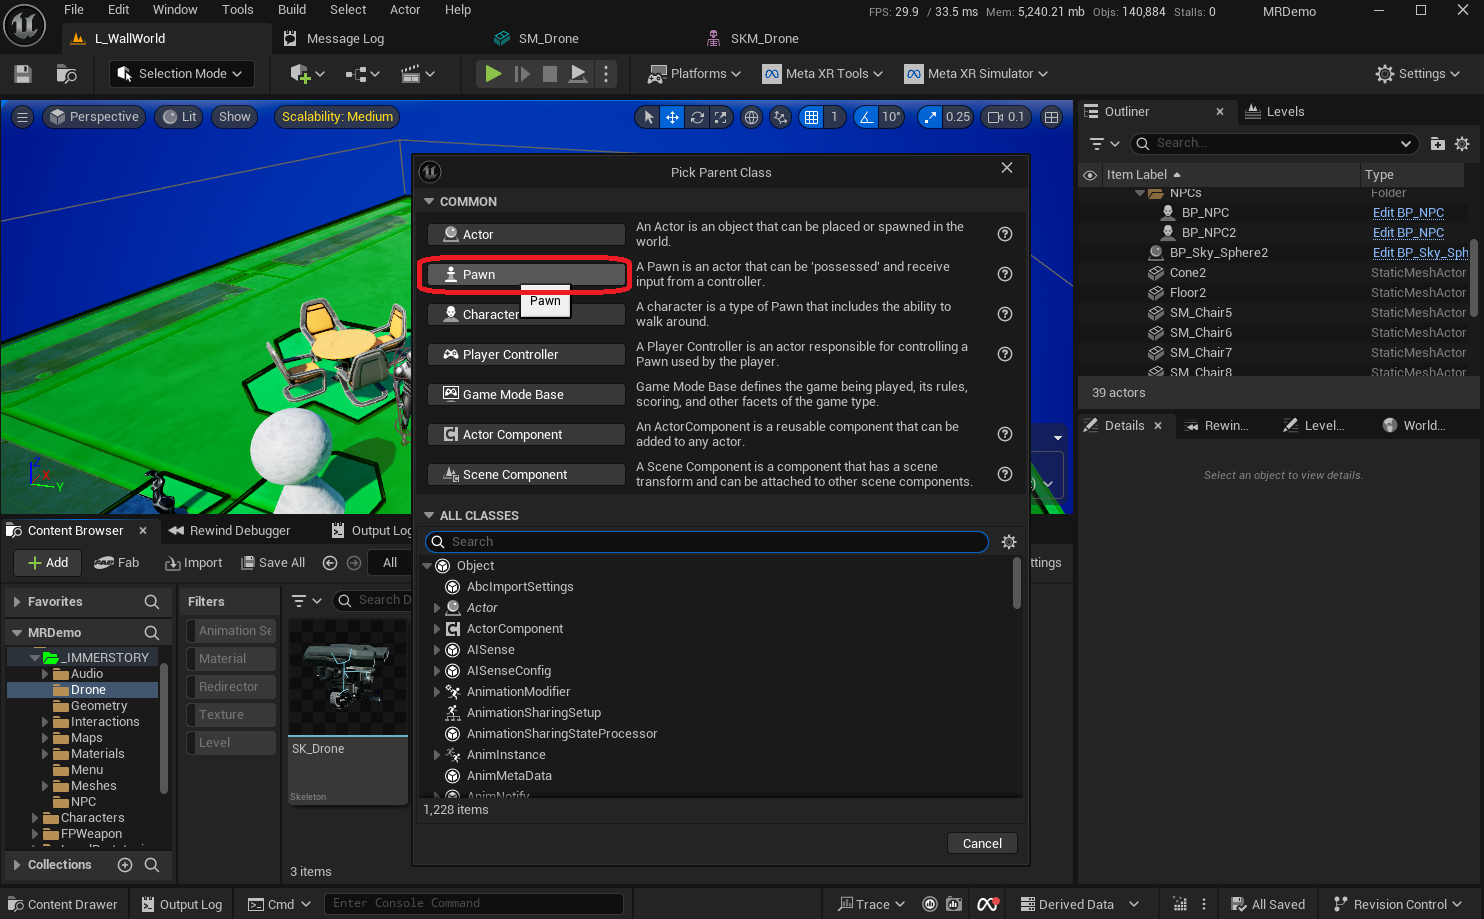
The following components are needed for the blueprint:
Root- aSphere Collisionwith a radius of 50SKM_Drone- aSkeletal Mesh Componentwith theSkeletal Mesh Assetset to theSKM_Droneand a scale of 0.4 so it nicely fits the sphere collisionCameraSocket- aScene Componentattached to thecamera_frontsocket of the skeleton, so we can easily access its transform in the blueprint logicGunSocket- aScene Componentattached to theturret_r_muzzlesocket of the skeleton, so we can easily access its transform in the blueprint logicFlameThrowerSocket- aScene Componentattached to theturret_l_muzzlesocket of the skeleton, so we can easily access its transform in the blueprint logic
FloatingPawnMovement- aFloating Pawn Movementwhich controls the movement dynamics for the pawn

For now, no logic needs to be added to the blueprint, as mapping player input to pawn movement will be done in a controller blueprint.
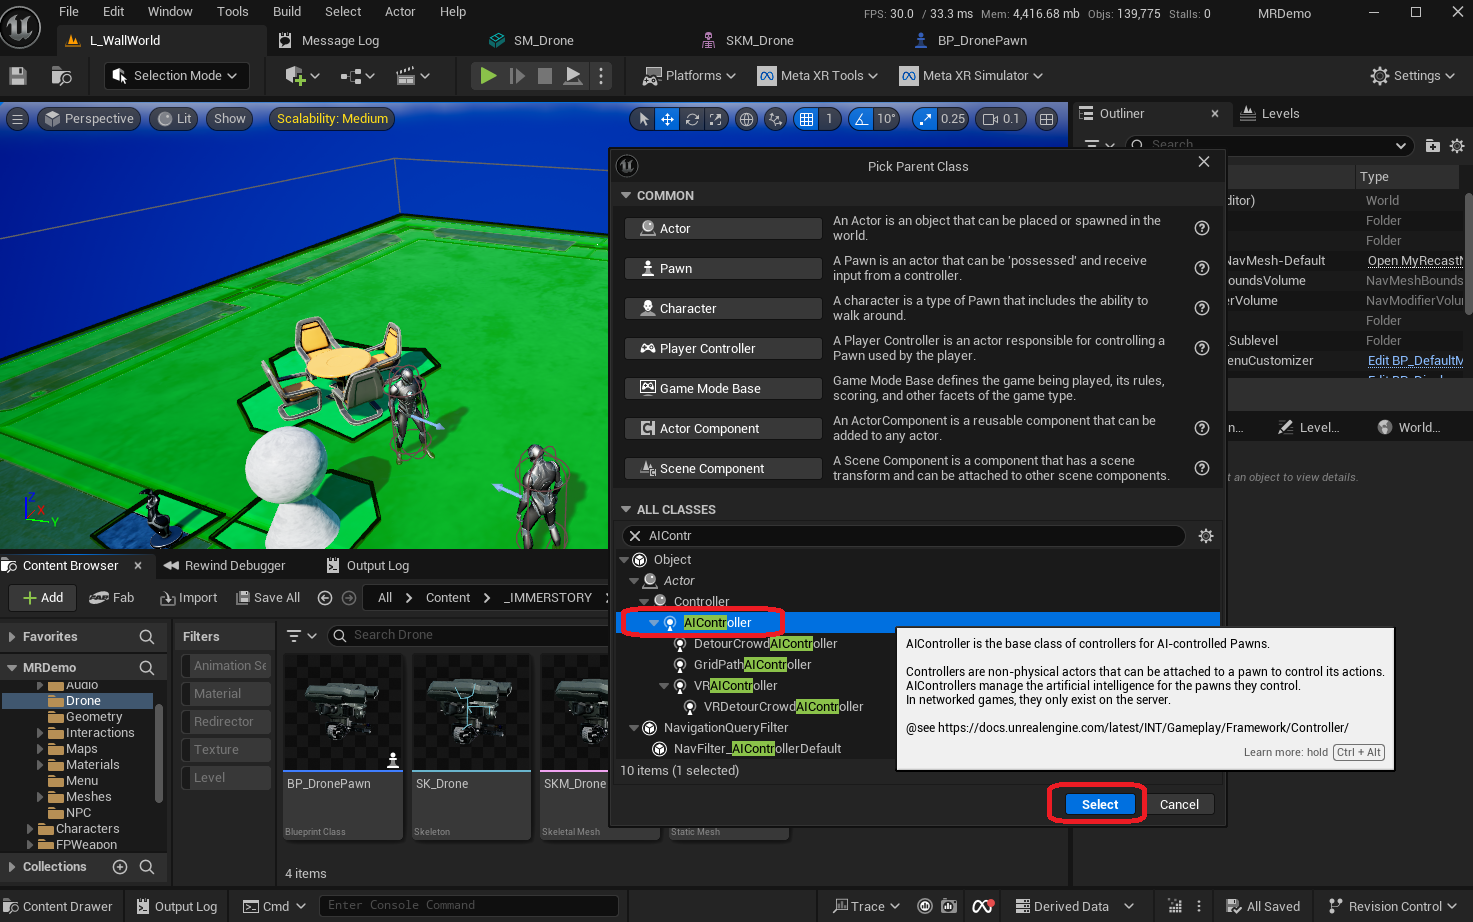
Drone Controller Blueprint
In order to let the player control the drone with the motion controller joysticks, we add a blueprint with parent class AIController.
This may seem counterintuitive, however each player can only have a single PlayerController, which is already controlling the player's pawn. So in order to control the drone pawn, we instead subclass AIController, and implement the player input mapping there, which ensures a good separation of concerns. As an additional benefit, this way we can even selectively process the player input based on gameplay events or player input, switch to a different drone or even a different controller altogether with different behaviors.
In order to receive player input events, we need to call the blueprint function Enable Input on the actual PlayerController, which we do when the controller possesses a pawn. When the pawn is unpossessed, we disable input, as there is no longer a pawn to be controlled.

While there are multiple possible control schemes for the drone, we implement the following:
Left joystick left/rightmaps to moving the drone left/rightLeft joystick up/downmaps to moving the drone forward/backwardRight joystick left/rightmaps to rotating the drone counterclockwise / clockwiseRight joystick up/downmaps to moving the drone up/down
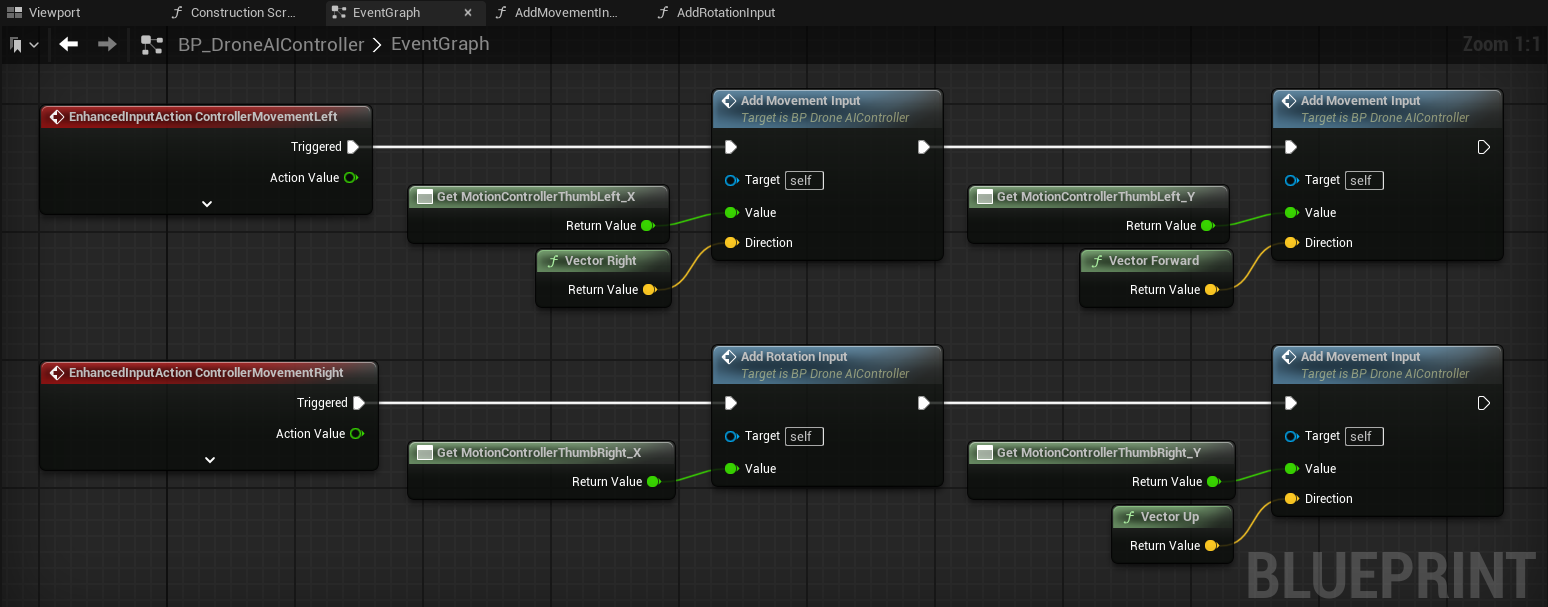
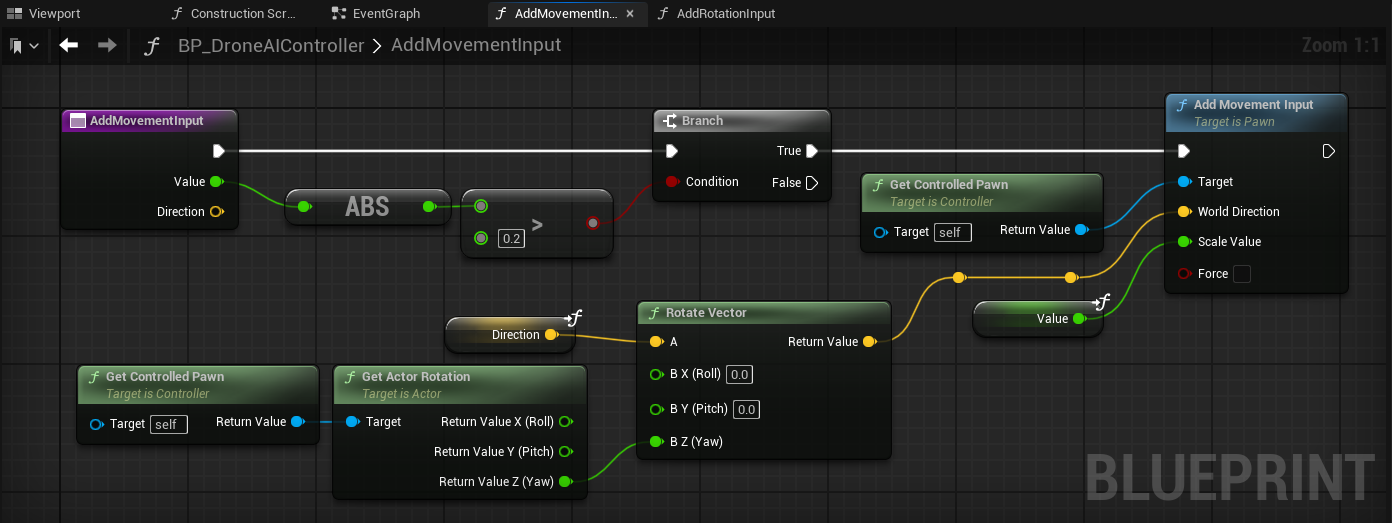
We implement a single blueprint function to apply movement in a given direction with a given magnitude (with a value between -1.0 and 1.0), which has the following main steps:
- Ensure that the magnitude is significant enough (e.g. at least
0.2regardless of the sign), so that we ignore unintended movement input due to imprecision - Map the world-space direction (right, forward, up) to the drone's frame of reference, so that a forward input will always move the drone forward, regardless of how the drone is rotated
There are many valid and useful frames of reference for mapping player input to drone movement. In this example, we've chosen to use the drone's frame of reference, specifically its rotation on the Z-axis. This works best as long as the player's orientation roughly matches the drone's orientation. For example, when the drone is facing the player, the drone moves towards the player when the player pushes the left joystick forward (which in this frame of reference adds forward movement to the drone).
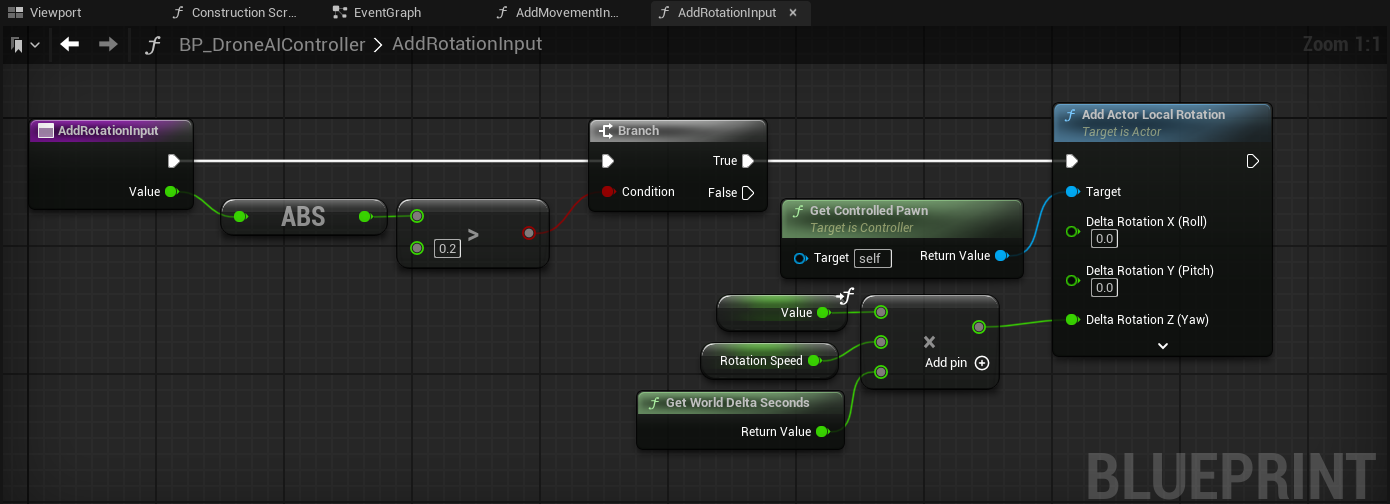
We implement a single blueprint function to apply rotation with a given magnitude (with a value between -1.0 and 1.0), which has the following main steps:
- Ensure that the magnitude is significant enough (e.g. at least
0.2regardless of the sign), so that we ignore unintended rotation input due to imprecision - Rotate the pawn with a fixed rotation speed (e.g. 360 degrees / second), considering the frame duration
Intermediate Result
Now that we have a drone pawn and controller, we can add it to the sublevel and test it.

The video below shows how the drone currently behaves in mixed reality.

Clicking play will embed the YouTube player and may set third-party cookies and collect data from YouTube.
While technically everything works, the drone feels very static, and the rotation is very abrupt, which is not very fun.
We can improve this as follows:
- Add rotational acceleration / deceleration, so that it is more similar to how the movement reacts to input
- Add a shooting mechanic, so the player can push the trigger button on the motion controller to launch a projectile from the gun
- Add procedural animation to add a little bounce
- Add procedural animation to lean the drone in the direction of movement
- Add procedural animation to keep the camera and gun/flamethrower stable
Improve Pawn Rotation
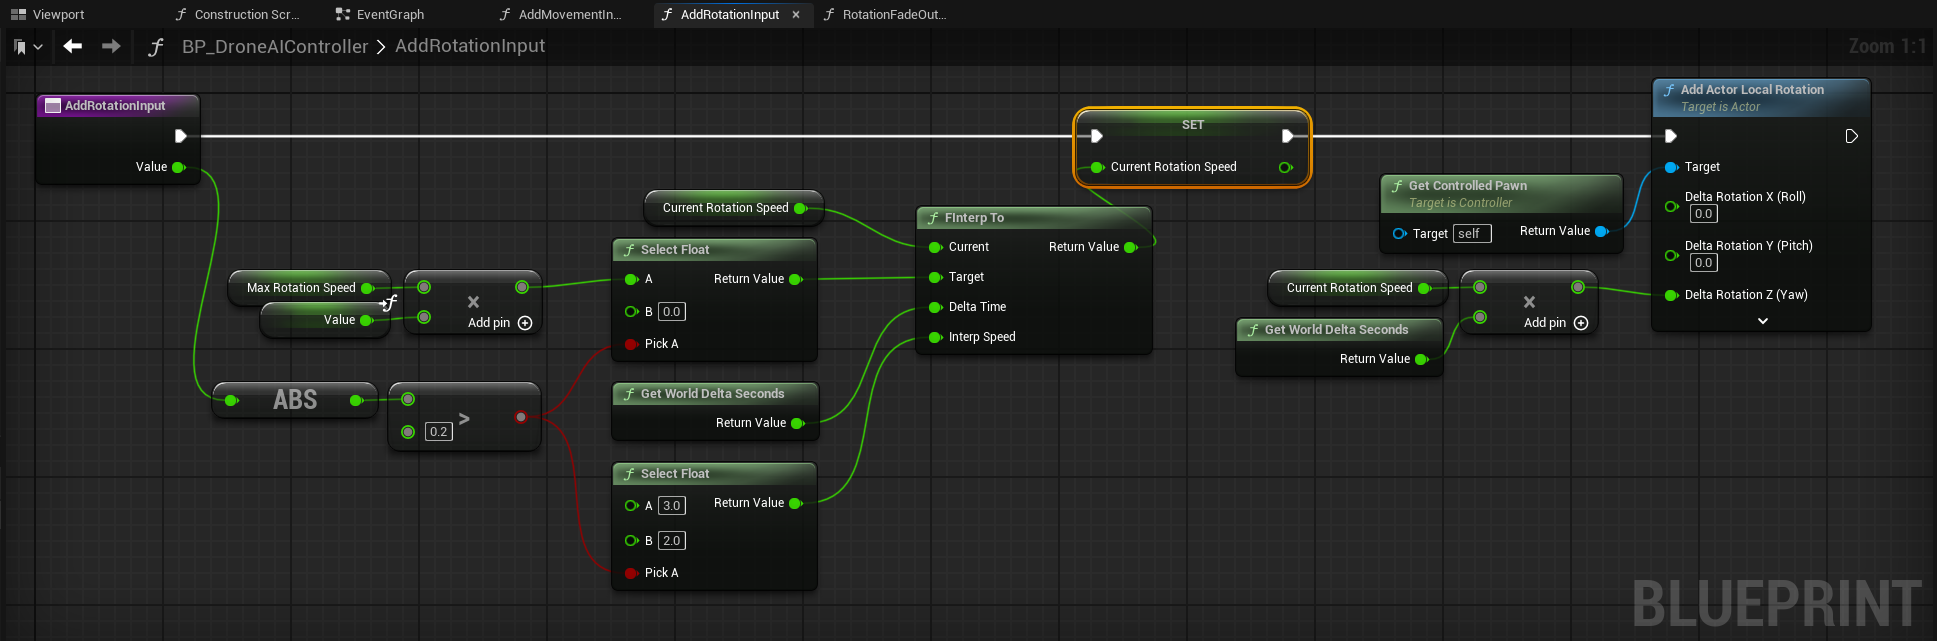
Currently the pawn rotation is strictly coupled to the player's input, whereas the pawn movement fades out when the player releases the motion controller joystick. We want to add a similar feeling for the pawn rotation.
In order to achieve this result, we extend our controller as follows:
- We track the
CurrentRotationSpeed, which by default is0 - When the player moves the motion controller joystick for rotation:
- When the input magnitude is larger than the deadzone, we adjust the
CurrentRotationSpeedto approach a target value (e.g. 360 degrees / second) based on the player's input in about 0.33 seconds usingFInterpTo - When the input magnitude is smaller than the deadzone, we adjust the
CurrentRotationSpeedto approach0in about 0.5 seconds usingFInterpTo - We rotate the pawn by the value of
CurrentRotationSpeedconsidering the frame duration - This ensures that when starting the rotation, the actual rotation is ramped up over some time
- When the input magnitude is larger than the deadzone, we adjust the
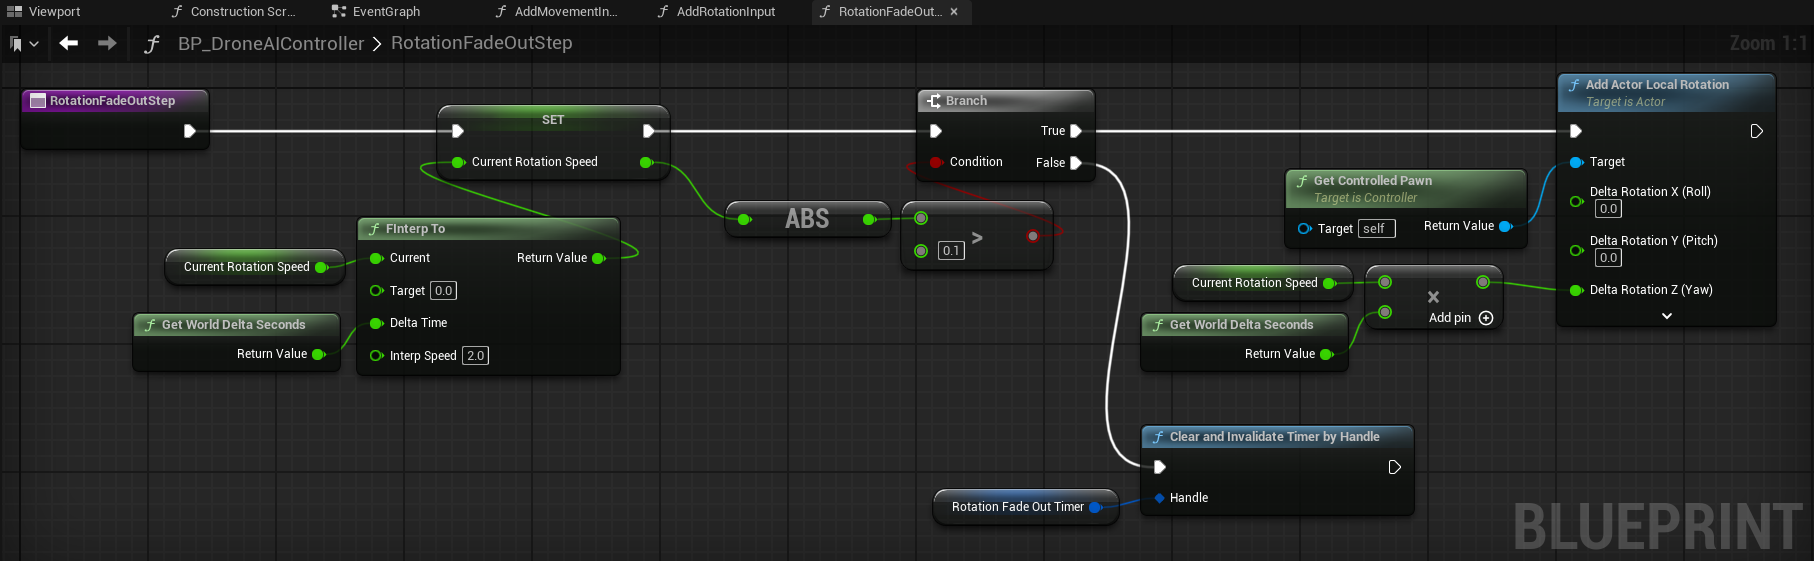
- When the player lets go of the motion controller joystick, we start a looping timer that runs every frame, which:
- Adjusts the
CurrentRotationSpeedto approach0in about 0.5 seconds usingFInterpTo - If
CurrentRotationSpeedis close to 0, we stop the timer - If
CurrentRotationSpeedis not close to 0, we rotate the pawn by the value ofCurrentRotationSpeedconsidering the frame duration - This ensures that when finishing the rotation, the actual rotation is faded out over some time instead of stopping instantly
- Adjusts the

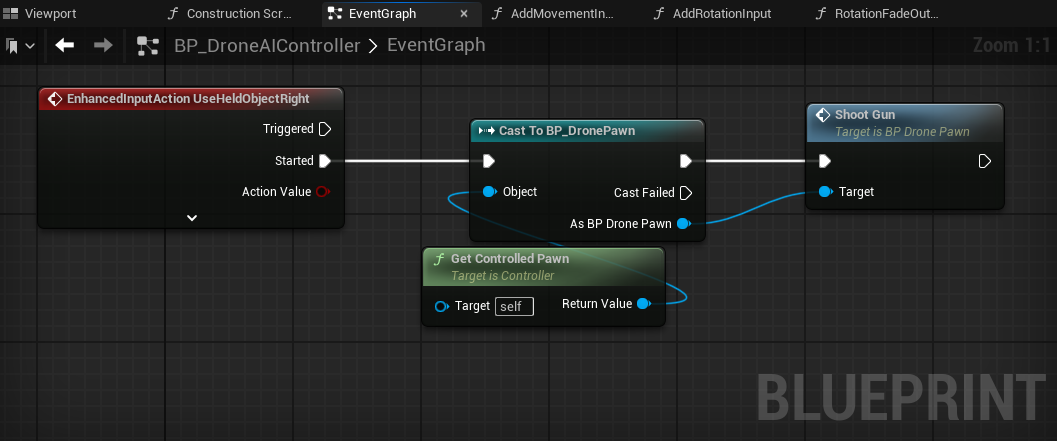
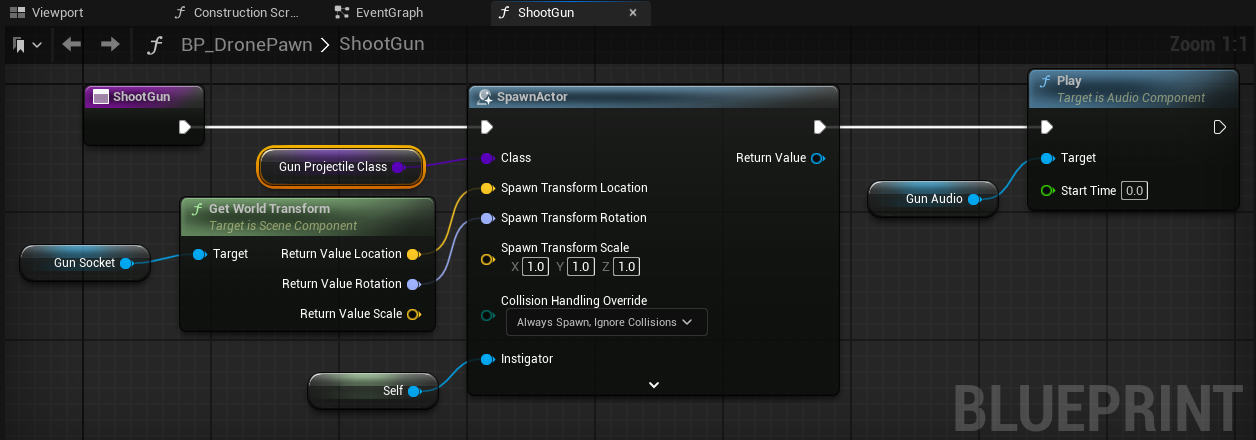
Shooting Mechanic for the Drone
In order to add a bit more interaction to the drone, we add a shooting mechanic. When the player presses the trigger button on the right motion controller, the drone will fire a projectile and play a sound.
For this, we make the following changes:
- The controller is extended to handle the event
UseHeldObjectRight, which is the trigger button on the right motion controller, and calls theShootGunfunction on the drone pawn - In the drone pawn, we add an Audio Component
GunAudioat the GunSocket, which we configure to play a sound - We implement the
ShootGunfunction in the drone pawn, where a projectile is spawned at the GunSocket, and the GunAudio is played

Final Result
Improving the drone rotation and adding a shooting mechanic already improve the drone quite a bit, as can be seen in the video below.
Clicking play will embed the YouTube player and may set third-party cookies and collect data from YouTube.
Further drone improvements with procedural animations will be covered in the next devlog blog post, where we will focus on movement-based leaning, aiming the camera and gun, and autonomous target seeking.
Conclusion
Adding a player controlled drone to a mixed reality level gives the player more agency in the virtual world, and significantly increases immersion when the drone can cross into the real world as well.
We at Immerstory are excited to support our customers with their immersive experiences, and look forward to sharing more exploration progress soon.
What immersive experience would you like to see? Let us know!
Additional Resources
Documentation for the MetaXR plugin, specifically the Mixed Reality Utility Kit which was used for this demo, can be found here.